
A1
|
 Caution
| 1 - | Gasket |
| q | Renew if damaged or leaking |
| 2 - | Cylinder head cover |
| q | Removing and installing → Chapter |
| 3 - | O-ring |
| q | Renew |
| 4 - | Hose |
| q | For crankcase breather |
| q | Press release tabs to detach |
| 5 - | Sealing bush |
| q | For fuel rail |
| q | Renew if damaged or leaking |
| 6 - | Cable guide |
| 7 - | Grommet |
| 8 - | Bolt |
| q | Tightening torque → Rep. gr.23 |
| 9 - | Fuel rail |
| q | Observe rules for cleanliness → Chapter |
| q | Do not attempt to bend high-pressure pipes to a different shape |
| q | Installing high-pressure pipes → Rep. gr.23 |
| 10 - | Bolt |
| q | Tightening torque → Rep. gr.23 |
| 11 - | Bolt |
| q | Tightening torque → Rep. gr.23 |
| 12 - | Fuel return hose |
| q | Do not dismantle |
| q | Installing → Rep. gr.23 |
| 13 - | O-ring |
| q | Renew |
| 14 - | Injector |
| q | Observe rules for cleanliness → Chapter |
| q | Removing and installing → Rep. gr.23 |
| 15 - | Retaining clip |
| q | Renew |
| 16 - | O-ring |
| q | Renew |
| 17 - | Copper seal |
| q | Renew |
| 18 - | Clamping piece |
| 19 - | Seal |
| q | For injector |
| q | Renewing → Chapter |
| 20 - | Filler cap |
| 21 - | Seal |
| 22 - | Grommet |
| 23 - | Cable guide |
| 24 - | Bolt |
| q | Renew if seal is damaged |
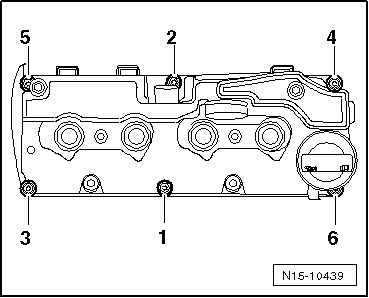
| q | Tightening torque and sequence → Fig. |
|
|