audi Workshop Repair Guides

Audi Workshop Service and Repair Manuals

Removing and installing air cleaner housing > < Removing and installing engine cover panel
Removing and installing air filter element
   
Removing
–  Release hose clip -1- and detach air duct.
–  Unscrew bolts -arrows- and detach air cleaner (top section).
  A24-10845
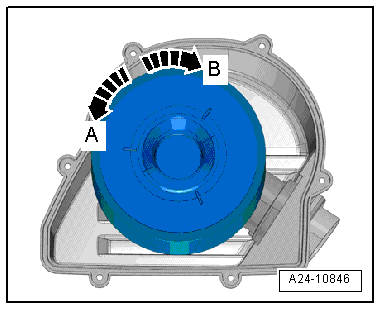
–  Turn air filter element in anti-clockwise direction -arrow A- and detach it.
Installing
Installation is carried out in the reverse order; note the following:
l  Tightening torques → Chapter „Air cleaner - exploded view“
  Note
t  Always use genuine part for air filter element.
t  Hose connections and hoses for charge air system must be free of oil and grease before assembly. Do not use any lubricants containing silicone when assembling.
t  The air cleaner housing must be clean.
t  Secure all hose connections with the correct type of hose clips (same as original equipment) → Parts catalogue
t  To prevent malfunctions, cover all critical parts of the engine air intake tract with a clean cloth when blowing out the air cleaner housing with compressed air.
t  Please observe requirements for disposal.
–  Check for salt residue, dirt and leaves in air intake hose (engine intake side).
–  Check for dirt in air intake hose from air duct.
  A24-10846
–  Clean water drain -arrow- and air cleaner (bottom section).
–  When installing the air filter element, check that it is properly centred in the retainer in the air cleaner (bottom section).
  A24-10866
–  Turn air filter element in clockwise direction -arrow B- so that it engages.
–  Carefully fit top section of air cleaner onto bottom section, without using any force.
–  Make sure that air hose is securely fitted on air cleaner (top section).
  A24-10846

Removing and installing air cleaner housing > < Removing and installing engine cover panel