| –
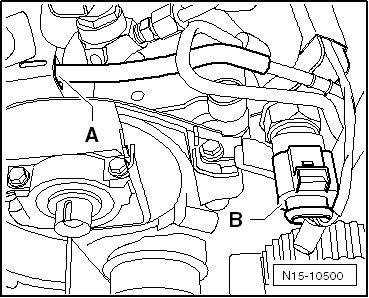
| Unplug electrical connector -item B- at fuel pressure sender -G247-. |
| –
| Unscrew fuel pressure sender -G247-. |
| –
| Extract dirt from opening in fuel rail (thread and sealing surface) using a vacuum cleaner. Do not use metal tools, etc. |

Note | Installation is carried out in the reverse order; note the following: |
Note | t
| The fuel pressure sender -G247- does not have a seal; instead, it has a deformable sealing lip. |
| t
| Check that sealing surfaces (deformable sealing lip) and threads on fuel pressure sender -G247- are not damaged. If inspection of fuel pressure sender -G247- shows that it is OK, it can be used again. |
| t
| Also check sealing surface at opening in fuel rail. |
| t
| The beginning of the thread and the deformable sealing lip of the fuel pressure regulating valve -N276- must be coated with diesel fuel. |
| –
| Screw in fuel pressure sender -G247- by hand. |
| –
| Then tighten fuel pressure sender -G247- to specified torque. |
| After installing fuel pressure sender -G247-, leave engine running at moderate speed for a few minutes when bleeding fuel system and then switch off again. |
Note | The fuel system is „self-bleeding“; do NOT open the high-pressure connections. |
| –
| Interrogate event memory and erase it if necessary. |
| –
| Carefully check the entire fuel system for leaks. |
| Renew affected component if leakage still occurs after tightening to correct torque. |
| –
| After completing the repair, road-test the vehicle. Accelerate with full throttle at least once. Then check the high-pressure section of the fuel system again for leaks. |
Note | If there is any air left in the fuel system, the engine may switch to the backup mode ('emergency running' mode) during the road test. Switch off the engine and erase the event memory. Then continue the road test. |
| –
| After road test, interrogate event memory again. |
|
|
|

 WARNING