
A2
|
|
|
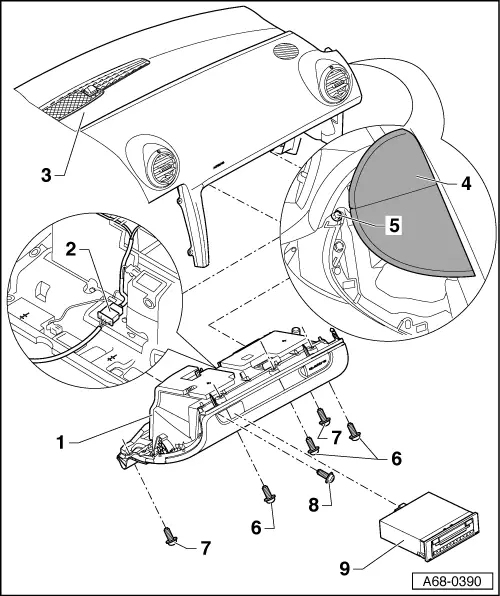
| 1 - | Glove box |
| q | Equipment versions: |
| t | Without compartment for maps |
| t | With compartment for maps |
| t | With CD changer |
| q | Removal and installation are identical for all versions |
| t | Removing |
 Note
Note| t | Removal and installation are described for a glove box with CD changer. |
| t | Mark connectors before unplugging to ensure correct assignment and avoid confusion. |
| – | Switch off ignition and remove ignition key. |
| – | With ignition switched off, disconnect earth wire at battery → Electrical system; Rep. Gr.27. |
| – | Remove dash panel end trim (right-side) -4- → General body repairs, interior; Rep. Gr.70. |
| – | Open glove box lid. |
| – | Remove CD changer -9- → Communication; Rep. Gr.91. |
| – | Remove bolt -5-. |
| – | From underneath, remove bolts -6- (3x) at front edge of glove box. |
| – | Support glove box. |
| – | Remove bolts -7- (2x) at rear edge of glove box. |
| Right-hand-drive vehicles |
| – | Remove bolt -8-. |
| All vehicles (continued) |
 WARNING
|
| – | Unplug connector -2- between supply lead/wiring harness for glove box. |
| – | Take out glove box. |
| – | Make a sketch or take a photograph as a guide for routing the wiring harness on the glove box. |
| – | Remove glove box wiring harness. |
| – | Re-work glove box for mounting key-operated switch to deactivate airbag on front passenger side -E224- → Chapter. |
| t | Installing |
| Install in reverse order of removal. Observe the following: |
| – | Route and secure wiring harness on glove box according to sketch or photograph. |
| – | Secure glove box wiring harness in clips provided → Chapter. |
| – | Make sure connectors engage correctly (audibly). |
| 2 - | Connector for supply lead/wiring harness |
| q | Routing and securing glove box wiring harness → Chapter |
| 3 - | Dash panel |
| 4 - | Dash panel end trim (right-side) |
| q | Removing and installing → General body repairs, interior; Rep. Gr.70 |
| 5 - | Bolt |
| q | Tightening torque: 3.5 Nm |
| 6 - | Bolts (3x) |
| q | Tightening torque: 3.5 Nm |
| 7 - | Bolts (2x) |
| q | Tightening torque: 3.5 Nm |
| 8 - | Bolt |
| q | Right-hand-drive vehicles only |
| q | Tightening torque: 3.5 Nm |
| 9 - | CD changer |
| q | Removing and installing → Communication; Rep. Gr.91 |