
A2
| Seal on door (front)/ mounting panel and on opening for exterior mirror wiring in door subframe |
 Note
Note| t | ALWAYS use the kit “Fasteners and seals for mounting panel” → Parts Catalogue. |
| t | All materials for the sealing operations must be taken from the kit “Fasteners and seals for mounting panel” → Parts Catalogue. |
| t | When installing new replacement doors you must always carry out all sealing operations after the door has been painted. |
| t | After renewing the door subframe → Item or the exterior mirror the opening for the exterior mirror wiring must be sealed with a butyl strip -AKL 450 005 05-. |
| t | If the door mounting panel has to be removed, take care when detaching door trim, mounting panel and clips and avoid bending the mounting panel. |
| t | After removing the mounting panel, you must ALWAYS renew the sealing strip → Item and renew the connection between the sealant bead → Item and the sealing strip using a butyl strip -AKL 450 005 05-. |
| t | All bolts, clips for wiring harnesses and the door trim have a sealing surface and must ALWAYS be renewed. |
| t | After installing the mounting panel and the door trim carry out a leak test with water. |
| t | The surfaces to be bonded must be at least as warm as room temperature. If necessary, heat up with a hot-air blower. |
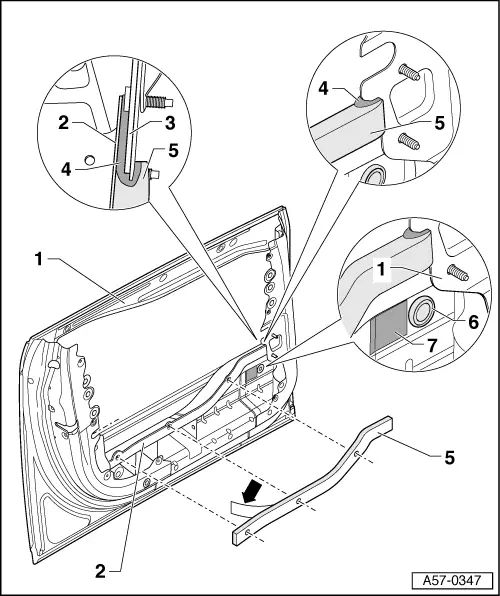
| 1 - | Front door |
| 2 - | Side impact bar |
| 3 - | Hinge reinforcement |
| 4 - | Sealant bead |
| q | Consisting of a butyl strip -AKL 450 005 05-. |
| q | Butyl strip -AKL 450 005 05- is included in the kit “Fasteners and seals for mounting panel” → Parts Catalogue. |
| q | Seals the gap between side impact bar → Item, hinge reinforcement → Item and forms a joint with sealing strip → Item. |
| q | Before applying the sealant bead you must bond the sealing strip → Item onto the side impact bar → Item. |
| q | Remove the damaged sealant bead very carefully to avoid damaging the paintwork on the door. Use a scraper or similar tool to remove the damaged sealant bead. |
| q | Apply new sealant bead as shown in illustration and then spread it evenly. Make sure that the gap between side impact bar → Item and hinge reinforcement → Item is filled completely and that the sealing strip → Item already bonded on is joined up with the sealant bead. |
| 5 - | Sealing strip (PU foam) |
| q | Is included in the kit “Fasteners and seals for mounting panel” → Parts Catalogue. |
| q | Self-adhesive on both sides; has a protective film backing |
| q | Do not detach protective film until just before you bond on the sealing strip. |
| q | Bonding surface of side impact bar → Item must be free of adhesive residue, dust and grease. |
| q | Apply cleaning fluid -D 009 401 04- to the bonding surface and rub it dry. |
| q | Remove protective film -arrow- on the side which is bonded on first. |
| q | Position sealing strip on side impact bar → Item. Do NOT press sealing strip on yet. |
| q | Align holes on sealing strip with holes in side impact bar. |
Note| The holes on the sealing strip and in the side impact bar must be flush. If this is not the case, the sealing strip will become damaged when the door is installed. |
| q | Firmly press on the sealing strip along the entire bonding surface. If there is already a sealant bead in place, pay particular attention to the joint between sealing strip and sealant bead. |
| q | If necessary renew joint between sealant bead and sealing strip. |
| q | Do not detach the outer protective film from the sealing strip until just before you install the mounting panel → Item. |
| 6 - | Plug |
| q | Is included in the kit “Fasteners and seals for mounting panel” → Parts Catalogue. |
| q | Make sure the plug is clipped into the side impact bar correctly. |
| 7 - | Seal |
| q | Is included in the kit “Fasteners and seals for mounting panel” → Parts Catalogue. |
| q | Self-adhesive |
| q | Bonding surface must be free of adhesive residue, dust and grease. |
| q | Apply cleaning fluid -D 009 401 04- to the bonding surface and rub it dry. |
| q | Position seal on opening to be plugged in side impact bar → Item. |
| q | Press seal on firmly. |