A2
|
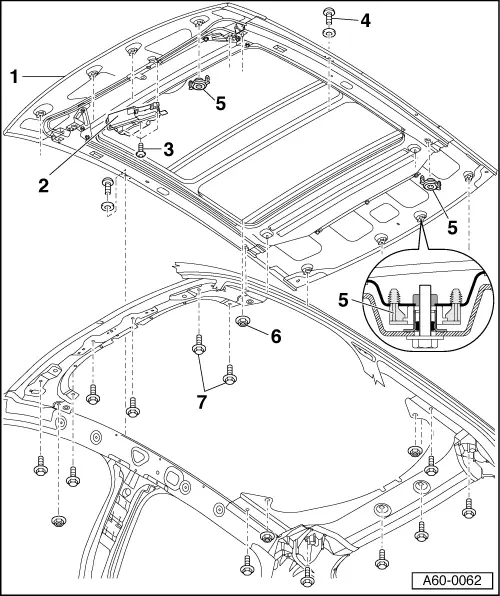
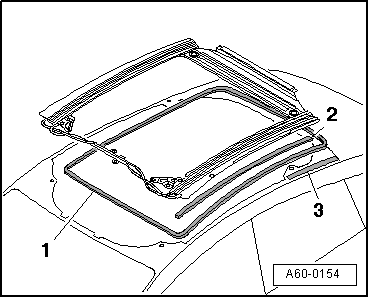
| 1 - | Sunroof frame |
| q | Removing: |
| – | Remove headliner and cover frame for sliding sunroof → General body repairs, interior; Rep. Gr.70. |
| – | Fully open sunroof towards the rear. |
| – | Remove bolts → Item. |
| – | Unscrew nuts → Item. |
| – | Remove hexagon bolts → Item. |
| – | Unplug electrical connectors to sunroof motor. |
| – | Open windows at front and rear and close doors. |
 Caution
|
| – | Two people are required to reach into the vehicle through the open side windows and press the sunroof unit out upwards at rear, starting at the frame, NOT at the glass panel. |
| q | Installing: |
 Note
Note| For installation you require the slide/tilt roof assembly device -VAS 6010-. |
| – | Remove the remains of the Metafol strip from the body in the area around the sunroof panel “3” (rear panel). |
| – | Affix a new Metafol strip → Fig. onto the side frame on the body. |
Note| Do not stretch the Metafol strip. |
| – | Detach backing from Metafol strip. |
| – | Renew bottom sealing strip and outer seal for guide rail → Fig.. |
| – | Lubricate top sealing lip on windscreen with washing-up liquid (commercially available type) in order to avoid damaging the seal when installing the sunroof. |
| – | Before installing, make sure that the adjusting elements → Item are screwed in as far as the stop. |
| – | Fit the sunroof in the roof opening, helped by a second mechanic. |
| – | When installing the new sunroof unit, make sure that the unit is first inserted in the area of the windscreen and then aligned with the windscreen. |
| – | Do NOT YET lay the sunroof down on the body at the rear. |
| – | Fit the sunroof properly at the front BEFORE putting it down at the rear end. |
| – | Position the slide/tilt roof assembly device -VAS 6010- on the vehicle → Chapter. |
| – | Centralise the assembly device at the side. |
| – | Close the tensioners at the sides. |
| – | Unscrew the adjuster screws, so that the front and rear pressure pieces make contact with the sides of the roof frame. |
| – | Check that pressure pieces have made contact using a feeler gauge (thickness: 0.2 mm). |
| – | Tighten adjuster screws to 1.5 Nm. |
| – | Align studs centrally with holes and tighten nuts → Item at front and rear to 8 Nm. |
| – | Screw in hexagon bolts → Item, starting in front centre and working towards the rear. |
| – | Tighten hexagon bolts to 8 Nm, following the same sequence as above. |
| 2 - | Sunroof motor |
| q | Removing: |
| – | Remove interior light. |
| – | Unplug electrical connector. |
| – | Unscrew bolts → Item and remove motor. |
| q | Installing: |
Note| The motor can be installed regardless of the position of the sunroof and the motor. |
| – | Position motor in sunroof and tighten bolts → Item to 4 Nm. |
| – | Plug in the motor. |
| – | Close sunroof completely. |
| – | With sunroof closed, press switch again in “close” position and hold switch in this position for approx. 10 seconds. |
| – | This will initialise the motor in the basic setting. |
| 3 - | Torx bolts |
| q | 4.5 Nm |
| 4 - | Cross-head screw |
| q | 3.5 Nm |
| 5 - | Adjusting element |
Note| The adjusting element is self-adjusting, i.e. it can compensate for differences in height between the sunroof and the roof frame during installation. |
| q | Operation → Fig.. |
| 6 - | Hexagon nut |
| q | 8 Nm |
| 7 - | Hexagon bolts |
| q | 8 Nm |