
A2
| Removing and installing head airbag |
 WARNING
|
WARNING
|
 Note
Note| Establish radio code before disconnecting battery. |

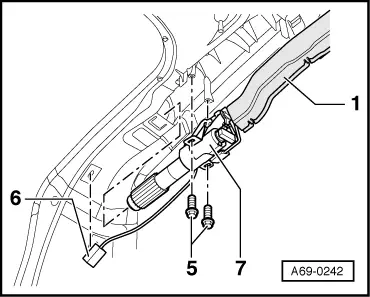
| 1 - | Head airbag |
| t | Removing |
| – | On vehicles with encoded radio/radio navigation system (RNS), heed and if necessary establish code. |
| – | Disconnect battery earth strap/cable and cover negative terminal. |
| – | Remove rear cross panel trim → Chapter. |
| – | Remove rear seat bench → Chapter. |
| – | Remove wheel housing trim → Chapter. |
| – | Remove luggage compartment floor lining → Chapter. |
| – | Remove luggage compartment trim → Chapter. |
| – | Remove D-pillar trim → Chapter. |
| – | Remove C-pillar trim → Chapter. |
| – | Remove upper B-pillar trim → Chapter. |
| – | Remove upper A-pillar trim → Chapter. |
| – | Remove moulded headliner → Chapter. |
| – | Unscrew bolts -5- (2x) → Fig. |
| – | Unscrew bolts -2- (3x). |
| – | Set down front section of airbag module on seats. |
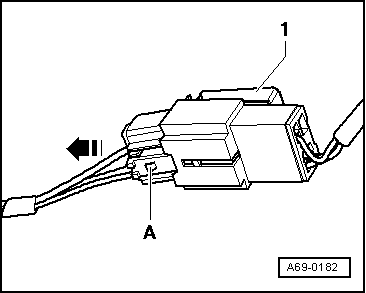
| – | Unplug connector -6- for head airbag → Fig. |
| – | Swivel gas generator -7- out of D-pillar → Fig. |
| – | Take head airbag -1- out of vehicle. |
WARNING
|
| t | Installing |
| – | Take head airbag -1- out of transportation container and secure head airbag -1- in the following sequence. |
| – | Swivel gas generator -7- into D-pillar → Fig. |
| – | Screw in bolts -2- (3x) loosely at tab -3-. |
| – | Screw in bolts -5- (2x) → Fig. |
| – | Screw in bolts -2- (3x) firmly at tab -3-. |
| – | Perform remaining installation operations in reverse order of removal. |
| – | Switch on ignition. |
WARNING
|
| – | Connect battery. |
| 2 - | Bolts (3x) |
| q | Tightening torque 4.5 Nm |
| q | Use riveting tool to re-tighten threaded bushings if loose. |
| 3 - | Tab |
| 4 - | Spacers |
| q | Part of head airbag scope of delivery |
| 5 - | Bolts (2x) |
| q | Tightening torque 4.5 Nm |
| q | Use riveting tool to re-tighten threaded bushings if loose. |
| 6 - | Connector for head airbag |
| 7 - | Gas generator |
|
|
Note
|
|