audi Workshop Repair Guides

Audi Workshop Service and Repair Manuals

Removing centre dash panel vent > < Exploded view of fitting locations
Removing dash panel
Removing dash panel
  Note
Establish radio code number prior to removal.
t  Removing:
–  Disconnect battery earth strap at battery.
–  Remove driver's airbag unit ⇒ Page → Chapter.
–  Remove steering wheel → Chapter.
–  Remove dash panel insert. → Rep. Gr.90
–  Remove left and right upper A-pillar trim → Chapter.
–  Remove rear left and right upper A-pillar trim → Chapter.
–  Remove left and right lower A-pillar trim with intermediate piece → Chapter.
–  Remove driver's storage compartment → Chapter.
–  Remove glove box → Chapter.
–  Remove front passenger's airbag → Chapter.
–  Remove rear centre console knee guide → Chapter.
–  Remove radio → Rep. Gr.91.
–  Remove heater controls → Rep. Gr.80.
–  Remove air conditioner operating unit → Rep. Gr.87.
–  Remove storage compartment and ashtray → Chapter.
–  Remove centre dash panel vent → Chapter.
Removing steering column switch
Driver's airbag unit and steering wheel removed
–  Pull steering column out and down as far as it will go.
   
–  Unscrew bolt -4- (2x).
–  Tightening torque 0.6 Nm
–  Lift off upper trim for steering column switch -1- and unfasten to rear at clips -8-.
On installation, insert upper shell hooks -7- into lower shell, swivel downwards and screw on.
  A70-0715
–  Unscrew bolt -3- (2x).
–  Tightening torque 4.5 Nm
–  Screw out hexagon socket-head bolt -5-.
–  Tightening torque 5 Nm
–  Unfasten release lever for steering column adjuster.
–  Detach lower trim for steering column switch -3-.
2 - Ignition/starter switch grommet
  A70-0715
–  Slacken off bolt -5-.
–  Pull steering column switch -6- slightly to rear and unplug connectors -1-, -2-, -3- and -4-.
–  Unplug connector to coil connector with slip ring.
–  Detach steering column switch -4-.
Removing light switch
  A70-0719
–  Press light switch -1- and at the same time turn it clockwise -2-.
–  Hold switch in this position and pull light switch housing to rear out of dash panel -3-.
–  Unplug connectors at switch.
Removing photosensor
  A96-0390
–  Carefully prise off cover -A-.
–  Unscrew bolt -B-.
–  Lift photosensor and secure cable connector with cord or cable tie.
–  Unplug cable connector.
Centre section to central tube
  A87-0050
–  Unscrew bolts -1- (2x), tightening torque 4 Nm.
Dash panel attachment
  A70-0730
1 - Dash panel
q   Unscrew bolts -2- (2x) beneath outer dash panel vents.
q   Unscrew outer bolts -3- (2x).
q   Unscrew bolts -4- (2x) on left and right at front centre console.
q   Unscrew bolts -5- (2x) on left and right in centre console opening.
q   Unscrew bolts -6- (2x) on left and right of steering column.
2 - Bolts (2x)
q   Tightening torque 4 Nm
3 - Bolts (2x)
q   Tightening torque 4 Nm
4 - Bolts (2x)
q   Tightening torque 4 Nm
5 - Bolts (2x)
q   Tightening torque 4 Nm
6 - Bolts (2x)
q   Tightening torque 4 Nm

Unfastening front passenger's airbag guide
   
–  Unscrew bolts -2- (4x), tightening torque 12 Nm.
Unfastening holder at centre console
  A70-0714
–  Unscrew bolts -3- (2x), tightening torque 4 Nm.
1 - Front passenger's airbag guide
Unplugging hazard warning switch relay connector
–  Unplug connector to hazard warning switch relay behind centre console storage compartment.
–  Pull out dash panel to rear.
t  Installing:
  A70-0721
–  Take sockets -1- (3x) out of body and attach sockets -1- to holders -2- of dash panel.
–  Use cord or cable tie as extension for photosensor.
–  Place dash panel in position and guide in photosensor extension.
–  Guide in dash panel, ensuring that dash panel air duct slides over heater/air conditioner air duct. Provide assistance by reaching with one hand into dash panel insert opening.
–  Make sure holders -2- with sockets -1- engage in body mounts. This can be seen from uniform gap between dash panel and windscreen.
–  Fit but do not secure steering column switch.
  A70-0715
–  Fit lower trim for steering column switch -6-.
–  Tighten bolts -3- (2x).
–  Tightening torque 0.6 Nm
–  Fit but do not tighten bolt -5-.
–  Fit steering wheel.
  A69-0075
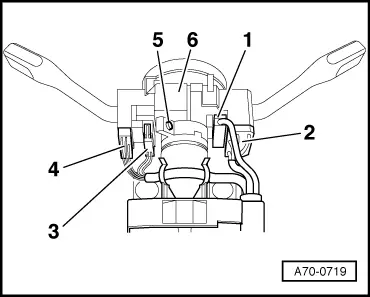
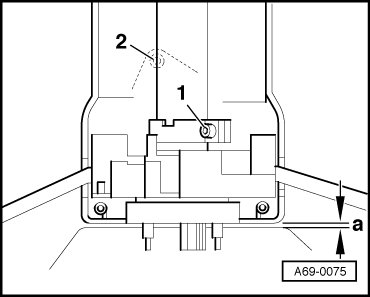
–  Pull steering column switch with lower trim towards steering wheel until dimension -a- = 3 mm.
–  Secure clamp -1-.
–  Tightening torque 2.8 Nm
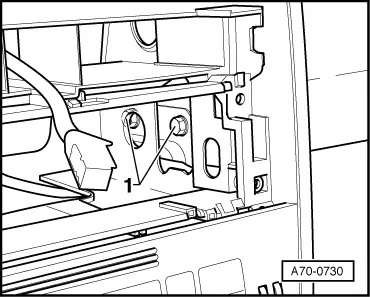
–  Tighten hexagon socket-head bolt -2-.
–  Tightening torque 5 Nm
Installing light switch
–  Plug in all connectors.
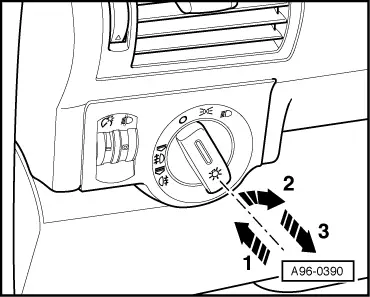
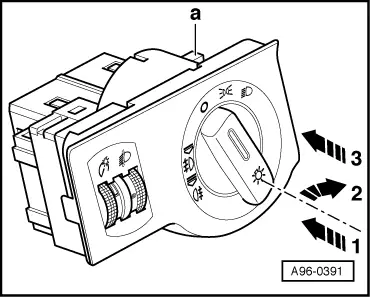
–  On installation, press light switch again -1- and at the same time turn it clockwise -2- to lower the two catches -a-.
–  In this position, press light switch housing into mount in dash panel -3- and engage.
–  Perform remaining installation operations in reverse order of removal.
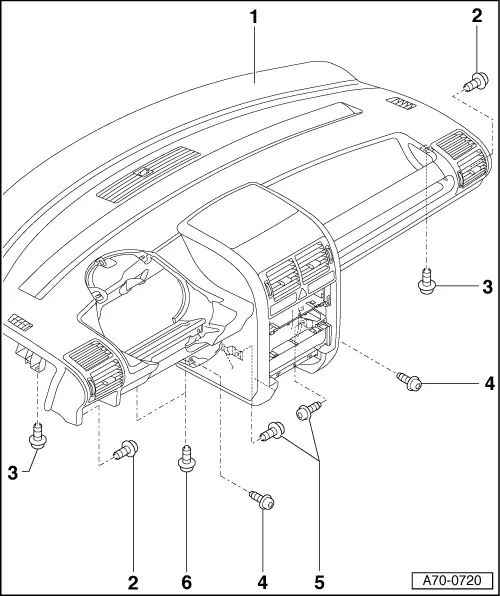
  Note
Following installation, check operation of dash panel air ducts (defroster, centre vent, side vent).
  A96-0391

Removing centre dash panel vent > < Exploded view of fitting locations