audi Workshop Repair Guides

Audi Workshop Service and Repair Manuals

Installing > < Removing and installing the defrost flap positioning motor V107 and the temperature flap positioning motor V68
Removing
Removing
–  Remove the glove box, the driver's storage compartment, the centre console and the dash panel: → General Body Repairs, Interior; Repair group 70; Dash panel
  Note
t  So as not to damage the dash panel fascia, the dash panel may only be placed on a clean workbench covered, for example, with clean cardboard.
t  On vehicles with right-hand drive, the positioning motors may only be replaced with the air conditioner removed (the dash panel cross member need not be removed). Air is routed to the air distributor housing via the left side, and the positioning motors can only be removed after separating the air distributor housing and the air conditioner → Chapter. (Removing and installing the central flap positioning motor -V70-)
–  Remove the dash panel cross member → General Body Repairs, Interior; Repair group 70; Dash panel
   
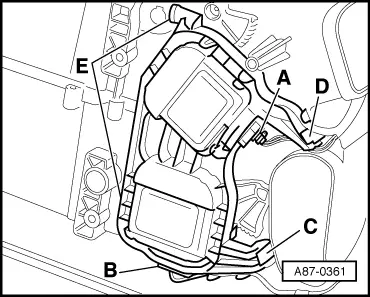
–  Remove connector -A- from the defrost flap positioning motor -V107- and connector -B- from the temperature flap positioning motor -V68-.
–  Release catches -C- and -D-.
–  Disengage the bracket from the retainers -E- and remove it with the temperature flap positioning motor -V68- and the defrost flap positioning motor -V107-.
–  Remove the positioning motor from the bracket → Chapter
  Note
The temperature flap positioning motor -V68- and the defrost flap positioning motor -V107- are different, which is why they possess different colours of gear wheel (black in the temperature flap positioning motor -V68- and white in the defrost flap positioning motor -V107-).
  A87-0361

Installing > < Removing and installing the defrost flap positioning motor V107 and the temperature flap positioning motor V68