audi Workshop Repair Guides

Audi Workshop Service and Repair Manuals

Transporting gearbox > < Removing gearbox
Installing gearbox
Installing gearbox
Procedure
  Note
t  Renew bolts which are tightened by turning through a specified angle.
t  Renew self-locking nuts and bolts, and seals, O-rings and gaskets.
t  Secure all hose connections with the correct hose clips (as original equipment); refer to → Electronic parts catalogue.
t  Re-attach all cable ties at the same locations when re-installing.
Tightening torques for installing gearbox → Anchor
   
–  Check whether there are dowel sleeves -A- and -B- for centring the engine and gearbox in the cylinder block; fit any missing dowel sleeves.
–  If fitted, ensure that the intermediate plate is correctly positioned on engine.
–  Clean the input shaft splines and hub splines on used clutch plates, remove corrosion and apply an extremely thin layer of clutch plate grease -G 000 100- to the splines. Then move the clutch plate back and forth on the input shaft until the hub moves freely on the input shaft. It is important to remove excess grease.
  N34-1161
–  Raise gearbox carefully using gearbox support -3282-.
–  Align gearbox with engine and install.
  N34-1164
–  Screw in the bolts -1- and -2- connecting the engine to the gearbox at the bottom and tighten; then screw in and tighten the bolts at the top → Anchor.
–  Install gearbox bracket → Fig..
–  Align the engine/gearbox assembly in installation position. To do so, tighten both spindles at the support bar -10 - 222 A-.
–  Install gearbox mounting → Fig..
  Note
Ensure stress-free installation of the engine/gearbox assembly.
  WARNING
Risk of accident.
Do not detach the support bar -10 - 222 A- until the gearbox bracket bolts have been tightened to torque.
–  Detach the support bar.
–  Install starter → Rep. gr.27.
–  Install the reversing light switch -F4- → Chapter.
–  Vehicles with power-assisted steering: install hydraulic lines → Rep. gr.48.
–  Install drive shafts → Rep. gr.40.
–  Install heat shield for drive shaft (right-side) → Fig..
–  Install pendulum support → Rep. gr.10.
–  Install the starter catalytic converter → Rep. gr.26.
–  Fit the gear actuator → Chapter.
  Note
  N34-1160
t  
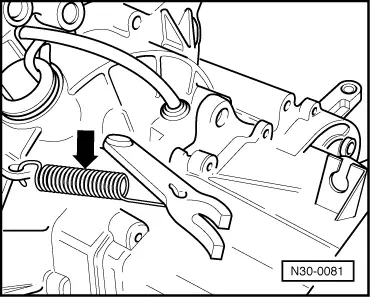
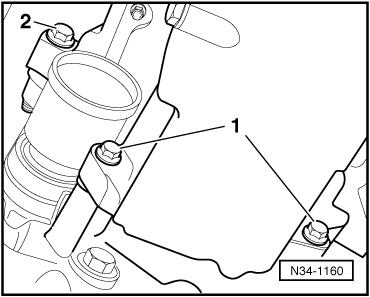
With a new gearbox, always take out the spring -arrow- between the release lever and gearbox as otherwise proper operation of the clutch slave cylinder is not guaranteed.
t  The spring acts as transportation safeguard for the release bearing.
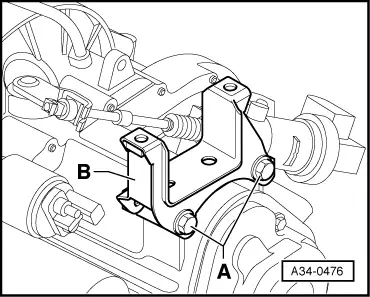
–  Fit the holder for the clutch slave cylinder → Chapter.
–  Install clutch slave cylinder → Chapter.
–  Check gear oil level and top up as required → Chapter.
–  Install noise insulation → Rep. gr.50.
–  Install hydraulic control unit → Chapter.
–  Observe correct procedure after connecting battery → Rep. gr.27.
  Caution
Overvoltage can cause irreparable damage to control units.
Do not use charger for boost starting,
–  Check the fluid level in the reservoir for the clutch mechanism and selector mechanism and replenish the fluid → Booklet809.
–  Adjust the clutch → Chapter.
–  Perform basic setting in the „vehicle self-diagnosis“ routine → Rep. gr.01.
Tightening torques
  Note
t  Tightening torques apply only to lightly greased, oiled, phosphated or black-finished nuts and bolts.
t  Additional lubricant such as engine or gear oil may be used, but do not use graphite lubricant.
t  Do not use parts which have been degreased.
t  Tolerance for tightening torques is ± 15 %.
  N30-0081
ComponentNm
Bolts and nutsM69
M715
M820
M1040
M1265

   
Heat shield for drive shaft (right-side) - tightening torque
–  Tighten the bolts for the drive shaft heat shield -arrow- to 23 Nm.
  A34-10006
Tightening torque for gearbox bracket
–  Tighten bolts -A- for gearbox bracket -B- to 50 Nm and turn a further 90°.
  A34-0476
Tightening torque for gearbox mounting
–  Tighten the gearbox mounting bolts -arrows- to 40 Nm and give a further 90° turn.
  A34-0475
Gearbox to engine
  N34-1161
ItemBoltNm
1, 2M12x6080
3M12x8080
4 1)M10x5045
5 2)M12x18080
A, BDowel sleeves for centralising
l  1) Tighten from engine end.
l  2) Also secures starter.


Transporting gearbox > < Removing gearbox