
A2
| Camshaft housing - exploded view |
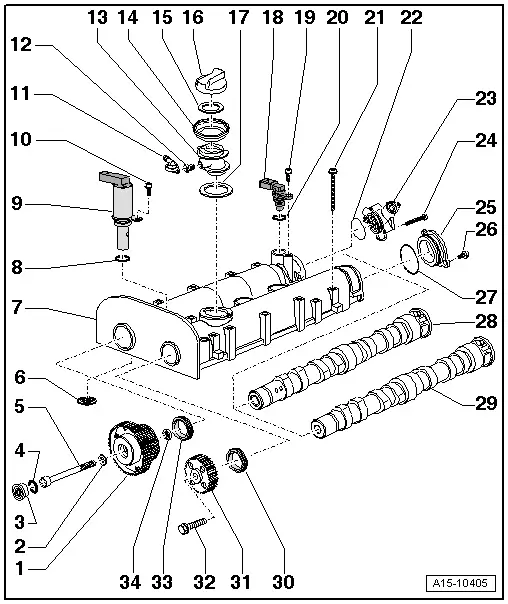
| 1 - | Inlet camshaft sprocket with camshaft adjuster |
| q | Do not dismantle |
| q | Removing and installing → Chapter |
| 2 - | Washer |
| 3 - | Screw plug |
| q | 25 Nm |
| 4 - | O-ring |
| q | Renew if damaged |
| 5 - | Bolt |
 Caution
|
| q | Renew |
| q | Lubricate threads and contact surface of bolt head with oil |
| q | 40 Nm + turn 90° further |
| 6 - | Oil strainer |
| q | Inserted in cylinder head |
| q | Renew |
| 7 - | Camshaft housing |
| q | With integrated camshaft bearings |
| q | Removing and installing → Chapter |
| q | Remove old sealant residues |
| q | Carefully clean sealing surfaces; they must be free of oil and grease |
| q | Coat with sealant before installing; for sealant refer to → Electronic parts catalogue |
| q | Installing: fit vertically from above onto studs and dowel pins |
| 8 - | O-ring |
| q | Renew |
| 9 - | Camshaft control valve 1 -N205- |
| 10 - | Bolt |
| q | 10 Nm |
| 11 - | Non-return valve |
| 12 - | Rubber grommet |
| 13 - | Oil filler neck |
| 14 - | Sealing collar |
| q | Renew if damaged |
| 15 - | Seal |
| q | Renew if damaged |
| 16 - | Filler cap |
| 17 - | Seal |
| q | Renew |
| 18 - | Hall sender -G40- |
| 19 - | Bolt |
| q | 10 Nm |
| 20 - | O-ring |
| q | Renew |
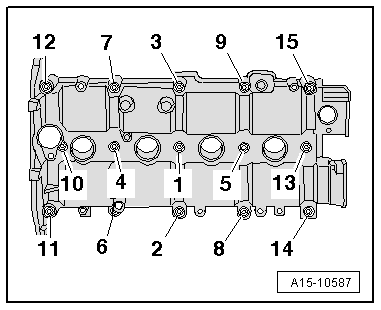
| 21 - | Bolt |
| q | Renew |
| q | Note correct sequence when loosening → Anchor |
| q | Tightening torque and sequence → Fig. |
| 22 - | O-ring |
| q | Renew |
| 23 - | High-pressure pump with fuel pressure regulating valve -N276- |
| q | Removing and installing → Rep. gr.24 |
| 24 - | Bolt |
| q | Tightening torque → Rep. gr.24 |
| 25 - | Sealing cap |
| 26 - | Bolt |
| q | 10 Nm |
| 27 - | O-ring |
| q | Renew |
| 28 - | Inlet camshaft |
| q | With cam for high-pressure pump |
| q | Before removing, detach roller tappet for high-pressure pump |
| q | Checking axial clearance → Chapter |
| q | Removing and installing → Chapter |
| q | Lubricate with oil before installing (also lubricate collar of axial bearing) |
| 29 - | Exhaust camshaft |
| q | Checking axial clearance → Chapter |
| q | Removing and installing → Chapter |
| q | Lubricate with oil before installing (also lubricate collar of axial bearing) |
| 30 - | Oil seal |
| q | For exhaust camshaft |
| q | Renewing → Chapter |
| 31 - | Exhaust camshaft sprocket |
| q | Removing and installing → Chapter |
| 32 - | Bolt |
| q | Renew |
| q | 20 Nm + turn 90° further |
| 33 - | Oil seal |
| q | For inlet camshaft sprocket with camshaft adjuster |
| q | Renewing → Chapter |
| 34 - | Washer |
| q | Not fitted on later versions → Electronic parts catalogue |
| q | If a washer was originally fitted, renew washer and install again |
|
|