Audi Workshop Service and Repair Manuals
HOME
FEATURES
MENU
INDEX
ABOUT US
Removing and installing convenience system central control unit J393 >
< Removing and installing 6+6-socket relay carrier
A2
Vehicle electrics
Electrical system
Wiring
Relay carriers, fuse carriers
Removing and installing 3-socket relay carrier
Removing and installing 3-socket relay carrier
Removing and installing 3-socket relay carrier
Removing
Caution
On vehicles with telematics system, activate service mode of telematics control unit before disconnecting battery
→ Radio, telephone, navigation, self-diagnosis; Rep. Gr.01
.
–
With the ignition switched off, disconnect the earth wire at the battery
→ Chapter
.
–
Lift the floor covering on the left side of the vehicle.
–
Turn catches
-1 … 3-
anti-clockwise and remove cover plate.
–
Remove nut
-3-
from “positive” lead.
–
Release catches
-2-
and
-4-
and remove 3-socket relay carrier
-1-
upwards from false floor
-arrow-
.
–
Unclip fuse carrier from connection point.
–
Detach relays and control units and then unclip the appropriate relay carrier.
Note
Exact assignment for 3-socket relay carrier can be found on appropriate current flow diagram
→ Current flow diagrams, Electrical fault finding and Fitting locations
.
Installing
Install in reverse order, paying attention to the following:
–
Connect the battery. Action to be taken
→ Anchor
.
Tightening torque
Component
Nm
Positive lead to relay carrier
9
Vehicle electrics
Electrical system
Wiring
Relay carriers, fuse carriers
Removing and installing 3-socket relay carrier
Removing and installing convenience system central control unit J393 >
< Removing and installing 6+6-socket relay carrier
 Caution
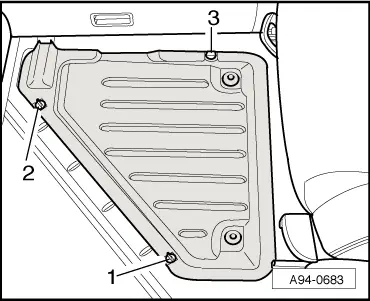
 Note
Note
 Note
Note