audi Workshop Repair Guides

Audi Workshop Service and Repair Manuals

Removing and installing gearbox mounting > < Transporting automatic gearbox
Installing gearbox
Installing gearbox
Installation is carried out in reverse sequence; note the following:
  Note
t  The special tools required are listed in the procedure for „Removing gearbox“ → Chapter.
t  Renew bolts which are tightened by turning through a specified angle.
t  Renew self-locking nuts and bolts, and O-rings, seals, and gaskets.
t  Hose connections and air pipes and hoses must be free from oil and grease before fitting.
t  Secure all hose connections with the correct hose clips (as original equipment); refer to → Electronic parts catalogue.
t  To ensure that the charge air hoses can be connected securely, you must spray the screws on used screw-type clips with rust remover prior to installation.
t  Re-attach all cable ties at the same locations when re-installing.
l  Tightening torques → Anchor
–  Before installing the gearbox ensure that the torque converter has been correctly fitted in the gearbox → Chapter.
  WARNING
If the torque converter is not fitted correctly, the torque converter drive lugs or the ATF pump will be irreparably damaged when the gearbox is joined to the engine.
   
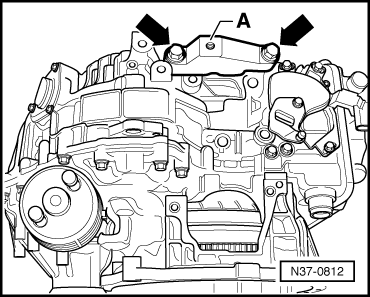
–  If gearbox is being renewed, transfer gearbox bracket -A--arrows-.
  N37-0812
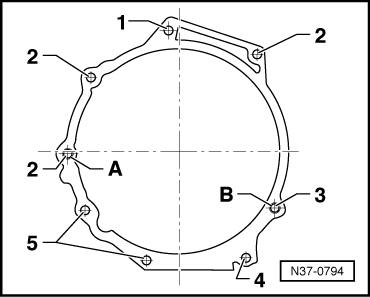
–  Before installing, ensure that dowel sleeves -A- and -B- are correctly located on engine.
–  Fit intermediate plate onto dowel sleeves.
–  When installing gearbox, observe torque converter contact impression on drive plate.
–  When pushing the engine and gearbox together, ensure that no wiring or pipes etc. can become trapped.
–  Secure gearbox to engine.
–  Use genuine nuts for attaching torque converter to drive plate → Electronic parts catalogue.
–  Tighten torque converter nuts with socket -V/175-.
  N37-0794
–  Align engine/gearbox assembly in installation position. To do so, raise with support bracket -10 - 222 A- until gearbox bracket makes full contact with gearbox mounting.
  Caution
The threads in the gearbox bracket and in the gearbox can be damaged if the bolts are not inserted straight.
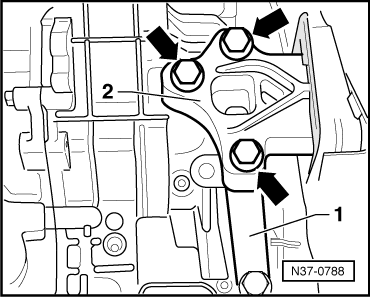
Before fitting the bolts -arrows-, the gearbox bracket -1- and the gearbox mounting -2- must be aligned so they are parallel. If necessary, press gearbox up with engine and gearbox jack.
–  Check adjustment of assembly mountings; adjust if necessary → Engine, mechanics; Rep. gr.10.
–  Bolt gearbox mounting to gearbox bracket → Chapter.
  WARNING
Do not remove support bracket -10 - 222 A- until all bolts securing the left-hand engine/gearbox mounting have been tightened to the specified torque.
–  Install starter → Electrical system; Rep. gr.27.
–  Bolt drive shafts to gearbox → Running gear, front-wheel drive and four-wheel drive; Rep. gr.40.
–  Secure swivel joint and coupling rod to wishbone → Running gear, front-wheel drive and four-wheel drive; Rep. gr.40.
–  Install pendulum support → Chapter.
–  Install exhaust system so it is free of stress → Engine, mechanics; Rep. gr.26.
–  Secure bracket for power steering line to gearbox → Running gear, front-wheel drive and four-wheel drive; Rep. gr.48.
–  Renew securing clip on support bracket for selector lever cable.
–  Check selector lever cable setting and adjust if necessary → Chapter.
–  Check and top up ATF level → Chapter.
–  Check coolant level → Engine, mechanics; Rep. gr.19.
–  Install battery tray and battery. Observe steps required after connecting battery → Electrical system; Rep. gr.27.
–  Perform self-diagnosis and initiate basic setting → Automatic gearbox 09A, self-diagnosis; Rep. gr.01.
–  Install noise insulation → General body repairs, exterior; Rep. gr.50.
–  Fit wheels → Running gear, front-wheel drive and four-wheel drive; Rep. gr.44.
Tightening torques
  Note
t  Tightening torques apply only to lightly greased, oiled, phosphated or black-finished nuts and bolts.
t  Additional lubricant such as engine or gear oil may be used, but do not use graphite lubricant.
t  Do not use parts which have been degreased.
t  Tolerance for tightening torques is ± 15%.
  N37-0788
Gearbox to engine:
  N37-0794
ItemBoltNumberNm
1M 12 x 40180
21)M 12 x 60380
3M 12 x 70180
4M 10 x 70145
5M 10 x 55245
A + BDowel sleeves in engine
1)The two bolts marked item 2 on the left of the illustration also secure a retainer bracket for engine wiring/pipework.

   
Gearbox bracket -A- to gearbox
–  Renew bolts.
  N37-0812
Bolts -arrows-50 Nm

   
Torque converter to drive plate57 Nm

All remaining bolted joints:
   
Component Nm
Bolts/nutsM610
 M820
 M1045
 M1265


Removing and installing gearbox mounting > < Transporting automatic gearbox