audi Workshop Repair Guides

Audi Workshop Service and Repair Manuals

Removing and installing oil pan > < Removing and installing parts of the lubrication system
4-cylinder Engine (2-valve), Mechanical Components
Removing and installing parts of the lubrication system
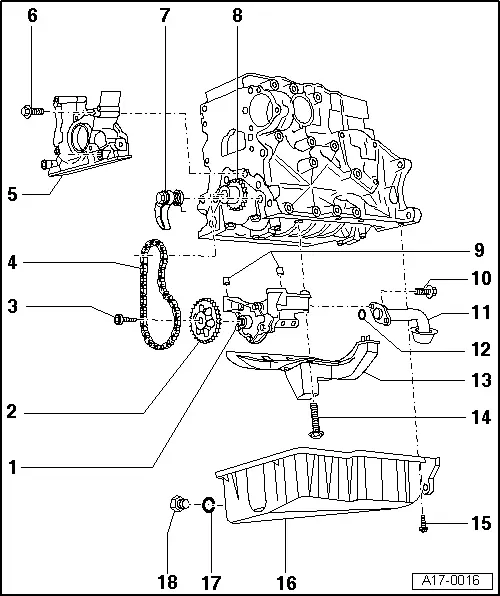
Overview of components
 
A17-0016

Part 1

  • Oil pump
    • ◆ With pressure relief valve (12 bar)
    • ◆ Removing and installing
      .
    • ◆ Prior to installation check that both dowel sleeves -Item 9- used for centring the oil pump/cylinder block are still present.
    • ◆ Renew pump if there is scoring on moving surfaces and gears.
    • ◆ Tightening torque for oil pump cover to oil pump housing: 10 Nm
  • Chain sprocket for oil pump
    • ◆ Sprocket can only be fitted on oil pump shaft in one position.
  • 22 Nm
 
A17-0016
  • Drive chain for oil pump
    • ◆ Mark D.O.R. before removing
    • ◆ Check for wear
  • Sealing flange - front
    • ◆ Apply silicone sealant when installing
    • ◆ Sealants

=> Parts List

    • ◆ Renewing crankshaft oil seal on pulley end => Page 13-49
  • 15 Nm
  • Chain tensioner
    • ◆ Tighten to 16 Nm
    • ◆ Do not dismantle
    • ◆ Note installation position
    • ◆ Pre-tension spring and engage before installing
 
A17-0016
  • Chain sprocket for oil pump
    • ◆ Removing and installing
  • Dowel sleeves
    • ◆ 2 off
  • 15 Nm
  • Suction pipe
    • ◆ Clean strainer if soiled
  • O-ring
    • ◆ Replace
  • Baffle plate
  • 16 Nm
  • 15 Nm
 
A17-0016
  • Oil pan
    • ◆ Removing and installing
      .
    • ◆ apply silicone sealant when installing
    • ◆ Sealants

=> Parts List

  • Sealing ring
    • ◆ Replace
  • Oil drain plug, 30 Nm
 
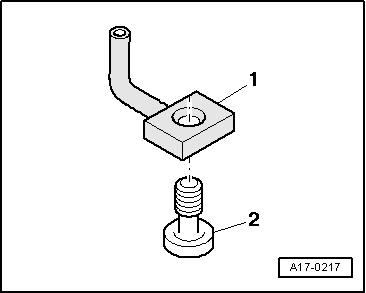
A17-0217

→ Fig.1    Oil spray jet and pressure relief valve

  •     1 -    Oil spray jet (for cooling of piston)
  •     2 -    Bolt with pressure relief valve - 27 Nm
 
A17-0031

Part 2

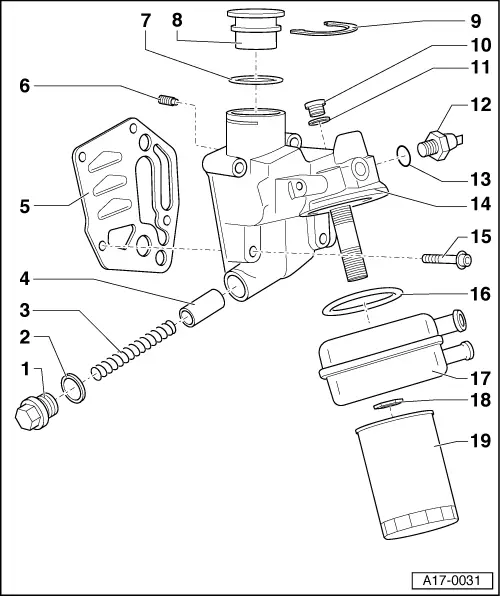
  • Screw plug - 40 Nm
  • Sealing ring
    • ◆ Replace
  • Spring
    • ◆ For pressure relief valve approx. 4 bar
  • Piston
    • ◆ For pressure relief valve approx. 4 bar
  • Seal
    • ◆ Replace
  • Oil retention valve
    • ◆ Tighten to 8 Nm
    • ◆ Built into oil filter bracket
  • O-ring
    • ◆ Replace
    • ◆ Slide on until flush with collar on cap -Item 8-
 
A17-0031
  • Cap
  • Locking clip
  • Screw plug - 15 Nm
  • Sealing ring
    • ◆ If seal is leaking, cut open and replace.
  • Oil pressure switch -F1, 1.4 bar
    -25 Nm
    • ◆ Black insulation
    • ◆ Checking => Page 17-17
  • Sealing ring
    • ◆ If seal is leaking, cut open and replace.
  • Oil filter bracket
    • ◆ With pressure relief valve, approx. 4 bar
  • 15 Nm + 90° (1/4 turn) further
    • ◆ Replace
 
A17-0031
  • Seal
    • ◆ Replace
    • ◆ Engage in projections on oil cooler
  • Oil cooler
    • ◆ See note
      .
    • ◆ Ensure clearance to adjacent components
    • ◆ Coolant hose connection diagram => Page 19-2
  • 25 Nm
  • Oil filter
    • ◆ Observe change intervals

=> Maintenance Manual

    • ◆ Observe installation instructions on oil filter
    • ◆ Tighten to 20 Nm

Removing and installing oil pan > < Removing and installing parts of the lubrication system