audi Workshop Repair Guides

Audi Workshop Service and Repair Manuals

Testing fuel gauge sender > < Overview of components: fuel delivery unit and fuel gauge senders
Fuel supply system - Diesel engines
Fuel supply system - four-wheel drive
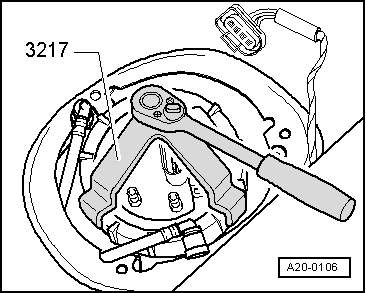
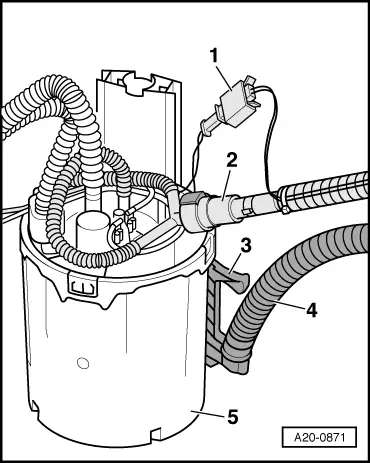
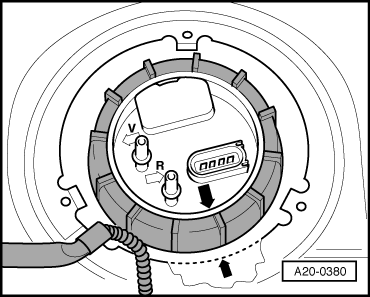
Removing and installing fuel delivery unit

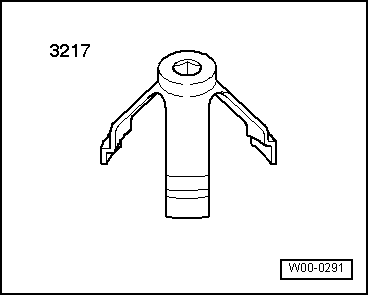
Observe safety precautions.

Observe rules for cleanliness => Page 20-3.

Special tools and workshop equipment required
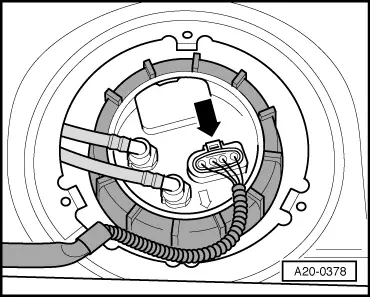
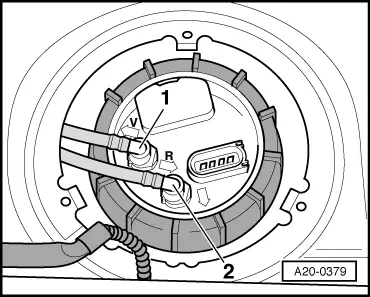
 
W00-0291
  • ◆ Union nut spanner 3217

Removing

  • ● The fuel tank must not be more than 1/3 full when removing the fuel delivery unit. Drain the tank if necessary. Procedure for draining fuel tank => Page 20-45.
  • ‒ Remove rear seat bench.

=> General body repairs, Interior; Repair group 72; Rear seats

  • ‒ Fold back floor covering under rear seat bench.
  • ‒ Detach cover for flange on fuel tank under rear seat bench (right side).
 
A20-0378
  • ‒ → Release and unplug electrical connector -arrow-.
Warning
  • ◆ The fuel system is under pressure. Place a cloth over the connection before opening the system. Then open the connection carefully to relieve pressure.

  • ◆ In extreme cases the fuel pipes/hoses or the fuel can reach a temperature of 100 C on vehicles with unit injector engine. Allow the fuel to cool down before disconnecting the pipes/hoses - acute danger of scalding.

  • ◆ Wear protective gloves.
  • ◆ Wear protective goggles.
 
A20-0379
  • ‒ → Press release catches and disconnect black fuel supply line -1- and blue fuel return line -2-.
 
A20-0106
  • ‒ → Remove union nut with spanner 3217.
  • ‒ Take flange of fuel delivery unit out of opening in fuel tank and move clear, with hoses connected.

 
A20-0871
  • ‒ → Reach into fuel tank and disconnect connector -1-.
  • ‒ Press release tab for hose connection and disconnect hose -2-.
  • ‒ Lift retainer -3- upwards and disengage retainer and hose -4- from fuel delivery unit -5-.

Note:

The illustration shows the fuel delivery unit removed from the vehicle.

  • ‒ Pull fuel delivery unit and seal out of the opening in fuel tank.

Installing

Install in reverse sequence; note the following points:

Notes:

  • ◆ Take care not to bend the fuel gauge sender when fitting fuel delivery unit.
  • ◆ Fit new seal for flange (dry) in opening in fuel tank.
 
A20-0871
  • ‒ → Fit fuel delivery unit -5- into fuel tank (sealing flange is set aside).
  • ‒ Insert retainer -3- for hose -4- in fuel delivery unit, and press in until it engages.
    • ‒ The retainer must be fitted correctly and engage properly
 
A20-0871
  • ‒ → Press hose connector onto hose -2- so that it engages.
  • ‒ Connect electrical connector -1- for fuel gauge sender II.
  • ‒ Slot guide on sealing flange into guide on fuel delivery unit (watch spring).

 
A20-0380
  • ‒ → Press sealing flange down against spring pressure, and turn sealing flange to installation position.
    • ‒ Marking on flange must coincide with marking on fuel tank -arrows-.
 
A20-0106
  • ‒ → Tighten union nut with spanner 3217.

 
A20-0379
  • ‒ → Connect fuel lines.
    • ‒ Black fuel supply pipe -1- goes to connection marked -V-.
    • ‒ Blue fuel return pipe -2- goes to connection marked -R-.
  • ‒ Plug in electrical connector.

Tightening torque

Component

Nm

Union nut for fuel delivery unit

80

Testing fuel gauge sender > < Overview of components: fuel delivery unit and fuel gauge senders