audi Workshop Repair Guides

Audi Workshop Service and Repair Manuals

Checking fuel gauge sender G / G169 > < Checking fuel pump delivery rate
Removing and installing fuel delivery unit
Special tools and workshop equipment required
   
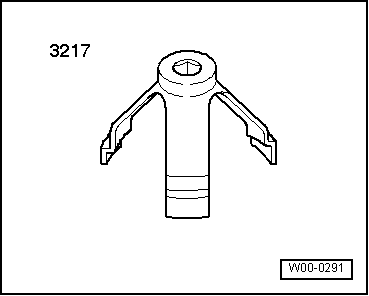
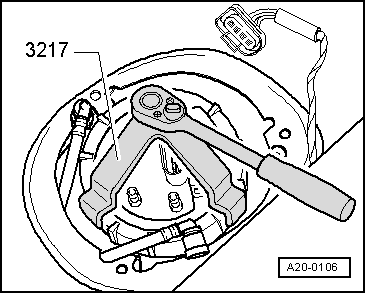
t  Union nut tool -3217-
t 
Removing
Observe safety precautions → Chapter.
Observe rules for cleanliness → Chapter.
l  The fuel tank must not be more than 1/3 full when removing the fuel delivery unit. Drain the tank if necessary. Procedure → Chapter.
  Caution
To prevent damage to the electronic components when disconnecting the battery:
Observe notes on procedure for disconnecting the battery.
–  Disconnect battery → Rep. Gr.27.
–  Unbolt cover (right-side) underneath rear seat bench.
  W00-0291
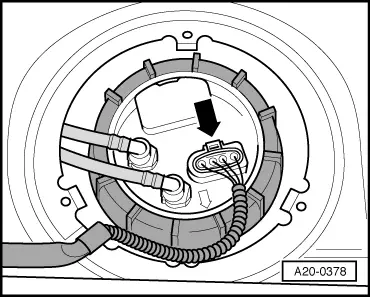
–  Unplug electrical connector -arrow-.
  WARNING
Risk of injury - fuel system operates under high pressure.
To reduce the pressure in the fuel system, wrap a clean cloth around the connection and carefully loosen the connection.
  A20-0378
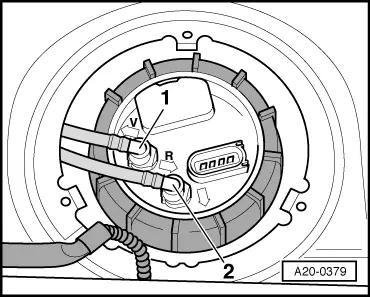
–  Press release tabs and disconnect fuel supply pipe -1- and fuel return pipe -2-.
  A20-0379
  Caution
The fuel tank must not be more than 1/3 full when removing the fuel delivery unit. Otherwise a large amount of fuel will escape.
–  Unscrew union nut using union nut tool -3217-.
–  Take flange of fuel delivery unit out of opening in fuel tank and move clear, leaving hoses connected.
  A20-0106
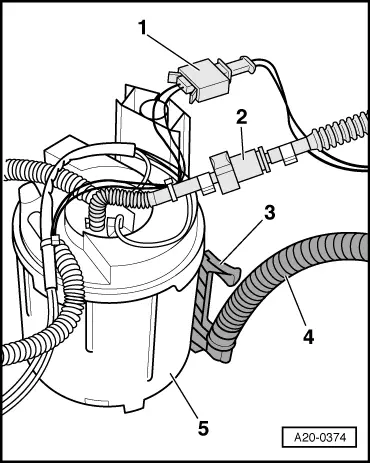
–  Reach into fuel tank and disconnect connector -1-.
–  Press release tab for hose connector and disconnect hose -2-.
–  Lift retainer -3- upwards and disengage retainer and hose -4- from fuel delivery unit -5-.
  Note
The fuel delivery unit has been removed in the illustration.
–  Pull fuel delivery unit and seal out of opening in fuel tank.
  Note
t  When removing fuel delivery unit, make sure you do not bend float arm of fuel gauge sender -G-.
t  Keep in mind that the fuel delivery unit still contains fuel.
Installing
l  Tightening torque → Chapter.
Installation is carried out in the reverse order; note the following:
  Note
t  Renew the seal.
t  When installing fuel delivery unit, take care not to bend float arm of fuel gauge sender -G-.
t  Make sure that fuel hoses are securely fitted.
  A20-0374
–  Insert fuel delivery unit -5- into fuel tank, with flange set aside.
–  Insert retainer -3- for hose -4- in fuel delivery unit and press in until it engages.
l  The retainer must engage properly.
–  Press hose connector onto hose -2- so that it engages.
–  Plug in electrical connector -1- for fuel gauge sender 2 -G169-.
–  Slot guide sleeve on flange into guide sleeve on fuel delivery unit; make sure spring is not damaged.
  A20-0374
–  Press flange down against spring pressure, and turn flange to installation position.
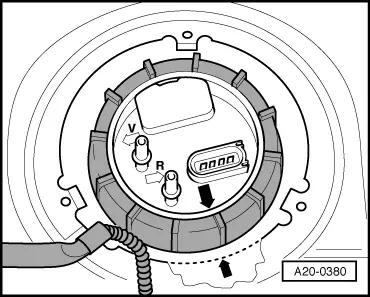
l  Marking on flange must align with marking on fuel tank -arrows-.
  A20-0380
–  Tighten union nut using union nut tool -3217-.
  A20-0106
–  Connect fuel pipes:
t  Fit black fuel supply pipe -1- onto connection marked -V-.
t  Fit blue fuel return pipe -2- onto connection marked -R-.
–  Plug in electrical connector.
–  Connect battery and perform steps required after re-connecting battery → Rep. Gr.27.
–  Put at least 5 litres of fuel into tank after installing fuel delivery unit.
  A20-0379

Checking fuel gauge sender G / G169 > < Checking fuel pump delivery rate