audi Workshop Repair Guides

Audi Workshop Service and Repair Manuals

Replacing the O-ring on the injection timing device cover > < Checking fuel system for leaks
TDI Injection and Glow Plug System (4-cyl.) 08.99 >
Servicing diesel direct injection system
Removing, installing and checking injectors

Note:

Defective injectors cause the following faults:

  • ◆ Loss of power
  • ◆ Excessive black exhaust smoke
  • ◆ Excessive blue smoke when starting from cold
  • ◆ High fuel consumption
  • ◆ Engine overheating
  • ◆ Knocking in one or more cylinders
  • ◆ Misfiring

Removing

  • ‒ Remove injection pipes using open ring spanner 3035.

Note:

Always complete remove pipe set. Do not alter pipe shape.

  • ‒ Remove securing nut, take off retainer and take out injector.

If the injectors are seized, construct the following auxiliary tool:

 
A23-0033
  • ‒ Saw off an injection pipe about 5 cm away from the injector union nut.
  • ‒ Braze an M6 nut onto the sawn off end of the pipe section.
  • ‒ Clean the auxiliary tool thoroughly. Any dirt will render the injector unusable.
  • ‒ → Screw the union nut end of the auxiliary tool to the seized injector, then apply special tool 3364 to the end with the soldered-on nut.

Installing

Note:

Always renew copper seals between cylinder head and injectors.

  • ‒ Insert the injectors.
  • ‒ Check mounting bracket is seated correctly in the cylinder head.
  • ‒ Fit retainer.

Tightening torque:

  • Injection pipes: 25 Nm
  • Retainer screw: 20 Nm

Checking

 
→ Read measured value block, display group 13, Engine idling
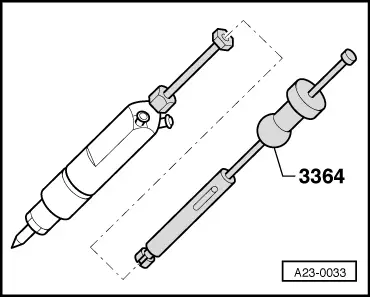
Read measured value block 13        ⇒
0.82mg/stroke 0.12mg/stroke 0.49mg/stroke
  • Specified value: -1.50 mg/stroke +1.50 mg/stroke (milligrams per stroke)
  • ‒ If one or more of the specified values is out of range, swap round the injectors (except the injector for No.3 cylinder).
  • ‒ If the fault moves along with the injector, fit a new injector.
  • ‒ If the fault remains on the cylinder, check the compression.
  • ‒ If the compression is OK, renew the relevant pressure valve and sealing ring =>Repair injection pump - Page 23-8.

Notes:

  • ◆ When removing the sealing ring from the pump, always use a soft object (plastic or wood) in order not to scratch the sealing surface.
  • ◆ After 15,000 km, the complete set of pressure valves must always be replaced.

This engine is equipped with dual spring injectors. The fuel injection therefore takes place in 2 stages.
If faults occur in these injectors they must be replaced, since neither repair nor pressure setting is possible.

 
V02-0184

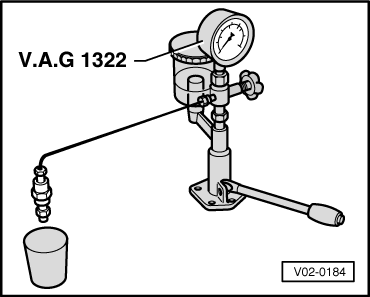
→ Testing injectors using V.A.G 1322 and pressure pipe V.A.G 1322/2.

Important
When testing injectors, care should be taken to ensure that the jet of fuel does not come into contact with the hands, as the high pressure will cause the fuel to penetrate the skin and it could cause severe injuries.
  • ● Pressure gauge on
  • ‒ Slowly depress the pump lever. When injection begins, read off spray pressure. If the pressure does not match the specified value, fit a new injector.

Engine codes: AGR, AHF

New injectors

190...200 bar

Wear limit

170 bar

Engine codes: ALH and ASV

New injectors

220...230 bar

Wear limit

200 bar

Testing for leaks

  • ● Pressure gauge on
  • ‒ Move pump lever down slowly and maintain a pressure of approx. 150 bar for 10 seconds. No fuel should leak from the injector opening.
  • ‒ If injector leaks, replace.

Replacing the O-ring on the injection timing device cover > < Checking fuel system for leaks