Audi Workshop Service and Repair Manuals
HOME
FEATURES
MENU
INDEX
ABOUT US
Removing and installing supplementary air heater elementZ35 (with supplementary air heater control unitJ604) >
< Removing and installing defroster flap control motorV107
A3 Mk2
Heating, ventilation, air conditioning system
Heating and air conditioning
Air conditioner
Air conditioning unit components
Removing and installing left temperature flap control motorV158 / temperature flap control motorV68
Removing and installing left temperature flap control motorV158 / temperature flap control motorV68
Removing and installing left temperature flap control motor -V158- / temperature flap control motor -V68-
Left temperature flap control motor -V158- on vehicles with automatically controlled air conditioner
Temperature flap control motor -V68- on vehicles with manually controlled air conditioner
Note
Vehicles with automatically controlled air conditioner are fitted with one control motor each for the left and right temperature flaps. On vehicles with manually controlled air conditioner, both temperature flaps are actuated by the temperature flap control motor -V68-. The designation for this control motor thus differs in the guided fault-finding routine and current flow diagram
→ "Guided fault-finding" function of vehicle diagnostic, testing and information system VAS 5051
and
→ Current flow diagrams, Electrical fault finding and Fitting locations
.
Removing
–
Remove the dash panel complete with the dash panel cross-member.
→ General body repairs, interior; Rep. gr.70
–
Remove the holder
-A-
and the control unit for data bus diagnostic interface -J533- (attached to the holder
-A-
in the area of the steering column)
→ General body repairs, interior; Rep. gr.70
and
→ Electrical system; Rep. gr.90
.
–
Mark the connector
-C-
to the control motor (to prevent interchange with other identical connectors).
–
Unplug the connector
-C-
from the left temperature flap control motor -V158- / temperature flap control motor -V68-.
–
Detach the cover
-A-
(from the heat exchanger).
–
Screw out the bolts
-D-
.
–
Detach the control motor
-B-
.
–
Detach the lever
-E-
of the control motor from the connecting rod
-F-
.
Installing
Note
At present, the lever
-E-
at the control motor is grey and the connecting rod
-F-
black.
Re-install all parts removed in reverse order, paying attention to the following:
–
Route the wiring harness such that it cannot come into contact with moving components (e.g. control motor lever).
–
Interrogate the event recorder of the operating and display unit, Climatronic control unit -J255- and erase any faults displayed
→ "Guided fault-finding" function of vehicle diagnostic, testing and information system VAS 5051.
–
Perform basic setting and final control diagnosis for the air conditioner and interrogate the event recorder again
→ "Guided fault-finding" function of vehicle diagnostic, testing and information system VAS 5051.
Heating, ventilation, air conditioning system
Heating and air conditioning
Air conditioner
Air conditioning unit components
Removing and installing left temperature flap control motorV158 / temperature flap control motorV68
Removing and installing supplementary air heater elementZ35 (with supplementary air heater control unitJ604) >
< Removing and installing defroster flap control motorV107
 Note
Note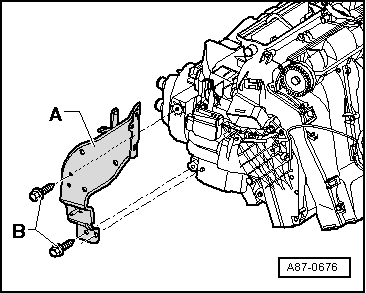 Note
Note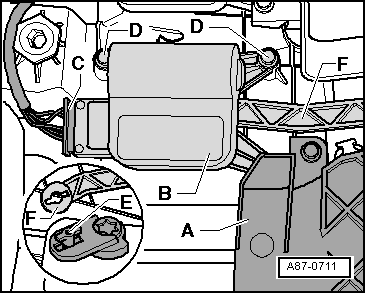
 Note
Note
Note
Note