audi Workshop Repair Guides

Audi Workshop Service and Repair Manuals

Exhaust system > < Checking charge air system for leaks
Removing and installing charge air cooler
Special tools and workshop equipment required
   
t  Engine bung set -VAS 6122-
  W00-10435
Removing
–  Remove radiator → Chapter.
–  Remove bumper cover (front) → Rep. Gr.63.
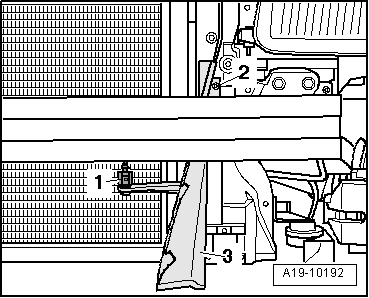
–  Detach electrical connector -1- at ambient temperature sensor -G17-.
–  Remove bolts -2- at air ducts (left and right) on charge air cooler.
–  Disengage air ducts -3- (push them slightly upwards to do so).
–  Swivel air ducts to left side of vehicle and guide out air ducts at rear of bumper.
  WARNING
Risk of injury caused by refrigerant.
The air conditioner refrigerant circuit must not be opened.
  Caution
Danger of damage to refrigerant lines and hoses.
Do NOT stretch, kink or bend refrigerant lines and hoses.
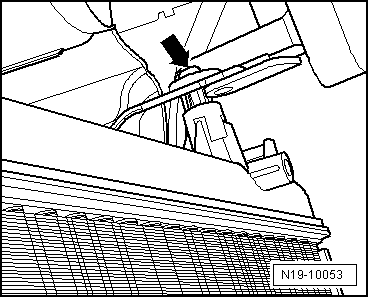
–  Remove bolt on retaining clip for refrigerant line in vicinity of longitudinal member.
  A19-10192
–  Remove bolts -2- securing condenser.
–  Remove bolts -1- securing charge air cooler.
–  Swivel charge air cooler slightly to rear.
  A19-0474
–  Remove bolt at bracket for refrigerant line (bottom right) at charge air cooler.
–  Swivel condenser forward into opening in lock carrier.
–  Detach charge air cooler upwards from lock carrier and remove by guiding it out diagonally from below.
Installing
Installation is carried out in the reverse order; note the following:
  Note
If there are slight impressions on the fins, refer to → Chapter.
  Note
t  Renew seal.
t  Secure all hose connections with the correct type of hose clips (same as original equipment) → Electronic parts catalogue.
–  Install radiator → Chapter.
–  Install bumper cover (front) → Rep. Gr.63.
–  Install air pipes/hoses with plug-in connectors → Chapter.
–  Fill up with coolant → Anchor.
  N19-10053

Exhaust system > < Checking charge air system for leaks