audi Workshop Repair Guides

Audi Workshop Service and Repair Manuals

Separating engine and gearbox > < Removing and installing engine, detaching from gearbox
Removing engine
   
Removing engine
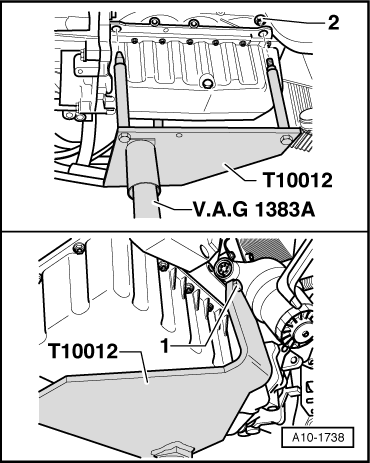
Special tools and workshop equipment required
t  Drip tray for workshop hoist -VAS 6208-
t  Engine and gearbox jack -V.A.G 1383 A-
t  Spring type clip pliers -VAS 5024A-
t  Stepladder -VAS 5085-
t  Engine bracket -T10012-
t  Hexagon key extension, 8 mm -3247-

   
Engine bung set -VAS 6122-
  Note
t  The engine is removed from underneath together with the gearbox.
t  Renew all cable ties which are released or cut open when removing the engine. Refit in the same position when installing the engine.
t  Collect drained coolant in a clean container for re-use or disposal.
–  Detach engine cover panel with air cleaner → Rep. gr.24.
  W00-10435
–  Remove electrical connector -arrow- for Lambda probe (before catalytic converter) from bracket, unplug and move clear.
  WARNING
Hot steam/hot coolant can escape - risk of scalding.
t  The cooling system is under pressure when the engine is hot.
t  To allow pressure to dissipate, cover filler cap on coolant expansion tank with cloth and open carefully.
–  Open filler cap on coolant expansion tank.
  A26-10134
–  Remove cover -1- over battery. To do so, press release tab -arrow-.
  Caution
To prevent irreparable damage to the electronic components when disconnecting the battery:
Observe notes on procedure for disconnecting the battery.
  A10-10250
–  With ignition switched off, disconnect battery earth cable -arrow-.
–  Remove battery. → Electrical system; Rep. gr.27.
  A10-10251
–  Remove battery tray -arrows-.
–  Use screwdriver to pry off cover caps on wiper arms and unscrew hexagon nuts.
–  Pull wiper arms off wiper shafts and remove.
  A10-1572
–  Unclip washer jets -arrow-.
–  Push washer jets through assembly opening back into plenum chamber, leaving hoses connected.
  A92-0135
–  Pull off rubber seal -1- on plenum chamber cover.
–  Detach plenum chamber cover -2-.
–  Detach engine wiring harness at rear plenum chamber panel.
  A10-1561
–  Remove plenum chamber intermediate plate -arrows-.
–  Remove engine control unit → Rep. gr.24.
  A10-1573
–  Unplug engine wiring harness connector -1-.
  A24-0730
–  Release wiring protector for engine wiring harness -arrow- and lift off.
  A10-1574
–  Open wiring duct brackets -arrows-.
  A10-1575
–  Move electrical connector -1- clear and unplug connector.
–  Open wiring duct bracket located below -2-.
–  Open wiring duct bracket -3-.
–  Remove engine control unit wiring harness from wiring duct.
  A10-10252
–  Unplug electrical connector -1- for reversing light switch.
–  Disconnect earth cable -2-.
–  Slide cover -3- to rear.
  A10-10254
–  Detach wires -1 and 2- at starter and move clear.
  A10-10255
–  Remove the cover above the fuse box (press release tabs -arrows-).
  A10-1624
–  Unscrew the electrical wire -arrow- and move clear up to alternator.
–  Remove both front wheels.
–  Remove noise insulation → Rep. gr.50.
  A10-1735
–  Remove noise insulation (left and right) - fasteners -1 ... 3-.
–  Place drip tray for workshop hoist -VAS 6208- beneath engine.
  A10-1566
–  To drain off coolant, detach bottom coolant hose -arrow-.
  A19-10150
–  Detach top coolant hose from radiator -2-.
  A19-10148
–  Detach coolant hoses going to heat exchanger -arrows-.
  Note
Shown in illustration from rear with engine removed.
  A21-10044
–  Unscrew securing bolts -arrows- for front exhaust pipe/turbocharger accessible from above.
  A26-10130
–  Disconnect vacuum hose -arrow- leading to brake servo.
  A10-10261
–  Unclip securing clips -1- and -2- on both selector cables.
–  Pull off selector cable end-pieces from gearbox selector lever and relay lever.
–  Detach cable support bracket from gearbox -arrows- and place to one side.
  WARNING
Do not press clutch pedal after disconnecting hose leading to slave cylinder.
  A10-10256
–  Pull out clip -2- as far a stop in -direction of arrow- and detach hose -1-.
  WARNING
Fuel supply line is pressurised. Wear safety goggles and protective clothing to avoid possible injury and skin contact. Before removing from hose connection wrap a cloth around the connection. Then release pressure by carefully pulling hose off connection.
  A10-10253
–  Mark fuel line -2- and line going to ACF -1-.
–  Disconnect fuel line -2- and move clear.
–  Disconnect ACF line -1- and move clear.
–  Disconnect vacuum line -3- going to activated charcoal filter (press release tabs).
–  Lift out ACF.
  A10-10258
–  Detach coolant hoses -1 and 2-.
–  Discharge air conditioner → Rep. gr.87.
  A10-10257
–  Disconnect air conditioner pipe -arrow- from compressor.
  A10-10262
–  Loosen bolts -arrows- of assembly mounting for engine approx. 2 turns.
  A10-1642
–  Loosen bolts -arrows- of assembly mounting for gearbox approx. 2 turns.
  A10-1678
–  Unplug electrical connector -1-.
–  Release cable retainers -2 and 3- and move electrical wiring clear.
  A10-1625
–  Unscrew bolts -1- from above.
  A19-10146
–  Remove air pipe -1 and 2- for charge air cooler.
  A21-10051
–  Unplug electrical connector -2-.
–  Unscrew the bolts -3- and remove radiator cowl from below.
  A19-10146
–  Detach electrical connector -1- from longitudinal member (left-side) and move wire clear.
  A19-10149
–  Detach air pipe -arrow- from charge air cooler.
  A21-10050
–  Detach air conditioner pipe from condenser -arrow-.
–  Unplug connector from charge pressure sender -G31- → Rep. gr.24.
  A10-10308
–  Unplug electrical connector at oil level sender -1-.
–  Unclip bracket -2-.
–  Unplug electrical connector at continued coolant circulation pump -3- and move wiring clear.
–  Remove propshaft (front) → Rep. gr.39.
  A10-10259
–  Remove heat shield above drive shaft using hexagon key extension, 8 mm -3247-.
–  Remove drive shafts (left and right) → Rep. gr.40.
  A10-10260
–  Remove underbody cover (right-side) -arrows-.
  A10-1663
–  Unplug electrical connector -arrow- for Lambda probe after catalytic converter and move wiring clear.
  A26-10132
–  Unscrew remaining securing nuts -arrows- for front exhaust pipe/turbocharger from below.
–  Remove support for front exhaust pipe with catalytic converter (unscrew bolts -1 and 2-).
  Note
To avoid damage, the flexible joints in the front exhaust pipe must not be bent more than 10 °.
  A26-10130
–  Separate exhaust system at clamp -arrows-.
  A10-1734
–  Remove front cross-piece for underbody -arrows-.
  A10-10248
–  Unbolt bracket for exhaust system -arrows-.
–  Detach catalytic converter with front exhaust pipe.
  A26-10131
–  Unscrew bolts -1 ... 3- and remove pendulum support.
  A10-1578
–  Remove additional coolant pump -arrows-.
  A10-10309
–  Bolt engine bracket -T10012- with securing bolt -1- and nut -2- to cylinder block (tightening torque: approx. 20 Nm).
–  Insert engine and gearbox jack -V.A.G 1383 A- in engine bracket -T10012- and raise engine slightly.
  Note
To unscrew bolts for assembly mounting use stepladder -VAS 5085-.
  A10-1738
–  Remove bolts -arrows- of assembly mounting on engine.
  A10-1642
–  Remove bolts -arrows- of assembly mounting for gearbox.
  Note
t  Check that all hoses, pipes and wiring connections between engine, gearbox and body have been detached.
t  Carefully guide engine/gearbox assembly when lowering to avoid damage.
–  Pull engine/gearbox assembly as far forward as possible, and lower gradually.
  A10-1678

Separating engine and gearbox > < Removing and installing engine, detaching from gearbox