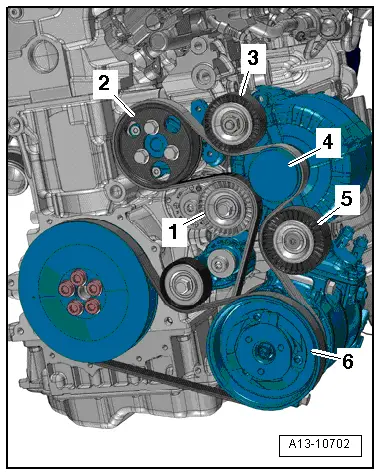
audi Workshop Repair Guides

Audi A3 Workshop Service and Auto Repair Manuals

Removing and installing poly V-belt tensioner for air conditioner compressor > < Removing and installing poly V-belt for A/C compressor
Removing and installing poly V-belt for alternator and coolant pump
   
Removing
–  Remove poly V-belt for air conditioner compressor → Chapter.
–  Disconnect hose -1- at activated charcoal filter (press release tab) and move hose clear.
  Note
Disregard -item 2-.
  A10-10762
–  Pull activated charcoal filter -1- with line attached upwards out of bracket -arrow B-; lift release tab -1- to do so.
–  Release activated charcoal filter -arrow B-, lift off -arrow A- and move clear to one side.
  Note
Disregard -item 2-.
  A20-10511
  Caution
If a used belt runs in the opposite direction when it is refitted, this can cause breakage.
Before removing, mark direction of rotation of poly V-belt for alternator and coolant pump with chalk or felt-tip pen for re-installation.
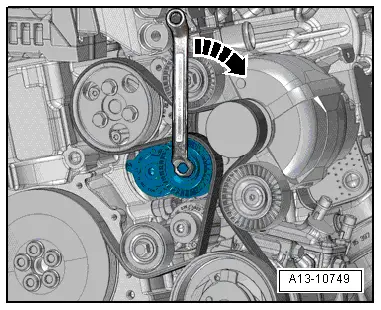
–  To slacken poly V-belt turn tensioner in clockwise direction -arrow-.
–  Detach poly V-belt for alternator and coolant pump and release tensioner.
Installing
Installation is carried out in the reverse order; note the following:
–  Swivel tensioner in clockwise direction -arrow-.
  A13-10749
–  Fit poly V-belt on poly V-belt pulleys (on alternator pulley last).
1 - Tensioner
2 - Coolant pump
3 - Idler roller
4 - Alternator
5 - Idler roller
6 - Air conditioner compressor
–  Release tensioner.
–  Check that poly V-belt is properly seated.
–  Install poly V-belt for air conditioner compressor → Chapter.
  A13-10702

Removing and installing poly V-belt tensioner for air conditioner compressor > < Removing and installing poly V-belt for A/C compressor