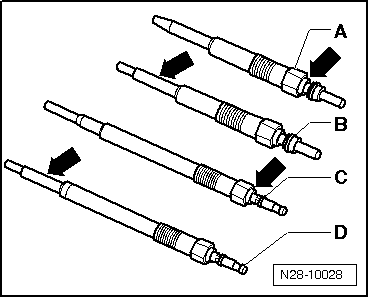
| Visible features of ceramic glow plugs |
| Vehicles with 2-valve cylinder head |
| -A- = metal glow plug with colour coding -arrow- |
| -B- = ceramic glow plug with supporting tube -arrow- (no colour coding) |

Note | Glow plugs -C and D- can be disregarded. |
| Important: Note the following points regarding ceramic glow plugs: |

Caution | t
| Due to the special properties of the material used, ceramic glow plugs are easily damaged and require extra care when handling and removing/installing. |
| t
| Transport and store only in original packaging or packed separately in bubble wrap. |
| t
| Do not remove new ceramic glow plugs from packaging until they are ready to be fitted. |
| t
| Ceramic glow plugs are sensitive to knocks and bending. For this reason, ceramic glow plugs which have been dropped (even from a height of only about 2 cm) must not be installed, even if no damage is apparent (hair-line cracks may not be visible). |
| t
| Always install a new ceramic glow plug if you are not sure the old one is in perfect condition. |
| t
| Damaged glow plugs (e.g. heater pin of the glow plug is damaged) will invariably cause engine damage. |
| t
| If the heater pin of the glow plug is damaged, the fragments must be removed from the combustion chamber before starting the engine for the first time, otherwise this will invariably cause mechanical damage (piston seizure). If necessary, the cylinder head must be removed. |
|
|
|

|
 Note
Note
 Note
Note