audi Workshop Repair Guides

Audi Workshop Service and Repair Manuals

Removing and installing rubber bush for steering box (generation 2) > < Removing and installing boot
Removing and installing track rod
   
Removing and installing track rod
Special tools and workshop equipment required
t  Ball joint puller -3287 A-
t  Hose clip pliers -V.A.G 1275-
t  Torque wrench -V.A.G 1332-
t  Open-end spanner attachment (38 mm) -V.A.G 1923-
t  Locking pliers for Phaeton steering box -VAS 6199-

Removing track rod
–  Turn steering wheel to straight-ahead position.
–  Clean outside of steering box in area of rubber boot.
   
–  Loosen nut -3- (counterhold track rod ball joint -2-).
–  Remove front wheel.
–  Slacken off nut on track rod ball joint (but do not remove yet).
Leave nut screwed on a few turns to protect threads on joint pin.
  N44-10005
–  Press track rod ball joint out of wheel bearing housing using ball joint puller -3287 A- (and then unscrew nut).
  N48-10011
–  Loosen spring-type hose clip -1- on rubber boot using hose clip pliers -V.A.G 1275- and push onto track rod.
–  Remove hose clip and detach rubber boot from steering box housing.
  N44-10005
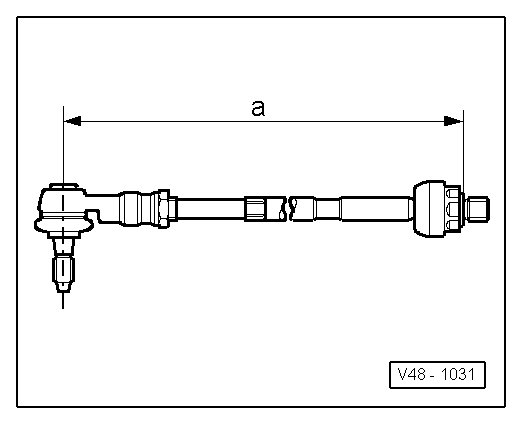
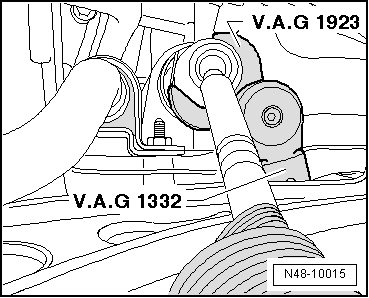
–  Unscrew track rod from steering rack using open end spanner attachment (38 mm) -V.A.G 1923-.
  Note
t  
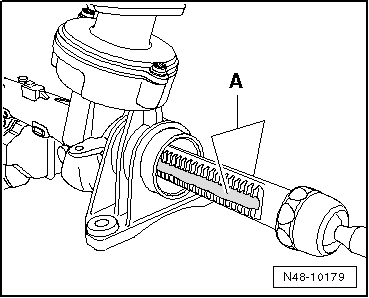
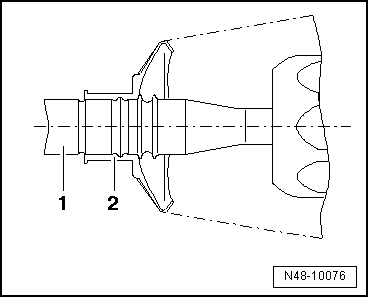
Renew complete steering box if there are signs of corrosion, damage, wear or dirt on the steering rack.
t  The complete steering box must also be renewed if there is no visible lubricating film on the steering rack.
Installing track rod
The steering rack must be lubricated with grease supplied in the repair kit before installing.
  Caution
Do NOT use any other type of grease.
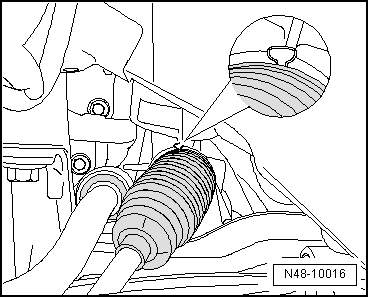
For this procedure turn steering to full lock in both directions.
A removed steering box is shown for ease of illustration.
  N48-10015
–  Grease the steering rack on the side with teeth -A- and on the side that contacts the thrust pieces using grease -G 052 192 A1-.
–  Turn steering wheel to straight-ahead position.
–  Fit new hose clips and rubber boot onto track rod.
  N48-10179
–  Screw track rod into track rod ball joint until dimension -a- is obtained.
Dimension -a- = 371 ± 1 mm
–  Screw track rod into steering rack and tighten to specified torque.
  V48-1031
–  Push rubber boot -2- onto track rod -1- (make sure boot is positioned correctly).
–  Push rubber boot onto steering box housing as far as stop.
  N48-10076
–  Tighten new O-type hose clip using locking pliers for steering box -VAS 6199- as far as shown in illustration.
Remaining installation steps are carried out in reverse sequence.
Tightening torques → Chapter „Exploded view of electromechanical steering box (generations 2 and  3)“
Tightening torques → Chapter
Wheel alignment must be checked after installing.
–  Check wheel alignment → Chapter
–  Perform basic setting of steering angle sender -G85- → vehicle diagnostic, testing and information systemVAS 5051B, „Guided Fault Finding“.
–  Then perform basic setting of steering → vehicle diagnostic, testing and information systemVAS 5051B, „Guided Fault Finding“.
  N48-10016

Removing and installing rubber bush for steering box (generation 2) > < Removing and installing boot