A4 Cabriolet Mk2
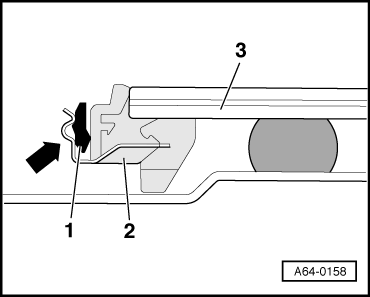
| Exploded view of windscreen |

| 1 - | Windscreen |
| q | Removing → Chapter |
| q | Installing → Chapter |
| q | On installation, slide upwards as far as stop at spacer → Item. |
| q | Align side dimension -d-. |
 Note
Note| Stickers affixed to the windscreen (e.g. for airbag) must be attached in the same positions on the new windscreen. |
| 2 - | Upper spacer |
| q | 3x, self-adhesive |
| q | Bond onto fastening strip at equal intervals |
| q | Bond 1x onto windscreen flange in centre of vehicle and at a distance of 430 mm to left and right. |
| 3 - | Adhesive bead |
| q | Heed setting times → Chapter. |
| q | Note different distances from edge of windscreen. |
| q | Distances from top and side edge of windscreen, dimension -a- = 16 mm and dimension -b- = 12 mm |
| q | Distance at bottom edge of windscreen is measured from outer side of clip. |
| q | Distance from bottom edge of windscreen is not always an equal distance from edge of windscreen. |
| q | Distances → Anchor. |
| q | Bead cross-section |
| q | Bead width = 8 mm + 2 mm |
| q | Bead height = 13.5 mm +1.5 mm |
| 4 - | Lower spacer |
| q | 2x, self-adhesive |
| q | Bond on in corners at bottom edge of windscreen. |
| 5 - | Windscreen adjuster |
| q | Slide in sideways as far as it will go at bottom edge of windscreen. |
| 6 - | Plenum chamber cover |
| q | Pull protective beading out of fastening strip before fitting plenum chamber cover → Fig. |
| q | Do not press into retaining strip until windscreen adhesive has set. |