
A4 Cabriolet Mk2
| Removing and installing front seat backrest |
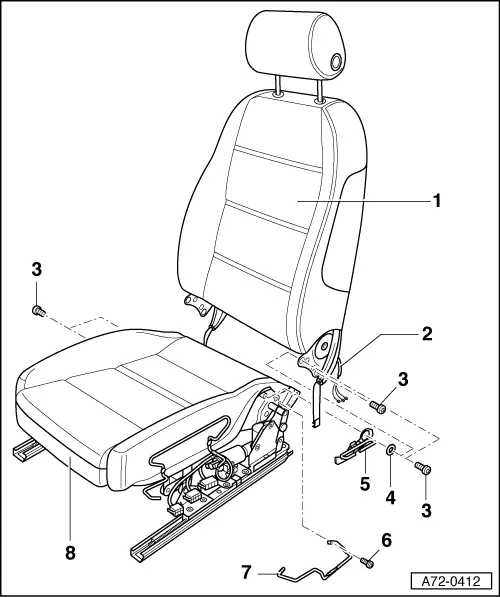
| 1 - | Backrest |
| t | Removing |
 WARNING
|
| – | Remove seat → Chapter. |
WARNING
|
| – | Attach seat repair stand -VAS 6136- to engine and gearbox support -VAS 6095-. |
| – | Attach front seat to seat repair stand -VAS 6136-. |
| – | Remove side trim (sill side) → Chapter. |
| – | Remove side trim (tunnel side) → Chapter. |
| 2 - | Wiring harness |
| 3 - | Bolts (4x) |
| q | Tightening torque: 20 Nm |
| 4 - | Plastic washer |
| 5 - | Bracket |
| 6 - | Bolt |
| 7 - | Bracket |
| 8 - | Seat pan |
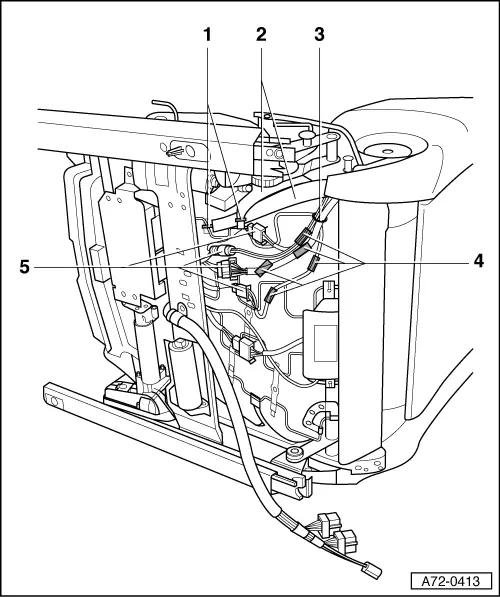
| 1 - | Cable ties (2x) |
| q | Unfasten cable ties -1- (2x). |
| q | Detach rubber straps -2- (2x). |
| q | Unplug connectors -5- (4x). |
| q | Unfasten cable tie -3- at wiring harness. |
| q | Unfasten adhesive strips at mounting rails -4- (5x). |
| 2 - | Rubber straps (2x) |
| 3 - | Cable tie |
| 4 - | Mounting rails (5x) |
| 5 - | Connectors (4x) |
| 1 - | Backrest |
| t | Removing |
| – | Unscrew bolt -6-. |
| – | Swivel bracket -7- upwards. |
| Vehicles with »Modular Light« wire routing |
| Vehicles with »Modular Light« wire routing are fitted with one wiring harness leading right through from the side airbag to the connector point → Anchor. |
| – | Remove corrugated tube → Chapter. |
| Vehicles with »Modular« wire routing |
| »Modular« wire routing is only used on vehicles featuring the bladder system and has not been implemented for all country-specific versions → Anchor. |
| – | Remove corrugated tube → Chapter. |
| All vehicles (continued) |
| – | Remove bolts -3- (4x). |
| – | Tilt backrest -1- forwards onto seat. |
| – | Press padding to side and carefully pull wiring harness -2- out of seat pan -8-. |
| – | Detach backrest -1-. |
| t | Installing |
| Install in reverse order of removal. Observe the following: |
WARNING
|
| – | When installing support -5-, tighten bolt -6- with plastic washer -4-. |
| – | Always renew bolts -3- (4x). |
| – | Re-cut threads in backrest frame before inserting bolts -3- (4x). |
 Note
Note| Make sure electrical connectors are fitted correctly (as far as stop) and engage audibly. |
| – | Switch on ignition. |
WARNING
|
| – | Connect battery earth wire with ignition switched on → Rep. gr.27. |
| – | If the airbag warning lamp -K75- indicates a fault following the installation, the event memory must be interrogated, erased and interrogated again → Vehicle diagnostic, testing and information systemVAS 5051B. |
| – | Seat with seat memory: After installing seat in vehicle, perform "basic setting" of backrest/seat. |
| 2 - | Wiring harness |
| 3 - | Bolts (4x) |
| q | Tightening torque: 20 Nm |
| 4 - | Plastic washer |
| 5 - | Bracket |
| 6 - | Bolt |
| 7 - | Bracket |
| 8 - | Seat pan |