audi Workshop Repair Guides

Audi Workshop Service and Repair Manuals

Adjusting selector mechanism > < Removing and installing gear lever knob with boot
Removing and installing selector mechanism
Removing
–  Remove gear lever knob together with boot → Chapter.
Vehicles with large radio slot:
–  Remove operating and display unit for air conditioner → Air conditioning system; Rep. Gr.87.
   
Vehicles with small radio slot:
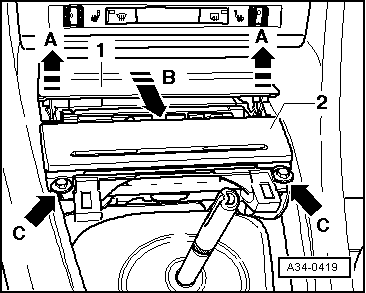
–  First lift trim panel -1- in direction of -arrow A-, then pull it out in direction of -arrow B-.
All models:
–  Unscrew bolts -arrows C- and then pull ashtray -2- out of centre console.
–  Unplug electrical connector for ashtray light.
–  Remove foam wedges from centre console.
–  Lift out the noise insulation.
  A34-0419
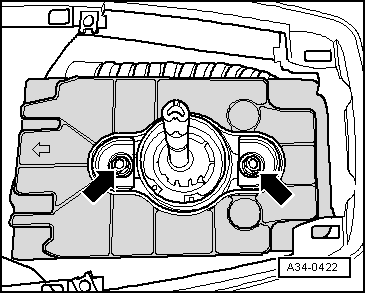
–  Unscrew noise insulation for gear lever housing -arrows-.
  A34-0422
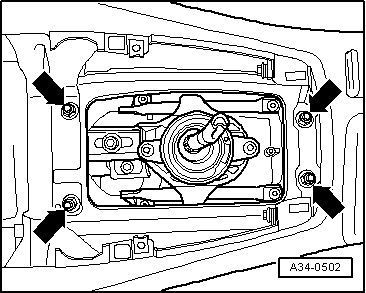
–  Remove nuts -arrows-.
  A34-0502
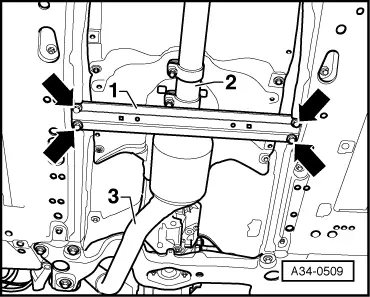
–  If fitted, remove tunnel brace -1--arrows-.
–  Disconnect exhaust system at clamp -2-.
–  Disengage rear section of exhaust system at rubber mountings and remove.
  Note
A second mechanic is required for removing the rear section of the exhaust system.
–  Remove heat shield above exhaust system.
  A34-0509
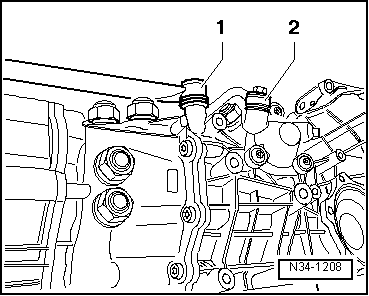
–  Unscrew connecting rod -2- for selector rod.
–  Detach push rod -1-; to do so, unscrew hexagon socket head bolt.
  N34-1208
–  Unscrew nut -1- and pull selector shaft lever -2- off gearbox selector shaft.
–  Remove selector mechanism to rear.
Installing
Installation is carried out in reverse sequence; note the following:
  Note
Renew seals/gaskets and self-locking nuts.
–  Install exhaust system and align it so it is stress-free → Rep. Gr.26.
–  If fitted, install tunnel brace → General body repairs, exterior; Rep. Gr.66.
–  Adjust selector mechanism → Chapter.
Tightening torques
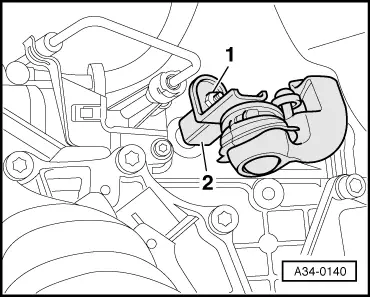
  A34-0140
ComponentNm
Push rod to gearbox40
Selector shaft lever to gearbox23
Selector shaft lever to selector shaft23


Adjusting selector mechanism > < Removing and installing gear lever knob with boot