audi Workshop Repair Guides

Audi Workshop Service and Repair Manuals

Automatic gearbox 09L, four-wheel drive > < Adjusting pinion shaft
Adjusting crown wheel
(Adjusting differential)
It is only necessary to readjust the crown wheel when the following components have been renewed:
t  Gearbox housing
Table of adjustments → Anchor
   
Special tools and workshop equipment required
t  Drift -VW 295-
t  Measuring tool -VW 382-
t  Universal measuring tool -VW 385-
t  Universal dial gauge bracket -VW 387-
t  Adjustable measuring lever -VW 388-
t  Thrust plate -VW 402-

   
t  Removal and installing tool -VW 459-
t  Crown wheel adjusting tool -VW 521-
t  Thrust plate -30-205-
t  Mandrel -30-505-
t  Thrust pad -3062-
t  Torque gauge 0 ... 600 Ncm
t  Dial gauge
t  Dial gauge extension

   
Determining total shim thickness “Stotal” for shims “S1”  + “S2”
(Adjustment of pre-load of tapered roller bearings for differential)
l  Pinion shaft removed.
–  Remove oil seal and outer races of both differential tapered roller bearings.
–  Take out shims → Item.
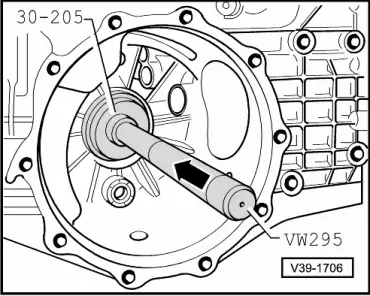
–  Drive tapered roller bearing outer race (with shim “S2”) into gearbox housing. For measurement purposes an “S2*” shim with a thickness of 1.20 mm is used (2 shims of 0.60 mm).
  Note
For measurement purposes a shim “S2” with a thickness of 1.20 mm is fitted provisionally. It is referred to below as “S2*”. After determining the backlash “S2*” will be replaced with the correct “S2”.
  V39-1706
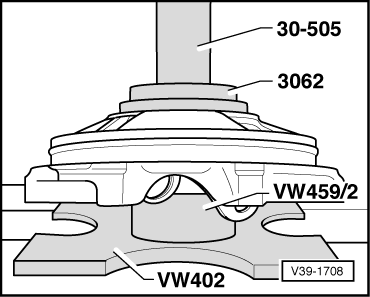
–  Press tapered roller bearing outer race (without shim “S1”) into cover for final drive.
–  Insert differential without drive wheel for speedometer sender -G22- into gearbox housing. The crown wheel is positioned on the left-hand side (same side as cover for final drive).
–  Fit cover for final drive and tighten 4 bolts to 25 Nm.
–  Position gearbox so that cover for final drive faces up.
–  Turn differential eight turns in both directions so that the tapered roller bearings settle.
  V39-1708
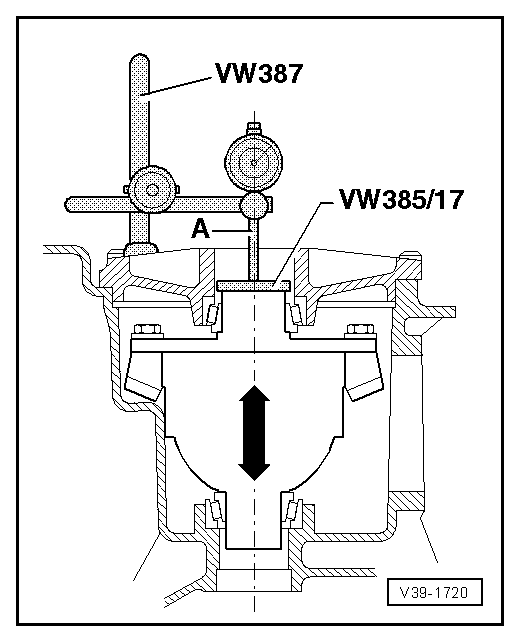
–  Set up measuring tool as shown in the illustration.
–  Apply dial gauge extension (30 mm) -item A- at centre of measuring plate -VW 387/17-.
–  Set dial gauge (3 mm measuring range) to “0” with a preload of 2 mm.
l  Tip of dial gauge must be located at centre of differential.
–  Raise differential without turning, read clearance off dial gauge and note down.
l  Measurement in following example: 0.62 mm.
  Note
  V39-1720
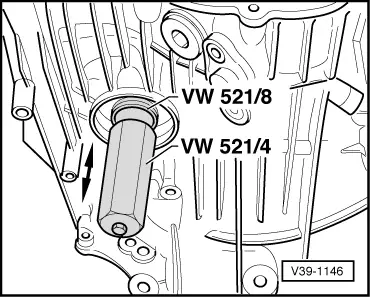
t  Secure crown wheel adjusting tool -VW 521/4- and -VW 521/8- on right of differential (housing side) to lift differential.
t  If the measurement has to be repeated, the differential must again first be turned 8 turns in each direction to settle the tapered roller bearings.
   Formula: “Stotal” = “S2*” + measured value + bearing preload
  V39-1146
Example:
Installed shim(s) “S2*”1.20 mm
Dial gauge reading (example)+ 0.62 mm
Bearing preload (constant value)+ 0.25 mm
Total shim thickness “Stotal
for shims “S1” + “S2”
= 2.07 mm

Determining thickness of shim “S1*”
  Note
t  The provisional shim “S1*” will be replaced with the final shim “S1” after determining the backlash.
t  Total shim thickness “Stotal” remains unchanged.
   Formula: “S1*” = “Stotal” – “S2*”
   
Example:
Total shim thickness “Stotal
for shims “S1” + “S2”
2.07 mm
Installed shim(s) “S2*”– 1.20 mm
Thickness of shim “S1*”+ 0.87 mm

Measuring backlash
(Position of crown wheel in gearbox housing)
l  Pinion shaft with shims “S3” and “S4” installed.
–  Install differential with crown wheel, shim “S1*” faces cover, shim “S2*” is inserted in gearbox housing.
–  Fit cover for final drive and tighten 4 bolts to 25 Nm.
–  Turn differential eight turns in both directions so that the tapered roller bearings settle.
   
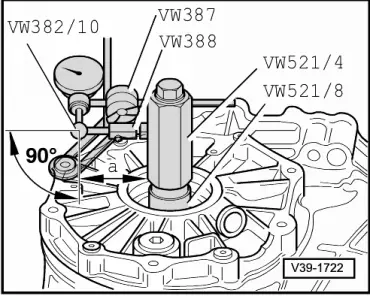
–  Set up measuring tools with dial gauge extension -VW 382/10- (6 mm, flat) as shown in the illustration.
–  Set measuring lever, adjustable -VW 388-.
l  Dimension -a- = 79 mm
–  Measure backlash between faces of gear teeth as follows:
–  Turn crown wheel until it makes contact with the face of one tooth (end of backlash travel).
–  Set dial gauge to “0” with a preload of 2 mm.
–  Turn back crown wheel until it makes contact with opposite face (backlash).
–  Take backlash reading and note down measured value.
–  Turn crown wheel through 90° and repeat measurements another 3 times.
  Note
If the individual measurements differ from each other by more than 0.06 mm, the installation of the crown wheel or the final drive gear set itself is not correct. Check installation; renew final drive gear set if necessary.
Determining average backlash
–  Add the 4 measured values together and divide by 4.
  V39-1722
Example:
1st measured value0.49 mm
2nd measured value+ 0.48 mm
3rd measured value+ 0.50 mm
4th measured value+ 0.49 mm
Sum of measured values= 1.96 mm

l  Result: the average backlash is 1.96 mm : 4 = 0.49 mm.
Determining thickness of shim “S2”
   Formula: “S2” = “S2*” – backlash + lift
   
Example:
Installed shim(s) “S2*”1.20 mm
Average backlash– 0.49 mm
Lift (constant value)+ 0.15 mm
Thickness of shim “S2”= 0.86 mm

–  Select thickness of required shim(s) from following table:
   
Available shims - Thickness of shims in mm 1)2)
0.450.650.85
0.500.700.90
0.550.75 
0.600.80 
l  1) For Part Nos. refer to → Electronic parts catalogue
l  2) Different shim thicknesses make it possible to obtain the exact shim thickness required, if necessary, fit 2 shims.

Determining thickness of shim “S1”
   Formula: “S1” = “Stotal” – “S2”
   
Example:
Total shim thickness “Stotal
for shims “S1” + “S2”
2.07 mm
Inserted shim “S2”– 0.86 mm
Thickness of shim “S1”= 1.21 mm

–  Select thickness of required shim(s) from following table:
   
Available shims - Thickness of shims in mm 1)2)
0.450.650.85
0.500.700.90
0.550.75 
0.600.80 
l  1) For Part Nos. refer to → Electronic parts catalogue
l  2) Different shim thicknesses make it possible to obtain the exact shim thickness required, if necessary, fit 2 shims.

   
Checking adjustment
–  After installing shims “S1” and “S2”, turn differential 5 turns in both directions so that the tapered roller bearings settle.
–  Measure backlash four times on circumference.
l  Specification: 0.12 ... 0.22 mm
  Note
t  Adjustment must be repeated if backlash is outside tolerance. The total shim thickness “Stotal” must remain unchanged.
t  The discrepancy between individual measured values must not exceed 0.06 mm.
  V39-1722

Automatic gearbox 09L, four-wheel drive > < Adjusting pinion shaft