audi Workshop Repair Guides

Audi Workshop Service and Repair Manuals

Exhaust system > < Removing and installing charge air cooler
Removing and installing charge air pressure senderG31
Removing and installing charge air pressure sender -G31-
   
Removing
–  On vehicles with auxiliary/additional heater, remove bolts -arrows- securing exhaust pipe for auxiliary/additional heater to noise insulation.
  A10-0407
–  Release quick-fasteners -1- and -2- and take off front noise insulation. Leave rear noise insulation in position.
–  Remove front bumper cover → General body repairs, exterior; Rep. Gr.63.
–  Move lock carrier into its service position → General body repairs, exterior; Rep. Gr.50.
  A10-1320
–  Unplug electrical connector -2- at charge air pressure sender -G31-.
–  Remove bolts and pull charge air pressure sender -G31- out of charge air cooler.
  Note
Disregard -item 1-.
Installing
Installation is carried out in the reverse order; note the following:
  Note
Renew O-ring.
–  Install lock carrier with attachments → General body repairs, exterior; Rep. Gr.50.
–  Install front bumper cover → General body repairs, exterior; Rep. Gr.63.
Tightening torque
  A21-10087
ComponentNm
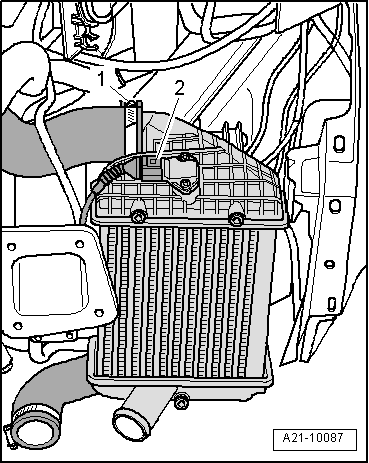
Charge air pressure sender -G31- to charge air cooler5


Exhaust system > < Removing and installing charge air cooler