audi Workshop Repair Guides

Audi Workshop Service and Repair Manuals

Removing and installing auxiliary radiator (right-side) > < Removing and installing radiator
Removing and installing auxiliary radiator (left-side)
Special tools and workshop equipment required
   
t  Drip tray for workshop hoist -VAS 6208-
  W00-10228
Removing
  Note
If there are slight impressions on the fins, refer to → Chapter.
–  Drain off coolant → Chapter.
–  Remove bumper cover (front) → Rep. Gr.63.
–  Remove air duct (left-side) -arrow- in front of auxiliary radiator.
  A10-1480
–  Unscrew bolt -2- at lock carrier (top).
–  Unscrew bolt -5- at bottom bracket.
–  Remove coolant pipe/hose and refrigerant pipe from retainers -3- and -4-.
–  Detach top retainer -1-.
–  Detach auxiliary radiator (left-side) from bottom bracket -arrow A-.
–  Move auxiliary radiator (left-side) to the front and detach from bottom bracket -arrow B-.
  A19-10203
–  Detach coolant hoses -1- and -2- at auxiliary radiator (left-side).
–  Remove auxiliary radiator (left-side).
Installing
Installation is carried out in the reverse order; note the following:
  Note
Secure all hose connections with the correct type of hose clips (same as original equipment) → Electronic parts catalogue.
–  Install bumper cover (front) → Rep. Gr.63.
–  Fill cooling system → Anchor.
  Note
The coolant in the entire system must be changed if the radiator is renewed
Tightening torques
  A19-10214
ComponentNm
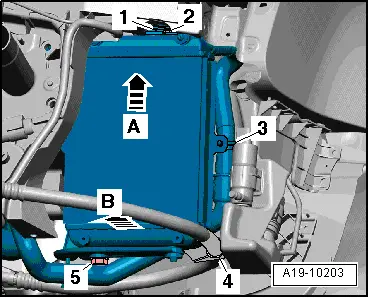
Auxiliary radiator (left-side) to bottom bracket9
Top retainer for auxiliary radiator (left-side) to lock carrier9


Removing and installing auxiliary radiator (right-side) > < Removing and installing radiator