audi Workshop Repair Guides

Audi Workshop Service and Repair Manuals

Draining fuel filter > < Removing and installing injection pump
Bleeding fuel system
Special tools and workshop equipment required
t  
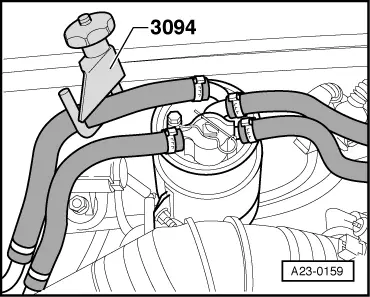
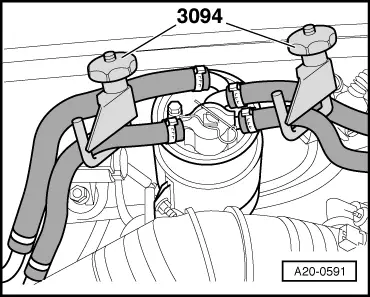
Hose clamps for hoses up to 25 mm Ø -3094-
t  
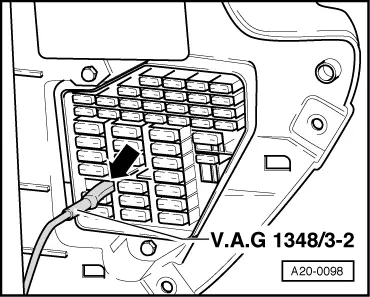
Remote control -V.A.G 1348/3A- for V.A.G 1348 with adapter cable -V.A.G 1348/3-2-
  WARNING
t  
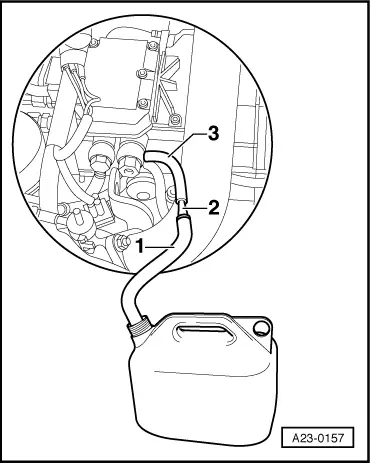
When bleeding the fuel system, make sure the inner section of the baffle housing (capacity approx. 0.5 litres) is permanently filled with fuel.
t  When the engine is not running (electric fuel pump off), the inner section of the baffle housing will only stay full if the tank is more than 1/3 full.
t  So if the fuel tank is less than 1/3 full, follow the procedure outlined below.
The following steps are only required if the fuel tank is less than 1/3 full (check fuel gauge in instrument cluster). If the tank is more than 1/3 full, you can start the bleeding procedure.
If you do not want to put more fuel in the tank because of tests that will be required later, the following method can be used to fill the inner section of the baffle housing with fuel:
–  Open fuse box lid on left-hand side of dash panel.
–  Pull out fuse No. 28 from fuse holder.
   
–  Connect remote control -V.A.G 1348/3A- for V.A.G 1348 with adapter cable -V.A.G 1348/3-2- to right-hand terminal of fuse socket No. 28 -arrow-.
–  Connect crocodile clamp to vehicle battery (positive).
  A20-0098
–  Using hose clamps up to Ø 25 mm -3094- clamp off fuel supply hose leading to fuel filter. (Rear left hose)
–  Operate remote control switch for about 30 seconds to fill baffle housing (fuel pump should run audibly).
–  Then remove hose clamps up to Ø 25 mm -3094- from fuel supply hose to fuel filter.
Bleeding
–  Remove engine cover panel → Chapter.
–  Open fuse box lid on left-hand side of dash panel.
–  Pull out fuse No. 28 from fuse holder.
  A23-0159
–  Connect remote control -V.A.G 1348/3A- for V.A.G 1348 with adapter cable -V.A.G 1348/3-2- to right-hand terminal of fuse socket No. 28 -arrow-.
–  Connect crocodile clamp to vehicle battery (positive).
  A20-0098
–  Using hose clamps up to Ø 25 mm -3094-, clamp off fuel return line at the following points:
t  Between filter and fuel tank
t  Between filter and injection pump
–  Detach fuel return line for injectors of right-side cylinder bank at injection pump.
  A20-0591
–  Fit a suitable length of transparent hose onto the free connection at the injection pump and run the hose into a suitable container (fuel canister or similar).
–  Operate remote control switch until fuel comes out of hose free of bubbles; fuel pump should run audibly.
–  Reconnect fuel return line to injection pump.
–  Remove hose clamps up to Ø 25 mm -3094- from fuel return hose.
When starting the engine for the first time after bleeding the fuel system, you must activate the electric fuel pump with the remote control switch.
–  Operate remote control -V.A.G 1348/3A- for V.A.G 1348 with adapter cable -V.A.G 1348/3-2- (fuse socket No. 28) while starting engine.
  WARNING
Do not prolong attempted starting for more than 15 seconds.
If engine does not start, repeat bleeding procedure.
–  Continue to press remote control switch for approx. 30 seconds after engine has started.
–  Then stop engine and remove remote control.
–  Re-fit fuse No. 28.
–  Start engine again and inspect fuel system for leaks (visual check).
–  Leave engine idling under no load for at least 5 minutes (to fully bleed fuel system).
  Note
If fuel system is leaking, check entire fuel system for leaks → Fuel supply system, diesel engines; Rep. Gr.20.
  A23-0157

Draining fuel filter > < Removing and installing injection pump