audi Workshop Repair Guides

Audi Workshop Service and Repair Manuals

Removing and installing return ring with slip ring > < Steering column switch module - exploded view
Removing and installing steering column switch module
Special tools and workshop equipment required
   
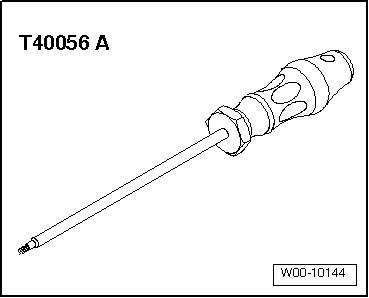
t  Special screwdriver T8 -T40056 A-
Removing
–  Remove driver's storage compartment → Rep. Gr.68.
–  Move steering wheel down and to rear as far as possible, making use of full range of steering column adjuster.
–  Remove airbag unit → Rep. Gr.69.
–  Remove steering wheel → Rep. Gr.48.
  W00-10144
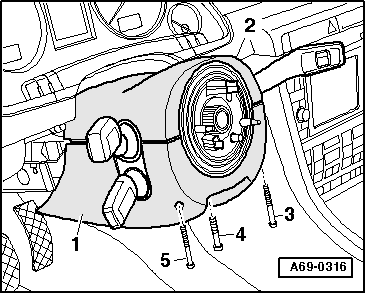
–  Unscrew bolts -3- and -5- using special screwdriver T8 -T40056 A-.
–  Remove hexagon socket head bolt -4-.
–  Separate upper trim -2- for steering column switch from lower trim -1- and remove both sections.
–  Fold upper trim towards instrument cluster and detach lower trim.
  A69-0316
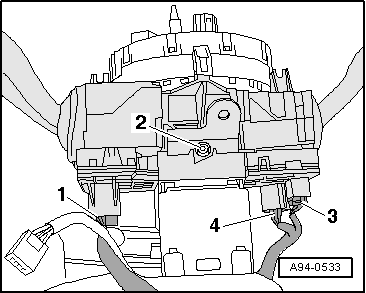
–  Remove bolt -2-.
–  Unplug electrical connectors -1- and -3-.
  WARNING
Before disconnecting the electrical connector -4-, the mechanic must discharge static by briefly grasping hold of striker plate for door or similar.
–  Unplug electrical connector -4-.
  A94-0533
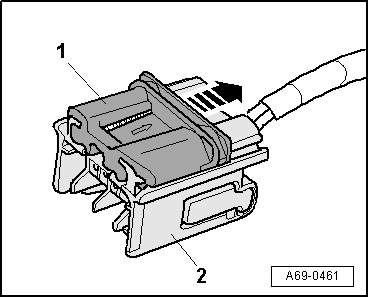
–  Press catch -1- in direction of -arrow- until connector -2- disengages.
–  Carefully detach steering column switch together with steering column electronics control unit -J527-.
Installing
Further installation is carried out in the reverse order; note the following:
–  Make sure all fasteners and the electrical connectors are properly engaged.
–  Insert top trim for steering column switch in hooks for bottom trim, press both sections together and tighten bolts.
–  Install driver's storage compartment → Rep. Gr.68.
–  Install steering wheel → Rep. Gr.48.
–  Install airbag unit → Rep. Gr.69.
Tightening torques
  A69-0461
ComponentNm
Steering column switch module3
Trim for steering column switch1


Removing and installing return ring with slip ring > < Steering column switch module - exploded view