audi Workshop Repair Guides

Audi Workshop Service and Repair Manuals

Removing and installing fan for electronics box (plenum chamber) > < Removing and installing main fuse holder
Removing and installing electronics box (plenum chamber)
Removing
  Note
All cable ties unfastened or cut open during removal must be reattached in same position when installing.
–  Switch off ignition and take out ignition key.
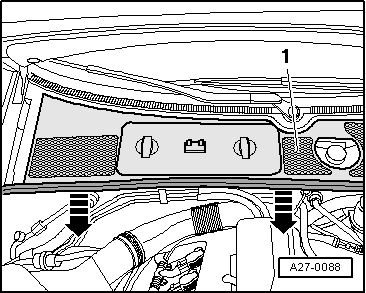
–  Detach rubber seal of plenum chamber cover in direction of -arrow-.
   
–  Remove plenum chamber cover -1- to front.
  A27-0088
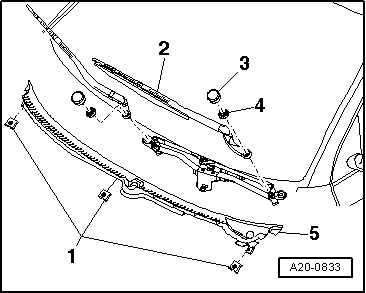
–  Remove wiper arms -2- and -items 3 and 4- → Chapter.
  Caution
To stop the cowl panel grille -5- being torn on removal, apply a small quantity of soap solution to the transition between the windscreen and cowl panel grille and pull the cowl panel grille vertically upwards out of the fastening strip, starting at the edge of the windscreen.
–  Pull off retaining clips -1- and detach cowl panel grille -5-.
  A20-0833
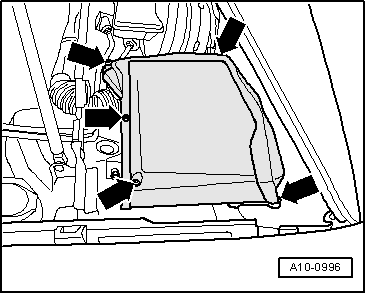
–  Remove cover for electronics box in plenum chamber -arrows-.
  A10-0996
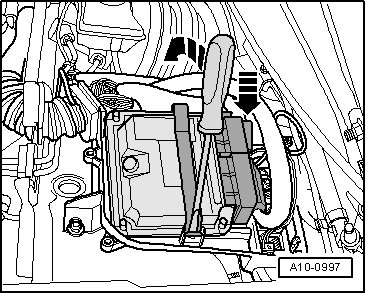
–  Use screwdriver to pry off retaining strap -arrows-.
  A10-0997
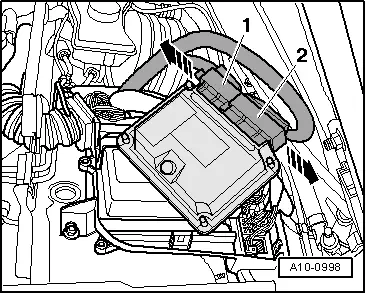
Engine control unit without protective housing:
–  Release retaining tabs -arrows- and unplug connectors -1- and -2- for engine control unit.
Engine control unit with protective housing:
–  Remove engine control unit with protective housing → Rep. Gr.24 or → Rep. Gr.23.
  A10-0998
Both versions:
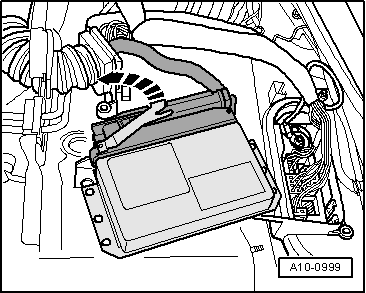
–  If fitted, release the retaining clip for the gearbox control unit.
–  Release connector -arrow- and unplug from gearbox control unit.
–  Cut the cable tie if fitted.
  A10-0999
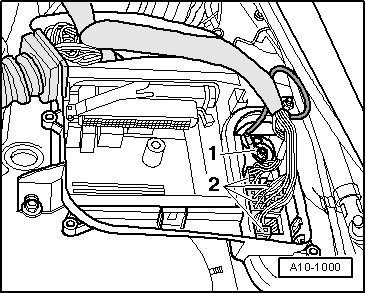
–  Unplug connectors -2- at rear of connector console.
–  Unscrew electrical wire -1-.
  A10-1000
–  Release retaining clips -arrows- and lift auxiliary relay carrier out of electronics box.
–  Detach the engine wiring harness at electronics box and bulkhead and move it clear.
  A10-1001
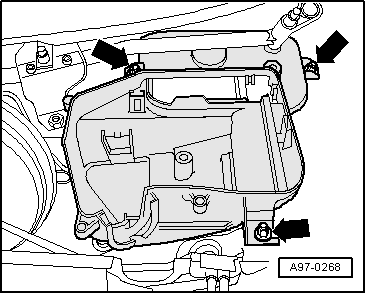
–  Unscrew securing nuts -arrows-.
–  Lift electronics box and remove upwards.
Installing
Installation is carried out in the reverse order; note the following:
  Note
All cable ties unfastened or cut open during removal must be reattached in same position when installing.
Tightening torque
  A97-0268
ComponentNm
Electronics box (plenum chamber) to body3


Removing and installing fan for electronics box (plenum chamber) > < Removing and installing main fuse holder