audi Workshop Repair Guides

Audi Workshop Service and Repair Manuals

Installing > < Assembly overview
5-Speed Manual Gearbox 01A (4WD)
Removing and installing thrust tube
Removing
  • ● Rear final drive installed

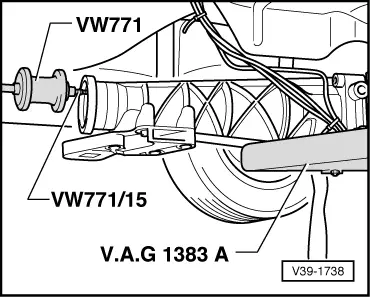
Special tools, testers and auxiliary equipment required

  • ◆ Multi-purpose tool VW 771 with 771/15
  • ◆ Drip tray V.A.G 1306
  • ◆ Universal mount V.A.G 1359/2
  • ◆ Engine/gearbox lifter V.A.G 1383 A
  • ‒ Place drip tray V.A.G 1306 underneath and drain gearbox oil.
  • ‒ Remove rear section of exhaust system as from clamp(s):

=> 4-cylinder Engine (5-valve), Mechanical Components; Repair Group 26; Removing and installing exhaust system parts

=> 4-cylinder Engine (5-valve turbo), Mechanics; Repair Group 26; Removing and installing parts of exhaust system

=> 4-cylinder Diesel Direct Injection Engine (TDI), Mechanics; Repair Group 26; Removing and installing exhaust system

=> 6-cylinder Engine (2-valve), Mechanics; Repair Group 26; Removing and installing exhaust system

=> 6-cylinder Engine (5-valve), Mechanical Components; Repair Group 26; Removing and installing exhaust system parts

  • ‒ Remove heat shield above propshaft.
 
V39-1727
  • ‒ Remove heat shield next to rear final drive.
  • ‒ → Check whether there is a factory marking (paint spot) on propshaft. If there is no mark, make a coloured mark on rear axle drive -B- to indicate the position of prop shaft flange -A-.
  • ‒ Unscrew fastening bolts for propshaft flange.

 
V39-1734
  • ‒ → Secure propshaft to handbrake cable bracket with wire.

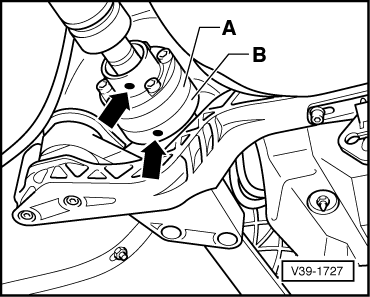
Note:

If it is not possible to push propshaft up and off flange, lower final drive before tying up propshaft. When lowering final drive, prevent propshaft from dropping down, and do not bend centre joint further than maximum angle permitted => notes on Page 39-76.

 
V39-1735
  • ‒ Support final drive with gearbox lifter V.A.G 1383 A.
  • ‒ → Unscrew bolts -arrows- from front of cross member for rear axle drive.
  • ‒ Detach front cross member.

 
A39-0210
  • ‒ Lower final drive about 10 cm.
  • ‒ → Unscrew 4 bolts for thrust tube -1 ... 3-

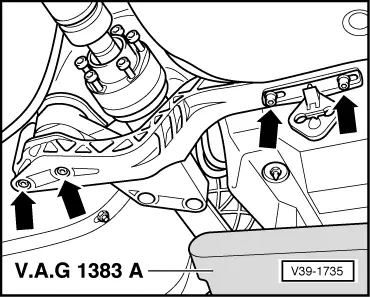
Note:

Fourth bolt is not visible in illustration.

 
V39-1738
  • ‒ → Pull off flange shaft with thrust tube.

Installing > < Assembly overview