audi Workshop Repair Guides

Audi Workshop Service and Repair Manuals

Attaching rear final drive to repair stand > < Replacing oil seals for flange shafts
6-speed manual gearbox 01E Four-wheel drive
Removing and installing rear final drive

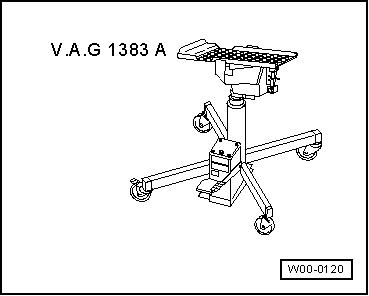
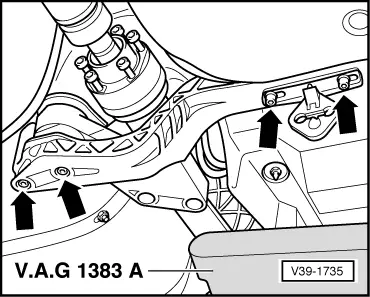
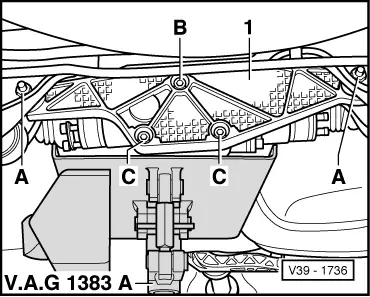
Special tools, testers and other items required
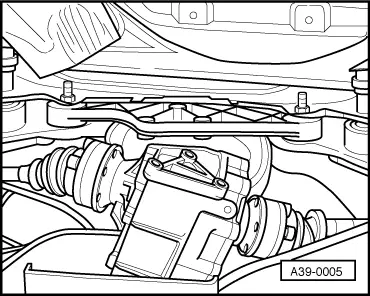
 
W00-0120
  • ◆ Engine/gearbox lifter V.A.G 1383 A
  • ◆ Universal holder V.A.G 1359/2

Removing

  • ‒ Remove rear section of exhaust system as of clamp(s).

=> Engine, Mechanics; Repair Group 26; Removing and installing exhaust system components

  • ‒ Remove heat shield over propshaft.
 
V39-1727
  • ‒ → Check for factory mark (coloured dot) at propshaft. If there is no coloured dot, make coloured mark to identify position of propshaft flange -A- with respect to rear final drive -B-.
  • ‒ Screw out bolts of propshaft flange.
 
V39-1734
  • ‒ → Use wire to tie up propshaft at holder for handbrake cable.

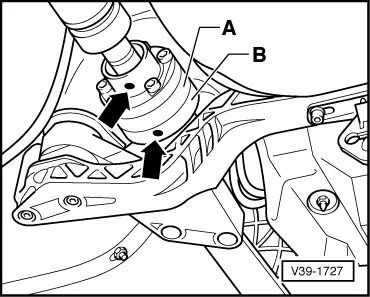
Note:

If propshaft cannot be pressed upwards past flange, lower final drive and then tie up propshaft. When lowering, secure propshaft to stop it falling and pay attention to permissible propshaft bending angle => Notes, Page 39-84.

  • ‒ Detach left/right drive shafts from rear final drive.

=> Running Gear, Front-wheel Drive and Four-wheel Drive; Repair Group 42; Removing and installing drive shaft

 
A39-0003
  • ‒ → Support final drive with gearbox lifter V.A.G 1383 A and universal holder V.A.G 1359/2.
  • ‒ Secure final drive with strap.
 
V39-1735
  • ‒ → Screw out bolts -arrows- at front cross member for rear final drive.
  • ‒ Detach front cross member.

 
V39-1736
  • ‒ → Screw out bolts -B- and -C- of rear cross member at rear final drive.
  • ‒ Lower final drive with gearbox lifter.

Note:

Cross member -1- does not have to be removed.

Installing

Install in reverse order, paying attention to the following:

Notes:

  • ◆ Always replace self-locking nuts.
  • ◆ After removing propshaft, always remove residual locking fluid from flange shaft threads at rear final drive. Otherwise there would be a danger of the bolts seizing when screwed in and shearing off on renewed disassembly.
  • ◆ Cleaning can be performed using a thread tap.
  • ◆ Replace seal between propshaft and input flange (remove backing and bond seal to flange shaft). Bonding surface must be free from grease.
  • ◆ Replace propshaft bolts (self-locking).
 
A39-0005
  • ‒ → Raise final drive with gearbox lifter until both drive shafts can be connected.
  • ‒ Slightly tighten drive shaft bolts.
  • ‒ Raise final drive and bolt to cross member and gearbox support.
  • ‒ Bolt on propshaft => Page39-91.

Notes:

 
V39-1727
  • ◆ → To prevent imbalance, flanges of propshaft -A- and rear final drive -B- must be fitted such that coloured marks are aligned -arrows-.
  • ◆ After detaching propshaft from rear final drive, do not re-install additional balancing plate (thicker packing plate) which may have been fitted between washer and bolt head.
  • ◆ Replace propshaft bolts (self-locking).
  • ‒ Bolt on drive shafts.

=> Running Gear, Front-wheel Drive and Four-wheel Drive; Repair Group 42; Removing and installing drive shaft

  • ‒ Check gear oil in rear final drive.
  • ‒ Perform stress-free alignment of exhaust system.

=> Engine, Mechanics; Repair Group 26; Removing and installing exhaust system components

Tightening torques

Component

Nm

Propshaft to final drive

55

Gearbox support to thrust tube

40

Front cross-member to body - M10

40

Front cross-member with exhaust system bracket to body - M8


23

Rear cross-member to final drive

55

Rear cross-member to subframe

50

Heat shields to final drive

25

Attaching rear final drive to repair stand > < Replacing oil seals for flange shafts