audi Workshop Repair Guides

Audi Workshop Service and Repair Manuals

Removing and installing bracket for alternator, vane pump and viscous fan > < Ribbed belt layout
4-Cyl. TDI®Engine, Mechanics
Dismantling and assembling engine
Removing and installing ribbed belt
  • ● Lock carrier in service position =>Page 13-1.
 
A10-0013

Removing

Note:

Before removing, mark direction of ribbed belt with chalk or felt-tipped pen. Running a used belt in the opposite direction could destroy it.

Vehicles with air conditioner:

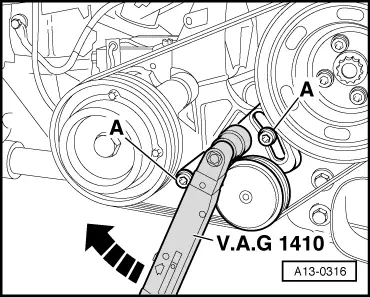
  • ‒ → Slacken off bolts of tensioning roller for air-conditioner compressor ribbed belt -arrows-, slacken off ribbed belt and detach.

 
N10-0186

All models:

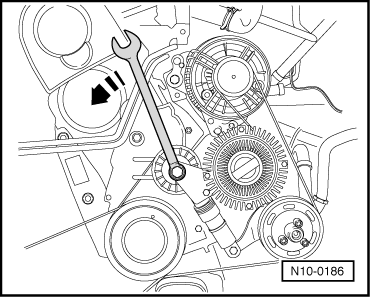
  • ‒ → Swivel tensioner in direction of arrow to slacken off ribbed belt.
  • ‒ Detach ribbed belt, slacken off tensioner.
 
N10-0186

Installing

Notes:

  • ◆ Make sure the ribbed belt is properly seated.
  • ◆ Ribbed belt layout => Page 13-21.
  • ‒ Mount ribbed belt on pulleys of crankshaft, vane pump, tensioning roller and viscous fan.
  • ‒ → Swivel ribbed belt tensioner in direction of arrow.
  • ‒ As a final step, position ribbed belt on alternator pulley and slacken off tensioner.
 
A13-0316

Vehicles with air conditioner:

  • ‒ Fit ribbed belt for air-conditioner compressor.
  • ‒ → Position torque wrench, as shown at the 7 o'clock position, at hexagon of tensioning roller and pre-tension to 25 Nm.
  • ‒ Simultaneously tighten bolts -A- to 20 Nm.

All models:

  • ‒ Start engine and check belt routing.
  • ‒ Install lock carrier =>Page 13-1.

Removing and installing bracket for alternator, vane pump and viscous fan > < Ribbed belt layout