audi Workshop Repair Guides

Audi Workshop Service and Repair Manuals

Removing and installing turbocharger > < Rules for cleanliness
4-Cyl. TDI®Engine, Mechanics
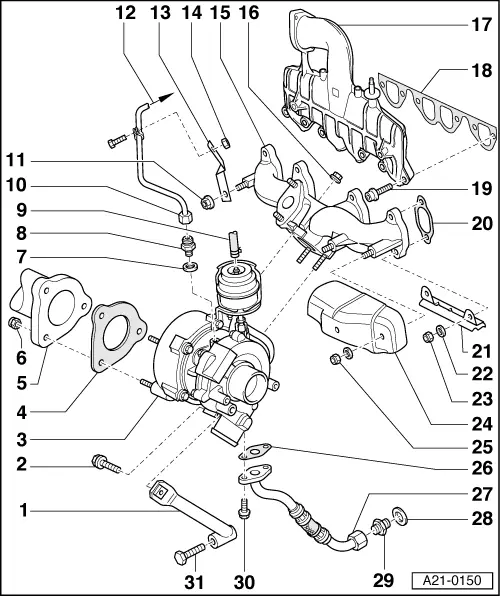
Servicing charge-air system with turbocharger
Exploded view of turbocharger removal and installation

Notes:

  • ◆ All cable ties unfastened or cut open on removal are to be re-attached in same position on installation.
  • ◆ Secure all hose connections with standard hose clamps:

=> Parts List

  • ◆ Hose connections and hoses must be free from oil and grease before fitting.
  • ◆ Always replace gaskets, sealing rings and self-locking nuts.
 
A21-0150
  • Holder
  • 20 Nm
  • Turbocharger
    • ◆ Checking => Page 21-7
    • ◆ Removing and installing=>Page 21-46
  • Gasket
    • ◆ Replace
  • Catalytic converter
    • ◆ With exhaust pipe
  • 25 Nm
    • ◆ Replace
  • Sealing ring
    • ◆ Replace
  • Bolted joint - 30 Nm
 
A21-0150
  • Hose
    • ◆ From charge pressure control solenoid valve -N75
  • Oil supply pipe
    • ◆ Tighten union nut to 22 Nm
  • 25 Nm
  • To oil filter holder
  • Holder
  • 10 Nm
  • Exhaust manifold
    • ◆ Removing and installing=>Page 26-17
  • 25 Nm
    • ◆ Replace
    • ◆ Apply hot bolt paste to thread and head resting surface
    • ◆ Hot bolt paste

=> Parts List

 
A21-0150
  • Intake manifold
    • ◆ Removing and installing=>Page 15-14
  • Gasket
    • ◆ Replace
    • ◆ Pay attention to installation position
  • 22 Nm
  • Gasket
    • ◆ Replace
    • ◆ Pay attention to installation position
  • Bracket
    • ◆ For heat shield -Item 24-
  • Washer
  • 25 Nm
    • ◆ Replace
 
A21-0150
  • Heat shield
    • ◆ Attach in holder -Item 21-
  • 25 Nm
    • ◆ Replace
  • Gasket
    • ◆ Replace
  • Oil return pipe
    • ◆ To cylinder block
    • ◆ Tighten union nut to 30 Nm
  • Sealing ring
    • ◆ Replace
  • Bolted joint - 40 Nm
  • 15 Nm
  • 40 Nm

Removing and installing turbocharger > < Rules for cleanliness