audi Workshop Repair Guides

Audi Workshop Service and Repair Manuals

Removing and installing toothed belt, engine codes 1Z, AFF, AFN, AHU > < Removing and installing bracket for alternator, vane pump and viscous fan
4-cylinder Diesel Direct Injection Engine (TDI), Mechanics
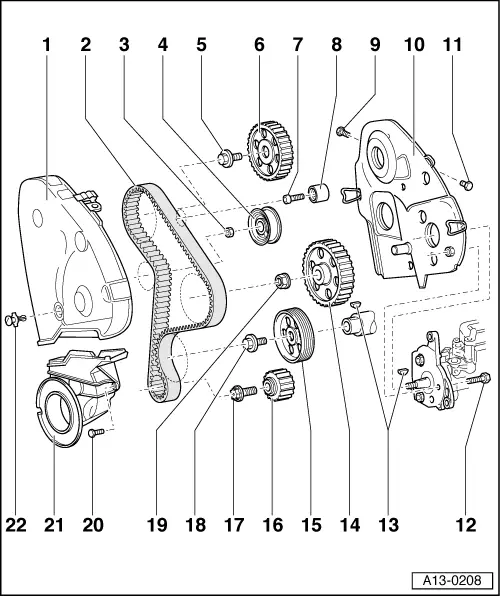
Dismantling and assembling engine
Toothed belt drive
 
A13-0208

Note:

Mark the direction of rotation with chalk or felt pen before removing the toothed belt. If the belt rotates in the wrong direction when it is refitted, this can cause breakage.

  • Toothed belt guard - top
    • ◆ Remove, to remove tensioner for ribbed belt -Item 13-7
    • ◆ When installing, engage carefully in bottom toothed belt guard.
  • Toothed belt
    • ◆ Mark direction of rotation with chalk or felt pen before removing.
    • ◆ Check for wear
 
A13-0208
    • ◆ Removing with engine codes 1Z, AFF, AFN, AHU
    • ◆ Installing (adjust valve timings) with engine codes 1Z, AFF, AFN, AHU
      => Page 13-43
    • ◆ Removing with engine code AHH
      => Page 13-47
    • ◆ Installing (adjust valve timing) with engine code AHH => Page 13-53
  • 20 Nm
  • Tensioner
    • ◆ Checking semi automatic toothed belt tensioner
      => Page 13-58
    • ◆ Installation position => Fig.1.
 
A13-0208
  • 45 Nm
    • ◆ Counter hold with 3036 to loosen and tighten
  • Camshaft sprocket
    • ◆ Release from camshaft taper by tapping with hammer and drift through hole of toothed belt guard
  • 25 Nm
  • Idler wheel
  • 10 Nm
  • Toothed belt guard - rear
  • 10 Nm
  • 25 Nm
 
A13-0208
  • Woodruff key
    • ◆ Ensure tight fit
    • ◆ On two piece injection pump sprocket/injection pump shaft without Woodruff key
  • Injection pump sprocket
    • ◆ Removing and installing one piece injection pump sprocket
      => Fig.3
    • ◆ Note Woodruff key on one piece injection pump sprocket
    • ◆ Central nut must not be opened on two part injection pump sprocket => Fig.4
  • Intermediate shaft sprocket
    • ◆ Installation position => Fig.2.
    • ◆ Note Woodruff key
 
A13-0208
  • Crankshaft sprocket
    • ◆ Contact surface between sprocket and crankshaft must be free of oil.
    • ◆ Can only be installed in one position.
  • 90 Nm + 1/4 turn (90°) further
    • ◆ Replace
    • ◆ Do not use oil
    • ◆ Use special tool 3099 or 3415 to loosen and tighten
    • ◆ Bolting on counter tool 3099 => Page 13-68
    • ◆ Remove bracket for torque reaction support -Item 17-4 before bolting on counter tool.
 
A13-0208
  • 45 Nm
    • ◆ Counter hold with 3036 to loosen and tighten
  • 45 Nm
    • ◆ Must not be opened on two piece injection pump sprocket => Fig.4
  • 10 Nm
  • Toothed belt guard - bottom
    • ◆ To remove, unbolt vibration damper
  • Expanding clip
 
A13-0053

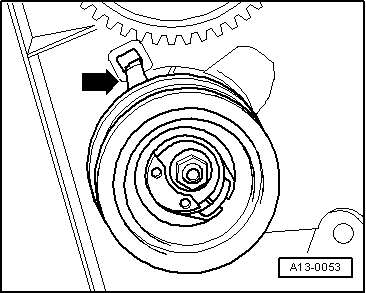
→ Fig.1    Installation position of semi-automatic tensioner

Retaining lug -arrow- must engage in slot on rear toothed belt guard.

 
A13-0205

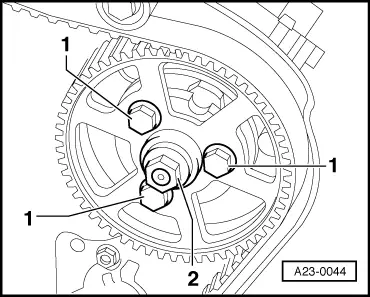
→ Fig.2    Installation position of intermediate shaft sprocket

  • ◆ Wide web -arrows- of intermediate shaft sprocket points towards front.
  • ◆ The inscription on wheel points towards rear.
 
V23-0077

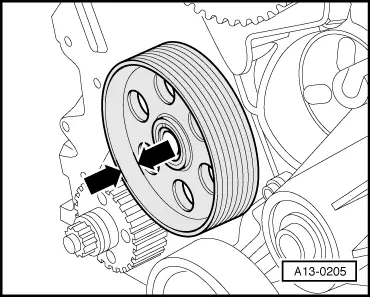
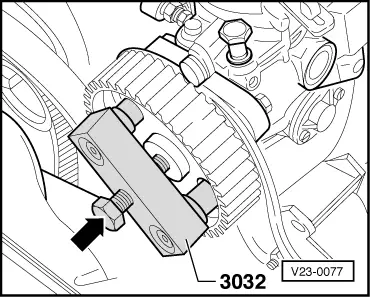
→ Fig.3    Remove one piece injection pump sprocket

  • ● Toothed belt removed => Page 13-38
  • ‒ Remove nut for injection pump sprocket.
  • ‒ Loosen arms of puller and place puller 3032 in position.
  • ‒ Align arms with holes in injection pump sprocket and tighten.
  • ‒ Use the puller to tension the injection pump sprocket.
  • ‒ Release the injection pump sprocket from the taper of the injection pump by gently tapping on the puller stem-arrow- (whilst doing so, hold the sprocket firmly to prevent it from falling out).
 
A23-0044

→ Fig.4    Removing and installing two piece injection pump sprocket

Note:

Do not loosen central nut -2- of injection pump sprocket. Otherwise the injection pump basic setting is maladjusted and can no longer be corrected using workshop tools.

  • ‒ Replace injection pump sprocket securing bolts -1-.

Note:

The securing bolts are stretch bolts and cannot be re-used. Once tightened to correct torque (20 Nm + 90°), they must be replaced after loosening.

Removing and installing toothed belt, engine codes 1Z, AFF, AFN, AHU > < Removing and installing bracket for alternator, vane pump and viscous fan