audi Workshop Repair Guides

Audi Workshop Service and Repair Manuals

Check lambda probe ageing upstream of catalytic converter > < Checking Lambda control
Motronic Fuel Injection and Ignition System (4-cyl) Turbo
Checking lambda control
Checking lambda probe and lambda control before catalytic converter

Special tools and workshop equipment required

  • ◆ V.A.G 1526 A
  • ◆ V.A.G 1594 A
  • ◆ V.A.G 1598/31
  • ◆ VAS 5051 with VAS 5051/1
  • or
  • ◆ V.A.G 1551 with V.A.G 1551/3 A

Test requirements:

  • ● No leaks in exhaust system.
  • ● Coolant temperature at least 80 °C.

Test sequence

  • ‒ Connect up vehicle diagnosis, measurement and information system VAS 5051 or fault reader V.A.G 1551 and select engine electronics control unit with "Address word" 01 .
    For this purpose, the engine must be running at idle speed
 
→ When indicated on display:
Rapid data transfer    HELP
Select function XX
  • ‒ Enter "04" to select "Start basic setting" and confirm with Q key.
 
→ When indicated on display:
Basic setting     Q
Enter display group number XXX
  • ‒ Enter "030" for "display group number 030" and confirm entry with Q key.
  • ‒ Check specified value in display zone 1.

Notes:

  • ◆ By increasing the engine speed the specified values are achieved quicker.
  • ◆ The "lambda probe status" indicates the condition of the lambda control and the lambda probes.

Display zones

1

2

3

4

Display group 030: Lambda probe status

Display

X X X

X X X

Display

Lambda probe status, bank 1, probe 1

Lambda probe status, bank 2, probe 1

Range

0 = off
1 = on

0 = off
1 = on


Specified value

1 1 1

1 1 0

Note:

If specified value not attained

Significance of 3-digit readout of display group 030

X

X

X

Display zones 1 and 2:

X

Lambda control 0 = not active, 1 = active

X

Lambda probe condition: 0 = not active, 1 = active

X

Condition of lambda probe heating: 0 = not active, 1 = active

Note:

The first digit of the 3-digit display (heating) fluctuates between 0 and 1.

  • ‒ Only continue the test if the display in display zone 1 has reached "111" at least once.

Checking lambda probe learned values and lambda control

  • ‒ Press C key.
 
→ When indicated on display:
Basic setting     Q
Enter display group number XXX
  • ‒ Enter "032" for "display group number 032" and confirm entry with Q key.
 
→ When adjacent display appears:
System in basic setting 32    ⇒
    1    2    3    4
  • ‒ Check lambda learned values in display zones 1 and 2:

Display zones

1

2

3

4

Display group 032: Lambda learned values

Display

xx.x %

xx.x %

Display

Lambda learned value
Bank 1, probe 1
at idle (additive)

Lambda learned value
Bank 1, probe 1
on part throttle
(multiplicative)

Specified value

-6.0...6.0 %

-10.0...10.0 %

Note:

If specified value not attained

  • ‒ Press C key.
 
→ When adjacent display appears:
Basic setting     Q
Enter display group number XXX
  • ‒ Enter "033" for "display group number 033" and confirm entry with Q key.
 
→ When indicated on display:
System in basic setting 33    ⇒
    1    2    3    4
  • ‒ Check the lambda control in display zones 1 and 2.

Display zones

1

2

3

4

Display group 033: Lambda control

Display

xx.x %

x.xxx V

Display

Lambda control
Bank 1, probe 1

Lambda probe voltage Bank1, Probe 1

Specified value

In range -10.0...10.0 % value must fluctuate at least 2 %

0.130...3.600 V

Note:

If specified value is not attained => ContinuationPage 24-79

If specified value is not achieved => Evaluation display group 033, Page 24-82

Note on display zone 2:

Indicated is the lambda probe voltage signal which was prepared and smoothed in the engine control unit. 1.5 V in the display corresponds to Lambda 1.

(cont.)

If the specified result is not achieved in display zone 1, or if the value does not fluctuate by at least 2%:

  • ‒ Perform test drive to free Lambda from any possible residues and repeat the test.

If the specified result is not achieved in display zone 1, or if the value does not fluctuate by at least 2%, even after the test drive:

  • ‒ Check the basic voltage => Page 24-83
  • ‒ Check the Lambda probe heating upstream of catalytic converter => Page 24-90.
  • ‒ Check the lambda probe upstream of catalytic converter for ageing .

Interpreting display group 032

Display zone: 1 / 2

Possible causes of fault

Fault remedy

Lambda learned values
below specified range

- Leak in intake area (pressure side between turbocharger and intake pipe)

- Check intake system for leaks and rectify unmetered air

- Oil dilution

- Carry out oil change or drive vehicle fairly fast on out-of-town roads

- High oil consumption

- Air mass meter defective

- Test air mass meter

- Solenoid valve for active carbon canister stuck open

- Check solenoid valve for activated charcoal canister

- Fuel pressure too high

- Check fuel pressure regulator

- Injector not closing

- Check injectors => Page 24-40

- Lambda probe heating defective
- Lambda probe defective

- Check Lambda probe heating

Interpreting display group 032

Display zone: 1 / 2

Possible causes of fault

Fault remedy

Lambda learned values above specified range

- Unmetered air in intake area

- Check intake system for leaks and rectify unmetered air

- Fuel pressure too low

- Check fuel pressure regulator

- Air mass meter defective

- Test air mass meter

- Lambda probe heating defective
- Lambda probe defective

- Check Lambda probe heating

- Injector only opens partially or not at all

- Check injectors => Page 24-40

- Activated charcoal filter system solenoid valve sticking

- Check solenoid valve for activated charcoal canister

Interpreting display group 033

Display zone: 2

Possible causes of fault

Fault remedy

Greater than 4.800 V

- Short to positive in wiring between lambda probe and control unit
- Lambda probe defective

- Check lambda probe wiring of lambda probe before catalytic converter

Less than 0.130 V

- Short to earth in wiring between lambda probe and control unit
- Lambda probe defective

- Replace lambda probe upstream of catalytic converter

Checking basic voltage

 
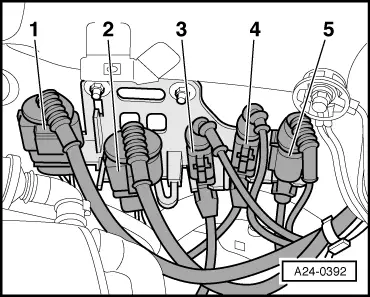
A24-0392
  • ‒ → Unplug 6-pin connector (black) -2- to lambda probe upstream of catalytic converter -G39.

Note:

To gain access to the connector screw out coolant expansion tank bolts and swivel expansion tank aside. Fuel hoses remain connected.

 
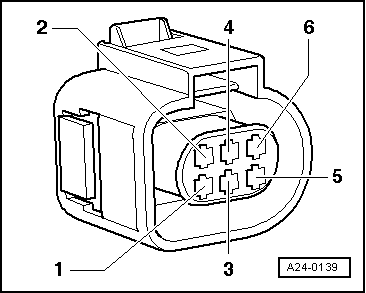
A24-0139
  • ‒ → Connect multimeter between contacts 1 and 5 to measure voltage.
  • ‒ Switch the ignition on.
    • ‒ Specified value: 0.400...0.500 V
  • ‒ Switch ignition off.

If specified value is not attained:

  • ‒ Check the Lambda probe lines.

If specified value is attained:

  • ‒ Replace the lambda probe upstream of catalytic converter -G39.

Check lambda probe wiring

 
A24-0392
  • ‒ → Unplug 6-pin connector (black) -2- to lambda probe upstream of catalytic converter -G39.

Note:

To gain access to the connector screw out coolant expansion tank bolts and swivel expansion tank aside. Fuel hoses remain connected.

  • ‒ Connect the V.A.G 1598/31 test box to wiring harness leading to engine control unit; the engine control unit should not be connected => Page 24-19.
 
A24-0139
  • ‒ → Test for open circuit in the following wiring connections.

Connector
contact

Test box V.A.G 1598/31
Socket

1

70

2

71

5

51

6

52

  • ‒ Rectify open circuit, if necessary

=> Current Flow Diagrams, Electrical Fault-Finding and Fitting Locations

  • ‒ Check for shorts between the two lines.

If the wiring is OK:

  • ‒ Fit a new engine control unit => Page 24-23.

Check lambda probe ageing upstream of catalytic converter > < Checking Lambda control