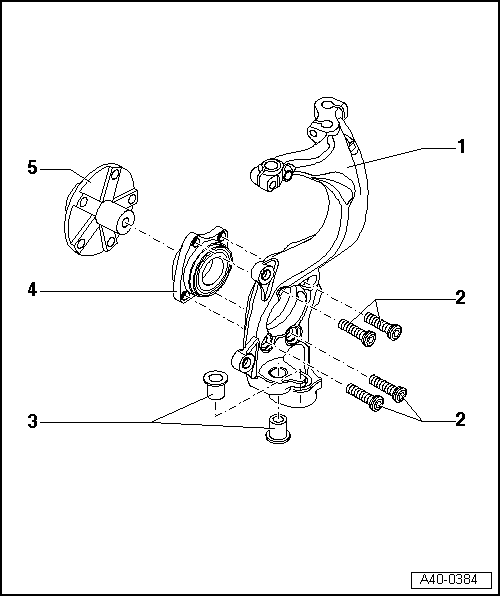
audi Workshop Repair Guides

Audi Workshop Service and Repair Manuals

Mounting bracket > < Servicing wheel bearing housing with V.A.G 1459 B
Running gear, Front-wheel drive and four-wheel drive
Wheel bearing housing
Servicing wheel bearing housing with bolted wheel bearing

Special tools and workshop equipment required

  • ◆ VW 401 Pressure plate
  • ◆ VW 402 Pressure plate
  • ◆ VW 407 Press tool
  • ◆ VW 412 Press tool
  • ◆ VW 416 B Tubular section
  • ◆ VW 511 Thrust piece
  • ◆ VW 519 Tubular section
  • ◆ V.A.G 1331 Torque wrench
  • ◆ V.A.G 1332 Torque wrench
  • ◆ 30-100 Fitting sleeve
  • ◆ Kukko 15-17 Parting tool
 
A40-0384
  • Wheel bearing housing
    • ◆ Holes must be free from grease
  • Cap screws
    • ◆ 80 Nm + further 90° turn
  • Bushings
  • Ball bearing
    • ◆ Pressing outø75 =>Fig.1
    • ◆ Pressing out ø82 =>Fig.2
    • ◆ Pressing in ø75 =>Fig.4
    • ◆ Pressing in ø82 =>Fig.5
    • ◆ Pressing off bearing inner race
      =>Fig.3
    • ◆ Removing and installing
    • ◆ Installation position:
    • ‒ Large ID of wheel bearing faces wheel hub
 
A40-0384
  • Wheel hub
    • ◆ Pressing out =>Fig.1 and Fig.2
    • ◆ Removing bearing inner race
      =>Fig. 3
    • ◆ Stepped design
    • ◆ Contact surface for wheel hub/brake disc and tapped holes must be free from paint and dirt

Removing

 
V44-0408
  • ‒ → Detach wheel trim. In the case of light alloy wheels, use puller from vehicle tool kit or suction grip -3208- to remove trim cap.
  • ‒ Slacken off hexagon bolt for outer joint of drive shaft by max. 90° (vehicle must be standing on its wheels to avoid danger of accidents).
  • ‒ Raise vehicle and screw out hexagon bolt for outer joint of drive shaft.
  • ‒ Remove wheel.
  • ‒ Secure brake disc with wheel bolt.
  • ‒ Pull wire of ABS speed sensor out of holder at wheel bearing housing/brake caliper.

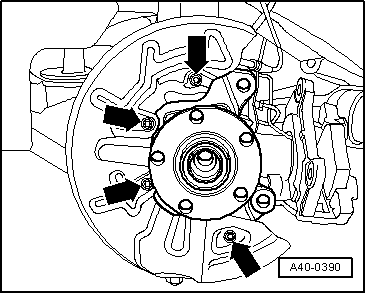
Vehicles with brake caliper HP-2

 
A40-0272
  • ‒ → Screw out hexagon bolt -2- and detach brake pipe holder.
  • ‒ Unscrew bolts -1- for brake caliper and detach brake caliper.
  • ‒ Re-attach brake pipe holder. Screw in and tighten hexagon bolt -2-.
  • ‒ Attach brake caliper to body such that its weight cannot bend or damage brake pipe.

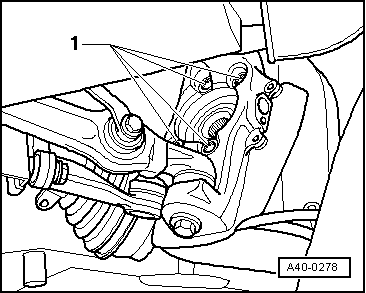
All vehicles (continued)

 
A40-0050
  • ‒ → Unscrew bolts -1- for brake caliper.
  • ‒ Detach brake caliper and attach to body such that its weight cannot strain or damage brake hose/brake pipe.
 
A40-0389
  • ‒ → Unscrew bolt -5- for ABS speed sensor.
  • ‒ Detach brake disc.

 
A40-0390
  • ‒ → Screw out bolts -arrows-.
  • ‒ Detach splash plate.
 
A40-0209
  • ‒ → Unscrew nut -1-, take out hexagon bolt and lift out both links -2-.

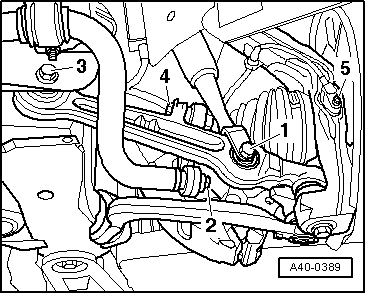
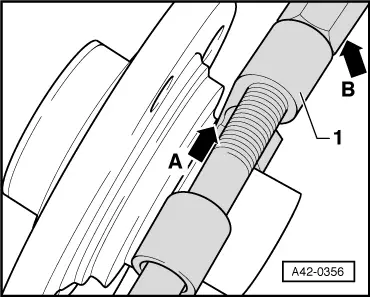
If hexagon bolt cannot be removed from wheel bearing housing, bolt and links -2- must be pressed out of wheel bearing housing => Page 40-133.

Slots in wheel bearing housing are never to be widened using a chisel or the like.

  • ‒ Swivel wheel bearing housing aside in direction of arrow and in doing so pull drive shaft journal out of wheel hub.
  • ‒ Use wire, for example, to attach drive shaft to body.

 
A40-0278
  • ‒ → Unscrew cap screws -1-.
  • ‒ Take out wheel bearing unit.
 
A42-0175

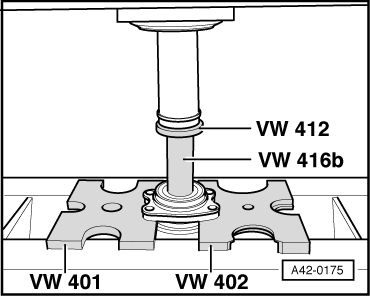
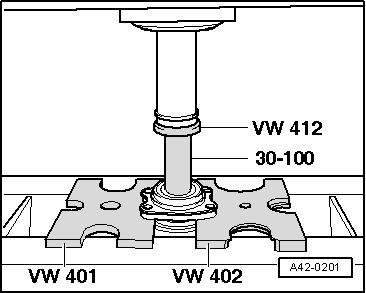
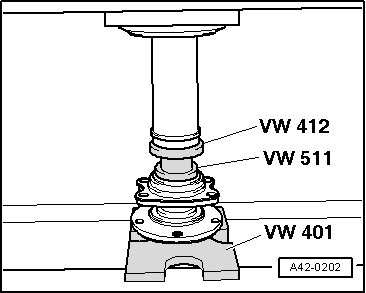
→ Fig.1    Pressing wheel hub out of wheel bearing (ø 75 mm)

 
A42-0201

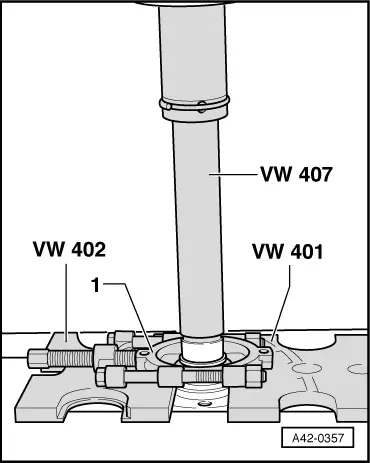
→ Fig.2    Pressing wheel hub out of wheel bearing housing

(ø82 mm)

 
A42-0356

→ Fig.3    Pressing bearing inner race off wheel hub

  • ‒ Insert parting tool -1- in annular groove of bearing inner race -arrow A- and pre-tension with spindle -arrow B-.
  •     1 -    Parting tool, e.g. Kukko 15-17 (commercially available)

 
A42-0357
  • ‒ → Press bearing inner race off wheel hub.
  •     1 -    Parting tool, e.g. Kukko 15-17 (commercially available)
 
A42-0176

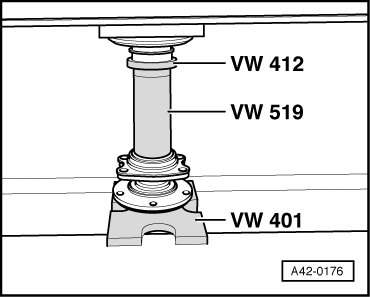
→ Fig.4    Pressing wheel hub into wheel bearing (ø 75 mm)

 
A42-0202

→ Fig.5    Pressing wheel hub into wheel bearing (ø 82 mm)

  • ‒ When pressing in, thrust pad -VW 511- may only rest on bearing inner race.

Installing

 
A40-0278
  • ‒ Insert wheel bearing unit in wheel bearing housing.
  • ‒ → Screw in cap screws -1- and tighten to 80 Nm + further 90° turn.
  • ‒ Slip outer joint of drive shaft into wheel hub and hand-tighten new hexagon bolt.
  • ‒ Remove any remnants of adhesive on thread of joint pins.
  • ‒ Insert both joint pins of upper links in wheel bearing housing.

 
A40-0209
  • ‒ → Press down upper links as far as possible whilst screwing on.
  • ‒ Tighten new self-locking nuts -1- to 40 Nm.
  • ‒ Fit ABS speed sensor.
  • ‒ Fit brake disc and screw on brake caliper.

=> Brake System; Repair Group 46

  • ‒ Screw on outer joint of drive shaft.

Note:

Vehicle must not be in contact with ground when tightening outer joint of drive shaft.

A second mechanic is required for the next operation.

  • ‒ 1st mechanic: Gets into vehicle and presses foot brake
  • ‒ 2nd mechanic: Tightens hexagon bolt for drive shaft

M14 hexagon bolt: 115 Nm

M16 hexagon bolt: 190 Nm

  • ‒ Fit and secure wheel => Page 44-1.
  • ‒ Tighten hexagon bolt for drive shaft. Vehicle must be standing on its wheels when tightening to avoid danger of accidents.
    • Give hexagon bolt further 180° turn.
  • ‒ Perform wheel alignment => Page 44-13.

Mounting bracket > < Servicing wheel bearing housing with V.A.G 1459 B