| Aerial wire from radio to aerial defective |
| The following are required for repair purposes: |
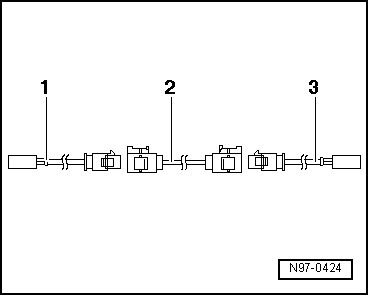
| 1 - | Adapter wire for connection to radio; length approx. 30 cm |
| 2 - | Connecting wire; available in various lengths |
| 3 - | Adapter wire for connection to aerial; length approx. 30 cm |
| –
| Unplug connectors of defective aerial wire from devices. |
| –
| Determine routing of defective aerial wire in vehicle and measure out overall length of aerial connection to be replaced in vehicle. |
| Total length of aerial connection = length of adapter leads -1- and -3- required as well as connecting wire -2-. |
| –
| Subtract 60 cm from total length of aerial connection measured to calculate required length of connecting wire needed. |
| –
| Procure the necessary adapter leads and connecting wire in the calculated length as genuine replacement parts as per the Parts catalogue. |
| –
| Cut connectors off defective aerial wire. |
| l
| Leave rest of defective aerial wire in vehicle. |
| –
| Connect adapter leads to units in vehicle. |
| –
| Fit connectors with a piece of foam sheathing to prevent rattling noise. |
| –
| Lay and secure connecting wire parallel to old aerial wire. |

Note | Aerial wires must not be kinked or bent excessively. Bending radius must not be less than 50 mm. |
| –
| Attach connecting wire to adapter leads. |
| –
| To prevent rattling noise, apply a suitable piece of foam sheathing to aerial connectors. |
|
|
|
