audi Workshop Repair Guides

Audi Workshop Service and Repair Manuals

Wiring test on navigation system I > < Automatic check of current vehicle parameter values
Radio, Telephone and Navigation System
Navigation system I (route navigation) (up to CW 28/99)
Calibrating wheels when changing tyres or replacing control unit

The navigation system must be re-calibrated following each tyre change (if permanent length defects are determined) or each replacement of the navigation system control unit (-J401).
Otherwise the navigation system operates on the basis of an approximate travel measurement which can only be calibrated by the control unit after a distance of approx. 100 km.

The standard tyres are re-calibrated using a simple selection process.
Second-hand or special tyres are re-calibrated on completion of a specified distance.

 
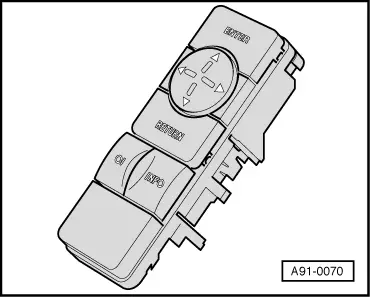
A91-0070
  • ‒ Invoking customer service software .
  • ‒ → Select the menu item "SET WHLS" with the cursor keys.

Display:

SERV. MENU:

> SET WHLS
WIRING
DRIVE TST
SYS. TEST
END

  • ‒ Confirm the selection with the "ENTER" key.

Display:


SELECT
MAKE OF
VEHICLE:
> CONTINUE

  • ‒ Press "ENTER" key to continue.

Display:

A3-AB
> A4 - SAL - B5
A4 - AVT - B5
A6 - SAL - C5
A6 - AVT - C5
A8-D2

  • ‒ Confirm the selection with the "ENTER" key.

Display:


VEHICLE:

A4 - SAL - B5

> YES
NO

  • ‒ Confirm the selection with the "ENTER" key.

Display:


GET TYRE
READINGS:
CONDITION
OF TYRES
> NEW
USED

Select tyre condition using cursor keys.

  • ‒ In the case of new tyres, select menu item "NEW" and confirm selection with the "ENTER" key.

Reading on display => Page 91-165:

  • ‒ In the case of used tyres, select menu item "USED" and confirm selection with the "ENTER" key.

Reading on display => Page 91-168:

New tyres:

Display:


SELECT
TYPE OF TYRE
> CONTINUE

  • ‒ Press "ENTER" key to continue.

Display:


195/65 15
> 205/60 15
205/55 16
225/50 16
225/45 17
SPECIAL

  • ‒ Use cursor keys to select tyre type for current vehicle from menu and confirm selection with "ENTER" key.

Possible tyre sizes => Tyre table, Page 91-166

Tyre table:

Tyre type

Circumference (mm)

A8

A6

A4

A3

185/65 R15

1895

-

-

X

-

195/65 R15

1935

-

X

X

X

205/60 R15

1910

-

X

X

X

205/55 R16

1930

-

X

X

X

215/55 R16

1960

-

X

-

-

225/50 R16

1930

-

X

-

-

225/60 R16

2071

X

-

-

-

WI 225/60

2059

X

-

-

-

255/40 R17

1940

-

X

-

-

225/45 R17

1930

-

-

X

X

225/55 R17

2071

X

-

-

-

225/40 R18

1940

-

-

X

-

245/45 R18

2074

X

-

-

-

255/35 R18

1937

-

-

X

-

Note:

For special tyre types, select the menu item "SPECIAL".

.

Example of display:


TYPE OF TYRE:
205/60 15
> YES
NO

  • ‒ If the tyre type has been correctly selected, confirm the selection "YES" with "ENTER" and complete wheel calibration.
  • ‒ If the wrong tyre type has been selected, select menu item "NO", confirm with "ENTER" and reselect tyre type.

Used tyres or special tyres:

Calibration requirements:

  • ◆ Determine a fortified driving route measuring 100 to 120 m. Measure the starting and finishing points beforehand with a steel measuring tape and mark.
    The route should be marked permanently (e.g. with paint) so that it can be used again.
  • ◆ In order to achieve a high level of accuracy, open the driver's door and align a reference point on the door sill (e.g. marked with adhesive tape) with the marked starting point.
  • ◆ Drive along the route as slowly and as straight as possible. Do not allow the tyres to spin.
  • ◆ Align the mark on the vehicle with the mark at the finishing point and stop the vehicle.

Display:


AMEND
TRACK
WIDTH?
YES
> NO

Notes:

  • ◆ Used standard tyres do not cause any changes in the track width.
  • ◆ Special tyres can change the track width. Any changes greater than 1% must be entered.
  • ◆ If no new track width changes are entered, the track width according to the selected vehicle type is maintained.
    Possible wheel treads => Wheel tread table, Page 91-171.
  • ‒ If there is no track width change, select the menu item "NO" and confirm with the "ENTER" key.
  • ‒ If the track width has changed, select the menu item "YES" and confirm with the "ENTER" key.

Display:


REAR TRACK
WIDTH:
.... MM
^
0123456789
^

 
A91-0070
  • ‒ → Enter the wheel tread using the cursor keys and the "ENTER" key.
  • ‒ Once the wheel tread has been entered (e.g. 1.479 mm), hold down the "ENTER" key (approx. 2 seconds) to confirm.

Example of display:


REAR TRACK
WIDTH:
1479 MM
> YES
NO

Track width table:

Model

Rear track (mm)

ABS pulse/rev.

Compass installation

A8-D2

1582

45

Specifically for A8

A6-C5 (SAL/AVT)

1569

45

Specifically for A6
Saloon/Avant

A4-B5 (SAL/AVT)

1479

45

Specifically for A4
Saloon/Avant

A3-AB

1495

43

Specifically for A3

If an unrealistic track width for the vehicle is entered (e.g. track width of the selected vehicle type ± 100 mm), the following display appears:


INVALID
ENTRY
> CONTINUE

  • ‒ Press the "ENTER" key to continue and re-enter the tread width.

Display:


ESTABLISH
TYRE
VALUES BY
DRIVING
> CONTINUE

  • ‒ Press "ENTER" key to continue.

Display:


THE
DISTANCE-
FOR CALI-
BRATION.
> CONTINUE

  • ‒ Press "ENTER" key to continue.

Display:


DISTANCE TO
TRAVEL:
...,. M
^
0123456789
^

 
A91-0070
  • ‒ → Enter the length of the prepared driving route using the cursor keys and the "ENTER" key.
  • ‒ Once the complete length of the driving route has been entered (e.g. 105 m), hold down the "ENTER" key (approx. 2 seconds) to confirm.

Example of display:


DISTANCE
ENTERED:
1 0 5. 0 M
> YES
NO

  • ‒ Confirm the selection with the "ENTER" key, if correct.
    Alternatively, select "NO", confirm with the "ENTER" key and re-enter the driving route.

Display:


DRIVE TO
THE CALI-
BRATION-
TRACK.
> CONTINUE

  • ‒ Drive the vehicle exactly to the starting point of the calibration route and continue with the "ENTER" key.

Display:


BEGIN
DRIVING
FOR CALI--
BRATION!
> START

  • ‒ To start, confirm with the "ENTER" key and drive along the route according to the specifications.

Display:


DRIVE ASSTRAIGHT
AS POSS.!
END REACHED?
> OK

  • ‒ Confirm the display OK with the "ENTER" key on completion of the route.

If the calibration is OK, the wheel calibration is terminated => Page 91-179.

However, if errors occur during the wheel calibration, one of the following error causes will appear on the display:

1. Cause "Defective wheel pulse"


ERROR:
CHECK THE
WHEEL
PULSES
> CONTINUE

  • ‒ Press the "ENTER" key to continue and check the wheel pulse signals.

=> Running Gear; Repair group 01, Self-diagnosis, Electrical test

  • ‒ Repeat wheel calibration => Page 91-161.

2. Cause "Route was too short"


ERROR:
DISTANCE
WAS TOO
SHORT.
> CONTINUE

  • ‒ Press the "ENTER" key to continue and re-enter the length of the calibration route => Page 91-174.

3. Cause "Invalid vehicle values"


VEHICLE
READINGS
NOT VALID!-
> CONTINUE

  • ‒ Press the "ENTER" key to continue and repeat the wheel calibration correctly => Page 91-161.

Terminating the wheel calibration

Display:

SERV. MENU:

SET WHLS
WIRING
DRIVE TST
SYS. TEST
>END

  • ‒ Confirm the selection with the "ENTER" key to terminate the wheel calibration.

Wiring test on navigation system I > < Automatic check of current vehicle parameter values