
A4 Mk2
|
|
|
 WARNING
|
 Note
Note| t | There are two curtain airbag versions. Both versions are described in the following. Determine the version fitted in the vehicle concerned and perform the relevant work steps. |
| t | Version 1 → Anchor |
| t | Version 2 → Anchor |
| Version 1 |
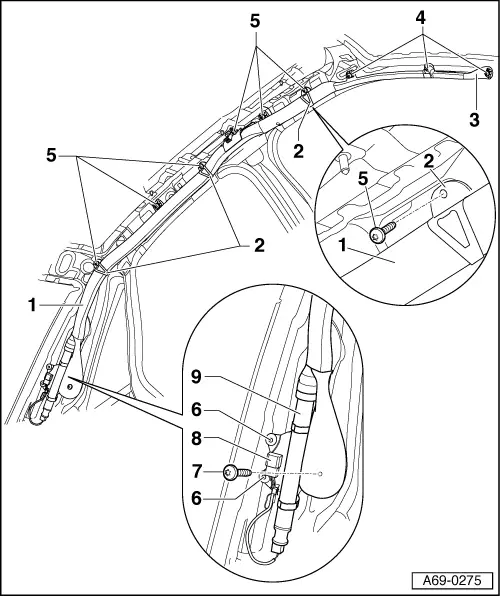
| 1 - | Curtain airbag |
| t | Removing: |
| – | Disconnect battery earth strap → Electrical system; Rep. gr.27. |
| – | Remove sun visor → Chapter. |
| – | Remove A-pillar trim (top) → Chapter. |
| – | Remove B-pillar trim (top) → Chapter. |
| – | Remove roof end trim → Chapter. |
| – | Remove D-pillar trim → Chapter. |
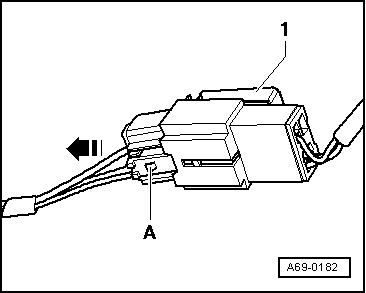
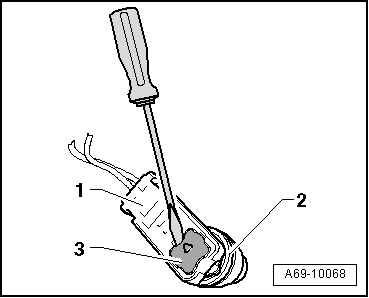
| – | Unplug connectors → Fig. |
| – | Slacken off the three bolts -4-. |
| – | Slacken off the six bolts -5-. |
| – | Slacken off bolt -7-. |
| – | Take the three retainers -2- out of roof frame. |
| – | Set down front section of curtain airbag unit on seats. |
| – | Slacken off the two bolts -6-. |
| – | Take curtain airbag -1- out of vehicle. |
| t | Installing: |
WARNING
|
 Caution
|
| – | Insert centre retainer -2-. |
| – | Insert remaining retainers -2-. |
| – | Screw in the two bolts -6-. |
| – | Tighten bolt -7-. |
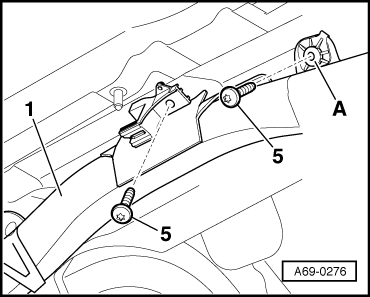
| – | Use two bolts -5- to attach airbag unit to B-pillar → Fig. |
| – | Secure the three retainers -2- with three bolts -5-. |
| – | Screw in last bolt -5-. |
| – | Screw in outer bolts -4-. |
| – | Screw in centre bolt -4-. |
| Perform remaining installation in reverse order of removal. Observe the following: |
| – | Switch on ignition. |
WARNING
|
| – | Connect battery earth strap → Electrical system; Rep. gr.27. |
Note| t | Observe measures to be taken after connecting the battery → Electrical system; Rep. gr.27. |
| t | If the airbag warning lamp -K75- indicates a fault following installation, you must interrogate, erase and then re-interrogate the event memory → Vehicle diagnostic tester. |
| 2 - | Retainers (5x) |
| 3 - | Tab |
| 4 - | Bolts (3x) |
| q | Tightening torque: 4 Nm |
| q | Self-locking |
| q | Always renew after removing |
| q | Always clean threaded holes for bolts (using a tap for example) |
| 5 - | Bolts (6x) |
| q | Tightening torque: 4 Nm |
| q | Self-locking |
| q | Always renew after removing |
| q | Always clean threaded holes for bolts (using a tap for example) |
| 6 - | Bolt (2x) |
| q | Tightening torque: 4 Nm |
| q | Self-locking |
| q | Always renew after removing |
| q | Always clean threaded holes for bolts (using a tap for example) |
| 7 - | Bolt |
| q | Tightening torque: 4 Nm |
| q | Self-locking |
| q | Always renew after removing |
| q | Always clean threaded holes for bolts (using a tap for example) |
| 8 - | Connector for curtain airbag |
| 9 - | Gas generator |
|
|
|
|
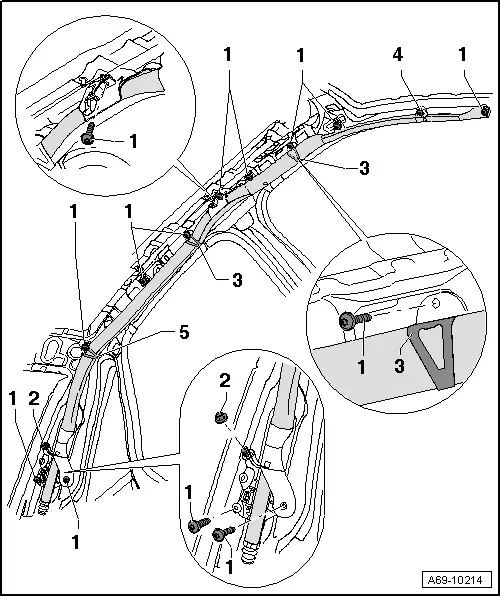
| 1 - | Bolt (10x) |
| q | Tightening torque: 4 Nm |
| q | Self-locking |
| q | Always renew after removing |
| q | Always clean threaded holes for bolts (using a tap for example) |
| 2 - | Cap nut |
| q | Tightening torque → Current flow diagrams, Electrical fault finding and Fitting locations |
| 3 - | Retainers (2x) |
| 4 - | Bolt (1x) |
| q | Tightening torque: 4 Nm |
| q | Self-locking |
| q | Always renew after removing |
| q | Always clean threaded holes for bolts (using a tap for example) |
| 5 - | Retainer (1x) |
|
|
|
|
Note
|