
A4 Mk2
 Note
Note
|
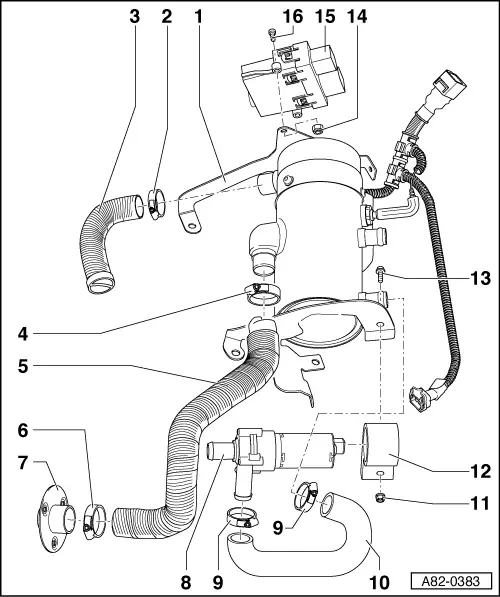
| 1 - | Auxiliary heater |
| q | Different design of burner unit for vehicles with petrol or diesel engine → Chapter → Parts List |
| q | Dismantling and assembling → Chapter |
| 2 - | Clip |
| 3 - | Intake hose |
| q | Different versions (metal if corrugated pipe, otherwise rubber) |
| q | Air inlet must not be impeded; check for contamination if necessary and clean |
| q | A guard may be fitted at the air inlet to prevent the ingress of large objects (e.g. mice) |
| q | Checking → Chapter |
| 4 - | Clip |
| q | Modified, enhanced clip design for vehicles manufactured since 10.02 → Parts List |
| q | Bolt tightening torque 7 Nm |
| 5 - | Corrugated exhaust pipe |
| q | Designed as exhaust silencer (inner and outer pipe with fabric inlay) |
| q | Installation in correct position → Chapter |
| q | Check for proper attachment of corrugated exhaust pipe at exhaust gas outlet connection of auxiliary heater. Make approx. 10 mm longitudinal cut in corrugated exhaust pipe in area of clip (facilitates attachment to exhaust pipe with clip) → Chapter. |
| q | Check corrugated exhaust pipe; make sure none of the fabric inlay (fitted between outer and inner pipe) projects into the inner pipe and impedes the emergence of exhaust gas (enhanced version for vehicles manufactured since 03.03) |
| 6 - | Clip |
| 7 - | Tailpipe |
| q | Mark position of tailpipe with respect to corrugated pipe before unfastening clip (on account of position of attachment points to noise insulation) |
| q | After attaching tailpipe, check exhaust pipe to ensure that emergence of exhaust gas is not impeded by projecting sections of the fabric inlay → Chapter |
| q | A guard is fitted at the air outlet to prevent the ingress of large objects (e.g. mice) → Chapter |
| 8 - | Circulation pump -V55- |
| q | Checking → Chapter |
| q | Removing and installing → Chapter |
| 9 - | Hose clamp |
| 10 - | Coolant hose |
| 11 - | Hexagon nut |
| 12 - | Holder |
| q | Rubber element |
| 13 - | Bolt |
| 14 - | Hexagon nut |
| q | Not fitted with all versions (possibly weld nut at auxiliary heater) |
| 15 - | Auxiliary heater control unit -J364- |
| q | Different control units for vehicles with petrol or diesel engine → Chapter and → Parts List |
| q | Replacing → Chapter |
| q | If the auxiliary heater control unit -J364- is replaced, the function of at least one remote control hand transmitter must be checked on vehicles with “Remote control” as optional extra (if function is not OK, all hand transmitters must be adapted to the auxiliary heater control unit -J364-) → Chapter (remote control assignment is performed in auxiliary heating radio controlled receiver -R64- by way of the auxiliary heater control unit -J364-). |
| q | In auxiliary heating mode, the metering pump -V54- is actuated with full voltage by the auxiliary heater control unit -J364- up to control unit part number index “B”. For control units as of part number index “C” (gradual introduction as of Model Year 2005), the voltage for the actuation signal of the metering pump -V54- will be limited in auxiliary heating mode to 9.2 V with the petrol version and 9.8 V with the diesel version, thus reducing the operating noise of the metering pump -V54-. |
| 16 - | Bolt |