audi Workshop Repair Guides

Audi Workshop Service and Repair Manuals

Removing and installing propshaft on Audi A8 > < Servicing propshaft - overview
Removing and installing propshaft on Audi A4, Audi Cabriolet and Audi A6
Special tools and workshop equipment required
   
t  Assembly tool -3139-
  W00-0948
t  Removal lever -80 - 200-
  W00-0353
t  Counterhold tool -T10172- with adapters -T10172/5-
  W00-10637
t  Engine and gearbox jack -V.A.G 1383 A- with universal gearbox support -V.A.G 1359/2-
t  Please refer to notes → Chapter.
t  Repairs on the propshaft should be carried out on a two pillar hoist.
  W00-0120
–  Disconnect exhaust system at clamps -arrows-.
  A26-0437
–  If fitted, remove rear cross piece -1-.
–  Remove rear section of exhaust system -2- behind clamps → Rep. Gr.26.
Audi A6:
–  Detach heat shield -3- from vehicle underbody -arrows-.
  A39-10010
Audi A4 and Audi Cabriolet:
–  Lever off fasteners -A- for heat shield above centre bearing.
–  Unscrew securing bolts for centre bearing -B-. Support the propshaft by hand during this procedure.
–  Remove heat shield with propshaft supported.
–  Fit securing bolts for centre bearing -B- again and hand-tighten.
  A39-0344
Continued for all vehicles:
–  Remove bolts securing front exhaust pipes -1- and -2-. Secure front exhaust pipes to side of underbody.
  Note
The flexible pipe connection (de-coupling element) on the front exhaust pipe must not be bent more than 10° – otherwise it can be damaged.
  A26-10063
–  Detach heat shield -A- from gearbox -arrows-.
  A10-1603
–  Check whether there is a factory marking (coloured dot) -arrows A and B- on the propshaft flange and on the rear final drive flange.
–  If not, mark position of propshaft flange -arrow A- in relation to rear final drive flange -arrow B- with paint marker.
  N39-0614
–  Attach assembly tool 3139 and tighten plastic nuts.
  Note
Do not fit assembly tool onto balance plates.
  A39-0346
–  Remove bolts -arrows- securing centre bearing.
  A39-0345
–  Remove bolts from connection between propshaft and gearbox (counterhold using counterhold tool -T10172- with -T10172/5-).
–  Remove propshaft from gearbox and support propshaft with engine and gearbox jack -V.A.G 1383 A-.
  A39-10185
–  Remove bolts -1- (6x) on rear CV joint.
–  Use counterhold tool -T10172- with adapters -T10172/5-.
–  Remove the propshaft.
  Note
The propshaft must be kept straight when it is stored or transported.
Installing propshaft on Audi A4 and Cabriolet and on Audi A6
Perform installation in reverse sequence of removal. Note the following:
t  Remove old, dried-out high-temperature grease from CV joints and flanges for propshaft. Put in exactly the same quantity of fresh high-temperature grease -G 052 133 A2-.
t  Clean all remaining locking fluid out of the tapped holes in the propshaft flange shafts on the gearbox and rear final drive. The threads can be cleaned with a thread tap. Otherwise the securing bolts can shear off when they are screwed in.
t  After detaching the propshaft from the rear final drive, the additional balancing washer (thicker washer) that may be fitted between the lock plate and one of the securing bolts must not be reinstalled.
t  Always install new securing bolts for propshaft (self-locking bolts).
t  Note correct position of propshaft: the central CV joint is located behind the centre bearing and towards the rear final drive.
  A39-10243
t  
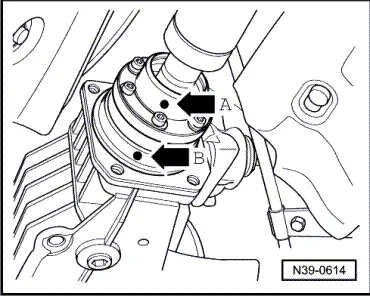
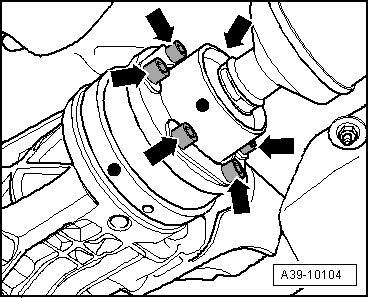
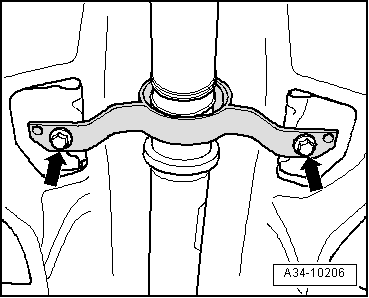
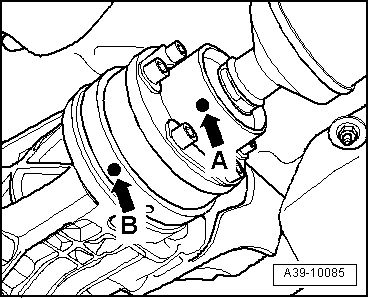
Make sure that the marks on the propshaft flange -arrow A- and on the gearbox/final drive flange -arrow B- are in line.
t  If a new propshaft is being installed and the factory marking on the rear final drive flange is no longer visible, the radial run-out at the flange for the propshaft must be measured → Chapter, and the coloured marking on the new propshaft must be aligned with the new marking on the flange.
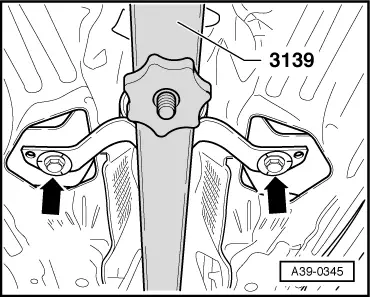
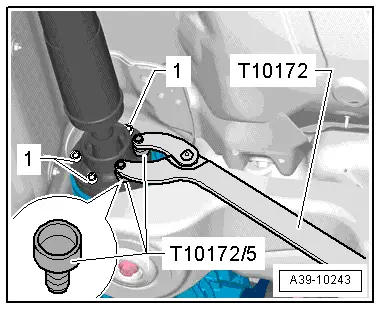
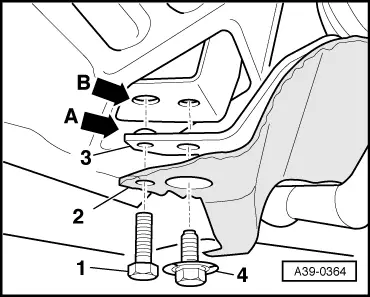
–  Gaskets for propshaft on flanges of gearbox and rear final drive must be renewed. Degrease sealing surfaces and glue on new gaskets.
  A39-10085
–  Bring propshaft into position and fit new bolts at rear final drive -arrows- and at gearbox.
  A39-10104
–  Screw in securing bolts -arrows- so that centre bearing can still be moved.
  A39-0345
–  Tighten bolts -1- securing propshaft on rear final drive to specified torque → Item.
–  Use counterhold tool -T10172- with adapters -T10172/5-.
  A39-10243
–  Tighten bolts securing propshaft (front end) to specified setting → Item.
–  Use counterhold tool -T10172- with adapters -T10172/5-.
–  Remove assembly tool -3139-.
  A39-10185
Audi A4 and Audi Cabriolet:
–  Remove securing bolts -arrows-. The propshaft must be supported by a second mechanic during this procedure.
  A34-10206
–  Install heat shield -2- (continue to support propshaft).
–  Fit securing bolts -4- on left and right again and screw in a few turns.
–  Secure heat shield -2- on centre bearing -3- with one bolt on each side -1- (M8 x 30).
  Note
The centralising lug -arrow A- must fit in the locating hole -arrow B- when tightening the bolt with washer -4-.
  A39-0364
–  Secure centre propshaft bearing to body so it is free of stress and tighten -2-. Tightening torque → Item
–  Remove locating bolts -1-.
–  Insert retaining clips for heat shield.
  A39-0348
Audi A6:
–  Secure centre propshaft bearing to body so it is free of stress and tighten. The centralising lugs on the centre bearing mounting must fit in the locating holes -arrows-. Tightening torque → Item
  A39-10011
–  Secure heat shield -3- to vehicle underbody -arrows-.
  A39-10010
Continued for all vehicles:
–  Secure heat shield -A- on gearbox -arrows-.
  A10-1603
–  Where required, secure front exhaust pipes -1- and -2-.
  A26-10063
–  Install rear section of exhaust system -2- → Rep. Gr.26.
–  Where fitted, install rear cross piece -1- → Rep. Gr.40.
Tightening torque
  A39-10010
Component Nm
Heat shield for propshaft to gearbox25


Removing and installing propshaft on Audi A8 > < Servicing propshaft - overview