A4 Mk2
|

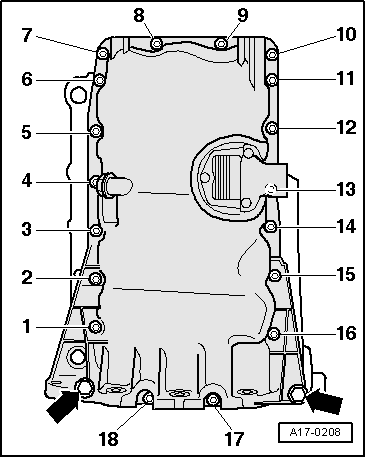
| 1 - | 15 Nm |
| 2 - | Oil dipstick |
| q | The oil level must not be above max. mark. |
| 3 - | Guide |
| 4 - | Guide tube |
| 5 - | Spacer plate |
| 6 - | Balance shaft assembly with oil pump |
| q | With pressure relief valve (12 bar) |
| q | Removing and installing → Chapter |
| 7 - | Bolt |
| q | Renew |
| q | Note different bolt lengths → Fig. |
| q | Tightening sequence → Fig. |
| 8 - | Bolt |
| q | Tightening sequence → Fig. |
| 9 - | Sump |
| q | Clean sealing surface before installing |
| q | Removing and installing → Chapter |
| 10 - | Bolt |
| q | Renew |
| q | Tightening sequence → Fig. |
| 11 - | Seal |
| q | Rolled onto → Item |
| 12 - | Oil drain plug, 30 Nm |
| q | With captive seal |
| q | Renew |
| 13 - | Chain sprocket |
| 14 - | 10 Nm |
| 15 - | Protective cap |
| 16 - | With oil level and oil temperature sender -G266- |
| 17 - | Seal |
| q | Renew |
| q | Lubricate before installing |
| 18 - | 20 Nm + turn 90° further |
| q | Renew |
| 19 - | Chain guard |
| 20 - | Chain |
| 21 - | Sealing flange |
| q | Must be positioned on dowel sleeves |
| q | Renewing crankshaft oil seal on pulley end → Chapter |