audi Workshop Repair Guides

Audi Workshop Service and Repair Manuals

Removing and installing radiator cowl > < Checking map-controlled engine cooling thermostatF265
Removing and installing radiator
Special tools and workshop equipment required
   
t  Used oil collection and extraction unit -V.A.G 1782- (only for vehicles with multitronic/automatic gearbox 01V):
  W00-10211
t  Drip tray for workshop hoist -VAS 6208- or drip tray -V.A.G 1306-
Removing
  Note
Collect drained coolant in a clean container for re-use or disposal.
  WARNING
Hot steam or hot coolant can escape when expansion tank is opened; cover filler cap with cloth and open carefully.
–  Open filler cap on coolant expansion tank.
  W00-10228
–  Release quick-fasteners -1- and -2- and take off front noise insulation.
–  Remove front bumper cover → General body repairs, exterior; Rep. gr.63.
  A10-1320
–  Place drip tray for workshop hoist -VAS 6208- or drip tray -V.A.G 1306- under engine.
Vehicles with coolant drain plug:
–  Open coolant drain plug on coolant hose (bottom) at radiator.
Vehicles without coolant drain plug:
–  Pull out retaining clip -1- for radiator outlet coolant temperature sender -G83--item 2-.
–  Pull radiator outlet coolant temperature sender -G83- out of hose connection and drain off coolant.
  A10-0895
All vehicles:
–  Detach coolant hose (bottom) from radiator -arrow-.
  A10-0979
–  Detach top coolant hose from radiator -arrow-.
  A10-0898
Vehicles with multitronic/automatic gearbox 01V:
–  If fitted, detach cover -1- on right of engine compartment.
  A10-1030
–  Disengage solenoid valve 1 for activated charcoal filter system -N80- at air duct.
–  Remove bolts -arrows-.
–  Remove air duct -2-.
  Note
  A10-0900
Observe rules for cleanliness when working on automatic gearbox → Rep. gr.00.
–  Place used oil collection and extraction unit -V.A.G 1782- underneath.
–  Detach ATF pipes (top -arrow- and bottom) from radiator: → Rep. gr.37.
–  Tie ATF pipes up onto longitudinal member to prevent fluid escaping.
  A10-0899
All vehicles:
–  Unbolt air cowls (left and right) at radiator -arrows-.
  A10-0896
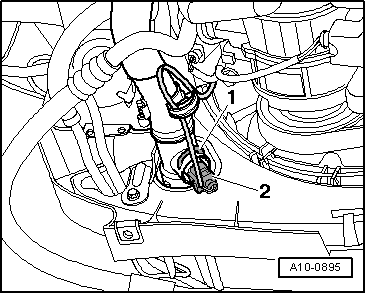
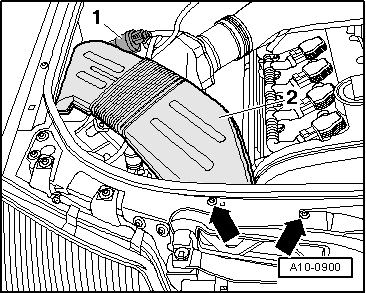
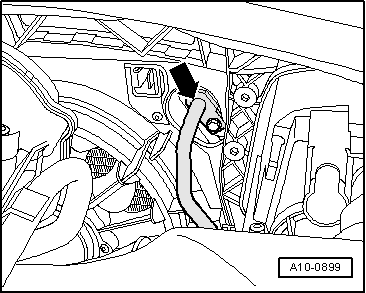
–  Unclip ambient temperature sensor -G17--item 2- from bracket.
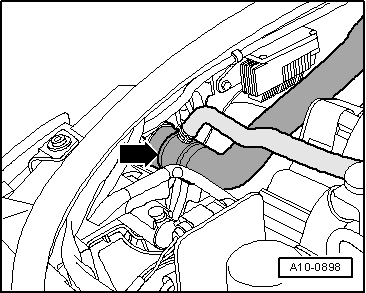
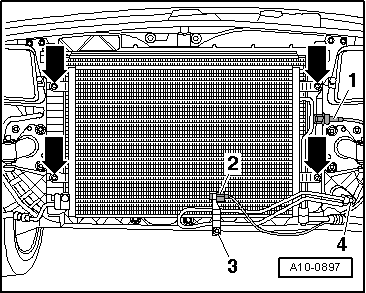
–  Unscrew bolts -3- and -4- for power steering cooling pipe; the hydraulic hoses remain attached.
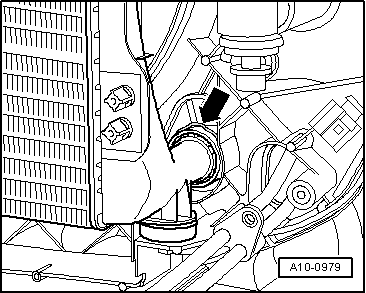
–  Detach electrical connector -1- at high-pressure sender -G65-.
  WARNING
The air conditioner refrigerant circuit must not be opened.
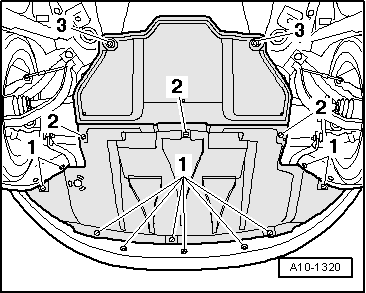
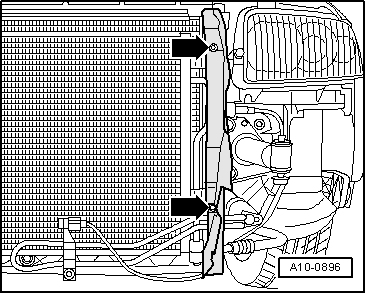
–  Unscrew securing bolts -arrows- for condenser.
  Note
To prevent damage to the refrigerant lines, ensure that the pipes and hoses are not stretched, kinked or bent.
–  Pivot condenser downwards with pipes/hoses attached.
  A10-0897
–  Release two retaining pins for radiator and pull out upwards -arrows-.
–  Swivel radiator forwards and lift off.
Installing
Installation is carried out in the reverse order; note the following:
–  Install front bumper cover → General body repairs, exterior; Rep. gr.63.
–  Fill cooling system → Anchor.
  Note
The coolant in the entire system must be changed if the radiator is renewed.
Vehicles with multitronic/automatic gearbox 01V:
–  Secure ATF lines → Rep. gr.37.
–  Check ATF level → Rep. gr.37.
Tightening torques
  A19-0050
ComponentNm
Condenser to lock carrier6
Power steering cooling pipe to lock carrier9


Removing and installing radiator cowl > < Checking map-controlled engine cooling thermostatF265