
A4 Mk2
| Crankshaft - exploded view |
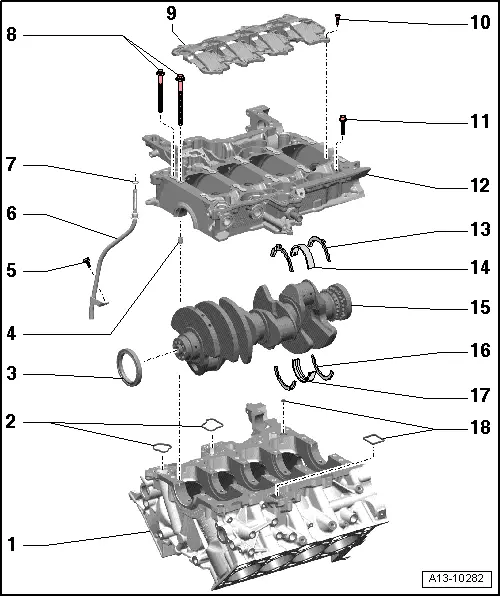
| 1 - | Cylinder block |
| q | Matched to -item 12- |
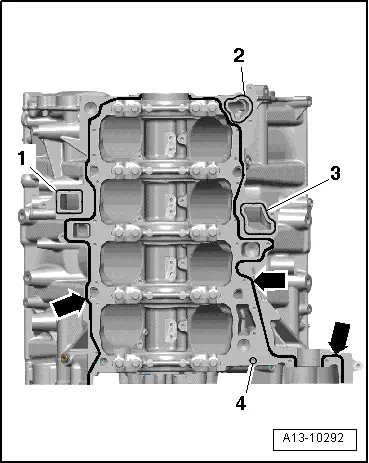
| q | Applying sealant onto cylinder block (for retaining frame) → Fig. |
| 2 - | Gaskets |
| q | Renew |
| 3 - | Oil seal for crankshaft (pulley end) |
| q | Renewing → Chapter |
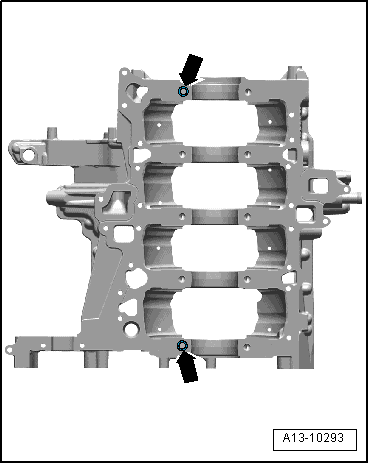
| 4 - | Dowel sleeve |
| q | 2x |
| q | Insert in retaining frame |
| q | Installation position → Fig. |
| 5 - | 9 Nm |
| 6 - | Guide tube for oil dipstick |
| 7 - | O-ring |
| q | Renew |
| 8 - | Bolts |
| q | For retaining frame |
| q | Renew |
| q | Different bolt lengths |
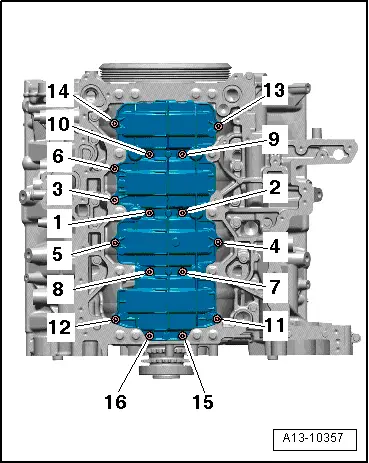
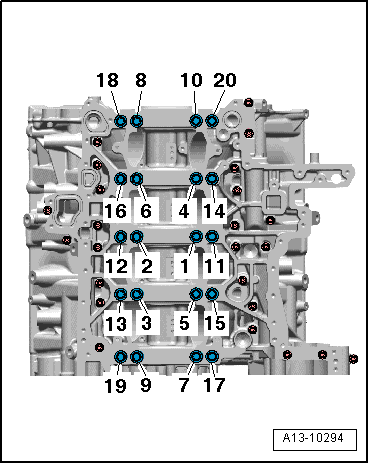
| q | Tightening sequence → Fig. |
| 9 - | Baffle plate |
| 10 - | 9 Nm |
| q | Tightening sequence → Fig. |
| 11 - | Bolt |
| q | For sealing surfaces: cylinder block/retaining frame |
| q | Different bolt lengths |
| q | Tightening sequence → Fig. |
| 12 - | Retaining frame |
| q | Matched to -item 1- |
| q | Applying sealant onto cylinder block (for retaining frame) → Fig. |
| q | Tightening sequence for securing bolts → Fig. |
| 13 - | Thrust washer |
| q | Only fitted on 4th crankshaft bearing |
| q | Oil grooves face outwards |
| q | Make sure it engages in retaining frame |
| q | Measuring axial clearance of crankshaft → Chapter |
| 14 - | Bearing shell |
| q | For retaining frame (without oil groove) |
| q | Mark used bearing shells for re-installation but not on bearing surface |
| q | Bearing shells worn down to the base layer must be renewed |
| q | Install new bearing shells for retaining frame with correct coloured markings |
| New crankshafts → Chapter |
| Used or machined crankshafts → Chapter |
| 15 - | Crankshaft |
| q | Measuring axial clearance → Chapter |
| q | Measuring radial clearance → Chapter |
| q | Crankshaft dimensions → Chapter |
| 16 - | Thrust washer |
| q | Only fitted on 4th crankshaft bearing |
| q | Oil grooves face outwards |
| q | Measuring axial clearance of crankshaft → Chapter |
| 17 - | Bearing shell |
| q | For cylinder block (with oil groove) |
| q | Mark used bearing shells for re-installation but not on bearing surface |
| q | Bearing shells worn down to the base layer must be renewed |
| q | Install new bearing shells for the cylinder block with the correct coloured markings |
| New crankshafts → Chapter |
| Used or machined crankshafts → Chapter |
| 18 - | Gaskets |
| q | Renew |
|
|
|
|
|
|
| Stage | Bolts | Tightening torque/tightening angle |
| 1. | -1 … 10- | 30 Nm |
| 2. | -11 … 20- | 20 Nm |
| 3. | -1 … 10- | 50 Nm |
| 4. | -11 … 20- | 30 Nm |
| 5. | -1 … 20- | turn 90° further |
|