audi Workshop Repair Guides

Audi Workshop Service and Repair Manuals

Chain for auxiliary drives - exploded view of components > < Drive chain for valve gear - exploded view of components
Removing and installing drive chain for valve gear
Removing
–  Remove camshaft timing chains → Chapter.
–  Remove chain for auxiliary drives → Chapter.
   
–  Detach guide rail -1- at cylinder head (left-side).
–  Unbolt chain tensioner -2-.
  A13-0609
–  Detach guide rail -1- at cylinder head (right-side).
–  Unbolt chain tensioner -2-.
  A13-0610
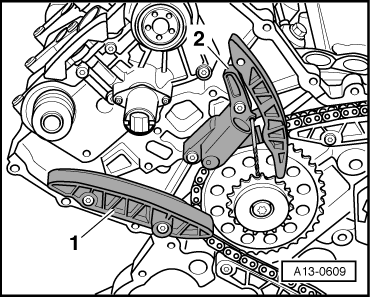
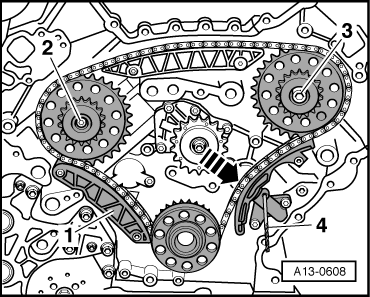
–  Press guide rail of chain tensioner for drive chain in direction of -arrow- and lock chain tensioner by inserting a 3.3 mm Ø drill bit -item 4-.
–  Mark running direction of chain with paint.
–  Remove bolts -2- and -3- and detach chain sprockets together with drive chain and guide rail -1-.
Installing
Installation is carried out in the reverse order; note the following:
  Note
Renew the bolts tightened with specified tightening angle.
–  Install chain for auxiliary drives → Chapter.
–  Install camshaft timing chains → Anchor.
Tightening torques
  A13-0608
ComponentNm
Drive chain sprocket (left-side) to bearing bracket5 + 90° → Note → Note
Drive chain sprocket (right-side) to cylinder block42
Chain tensioner for camshaft timing chain (left-side) to cylinder head5 + 90° → Note → Note
Chain tensioner for camshaft timing chain (right-side) to cylinder head5 + 90° → Note → Note

1)  Renew bolts.
2)  90° equals a 1/4 turn.
   

Chain for auxiliary drives - exploded view of components > < Drive chain for valve gear - exploded view of components