audi Workshop Repair Guides

Audi Workshop Service and Repair Manuals

Removing and installing intake manifold flap motor V157 with intake manifold flap potentiometer G336 > < Removing and installing injectors
Renewing combustion chamber ring seal (teflon ring seal)
  Note
The combustion chamber ring seal must always be renewed prior to reinstalling the injector.
   
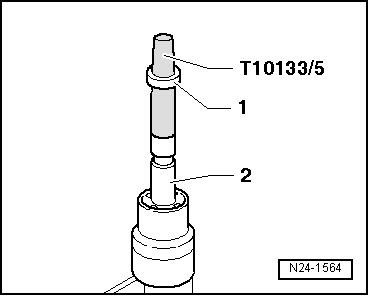
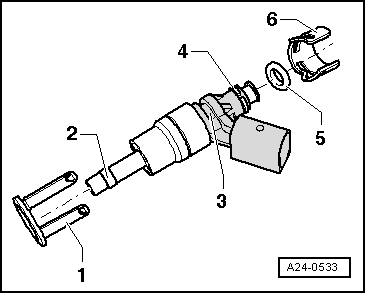
–  Illustration shows injector assembly
1 - Radial compensation element, renew if damaged
2 - Combustion chamber ring seal (teflon ring seal) - renew; when fitting, do not grease ring or use any other lubricant
3 - Groove on injector
4 - Spacer ring (renew if damaged)
5 - O-ring (renew; apply thin coating of clean engine oil prior to installation)
6 - Support ring (via this support ring, fuel rail exerts force which secures injector in cylinder head)
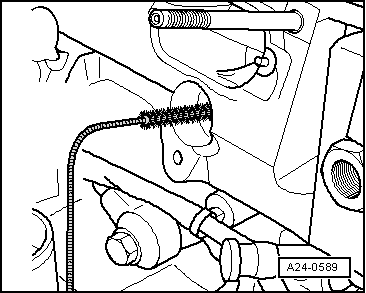
–  Carefully remove old teflon ring using suitable tools (e.g. cut open ring using razor blade, or prise open ring with small screwdriver and then pull off forwards). It is important to ensure that the groove and the continuous ridge in the bottom of the groove are not damaged.
  Note
The injector must be renewed if the groove is damaged.
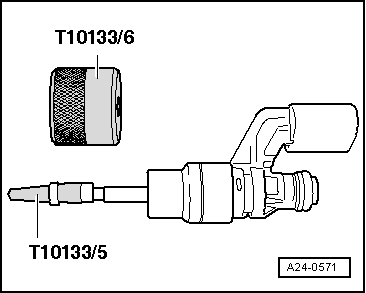
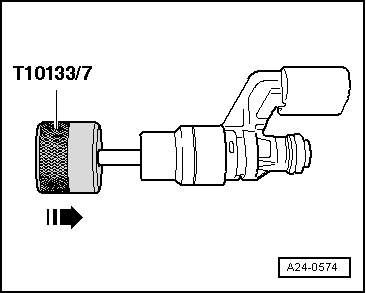
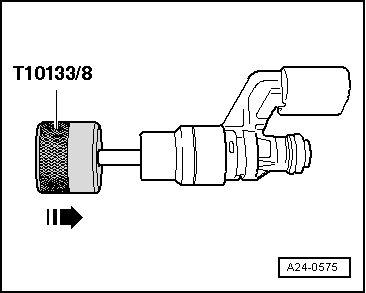
–  Before new teflon ring is fitted, any combustion residue must be removed from ring groove and injector stem using a clean cloth.
  Note
The illustration shows an injector with “offset connector”. This can be ignored since it is not relevant when replacing the combustion chamber ring seal.
  A24-0533
–  Fit assembly cone -T10133/5- with new teflon ring -1- onto injector -2-.
  N24-1564
–  Use assembly sleeve -T10133/6- to press teflon ring further onto assembly cone -T10133/5- until it seats in groove. Do not use any lubricants during this procedure.
  Note
The teflon ring is widened as it is pushed onto the injector. The teflon ring must therefore be compressed again after it has been fitted. This is done in two steps. The procedure is described below.
Step 1 of teflon ring seal calibration (adaption) is done with calibration sleeve -T10133/7-.
  A24-0571
–  Slide calibration sleeve -T10133/7- onto injector as far as the stop by pressing lightly and turning approx. 180°. Pull calibration sleeve -T10133/7- off again by turning it in the opposite direction.
Step 2 of teflon ring seal calibration (adaption) is done with calibration sleeve -T10133/8-.
  A24-0574
–  Slide calibration sleeve -T10133/8- onto injector as far as the stop by pressing lightly and turning approx. 180°. Pull calibration sleeve -T10133/8- off again by turning it in the opposite direction.
–  Fit new O-ring on injector. Lubricate O-ring lightly with clean engine oil before installing.
–  The teflon ring must not be lubricated.
  A24-0575
–  Use supplied nylon brush -T10133/4- to thoroughly clean holes for high-pressure injectors in cylinder head prior to installing injector.
  Note
An open inlet valve may prevent cleaning. If so, the engine must be cranked by hand by rotating the crankshaft with a spanner.
–  Refit support ring -1- on injector and clip radial compensation element -2- onto support ring.
–  Push injector by hand as far as it will go into aperture in cylinder head (do not use oil or grease). Ensure that the injector is properly seated in the cylinder head.
  Note
t  It should be possible to insert injector easily. If necessary wait until the combustion chamber ring seal has contracted sufficiently.
t  Note correct installation position and ensure that injectors are properly seated in cylinder head.
  A24-0589
t  If the injector cannot be pushed in by hand, use puller -T10133/2A--2- with striker -T10133/3- to insert injector.
–  The remaining installation steps are carried out in the reverse sequence.
–  Install intake manifold with fuel rail → Chapter.
  A24-0588

Removing and installing intake manifold flap motor V157 with intake manifold flap potentiometer G336 > < Removing and installing injectors