audi Workshop Repair Guides

Audi Workshop Service and Repair Manuals

Adjusting headlights > < Gas discharge headlights - exploded view
Removing and installing headlights
Removing
  WARNING
High voltage! Danger to life!
Safety precautions when handling gas discharge lamps → Electrical system; General information; Rep. Gr.94.
–  Remove front bumper cover → Rep. Gr.63.
–  With ignition switched off, disconnect earth wire at battery:
t  Battery in engine compartment → Chapter
t  Battery in luggage compartment → Chapter
   
–  Remove bolt -3-.
–  Loosen bolts -1- and -2- a few turns but do NOT unscrew completely.
–  Remove headlight from body towards front.
–  Unplug electrical connector.
  A94-10099
Installing
Installation is carried out in the reverse order; note the following:
–  Check adjusting nut -1- of adjuster for freedom of movement -arrows-.
–  Screw down adjusting nut as far as it will go, but do not tighten.
  A94-10117
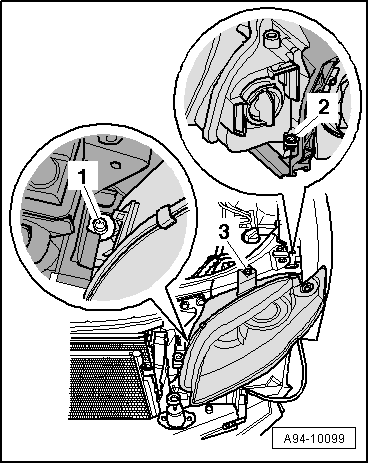
–  Insert headlight and screw in bolts -1 ... 3- two complete turns.
–  Install front bumper cover → Rep. Gr.63.
–  Align headlight with body contours and front bumper cover (note gap widths).
–  Tighten bolts in the sequence -2-, -1- and -3-.
  Note
When the bolts are tightened the adjusting nut of the adjuster element automatically rotates against the mounting point of the headlight housing and fixes it in place.
–  Check gaps; if necessary, repeat procedure for installing headlight.
–  Connect the battery. Action to be taken:
t  Battery in engine compartment → Anchor
t  Battery in luggage compartment → Anchor
–  Following installation, adjust headlights → Booklet803.
Tightening torque
  A94-10099
ComponentNm
Headlight to lock carrier4.5


Adjusting headlights > < Gas discharge headlights - exploded view